Damper parameters and adjustments
This section is intended for breeders who already have some experience. It is possible that by adjusting the flap, you will cause the bumblebees difficulties with passage or, conversely, devalue its primary protective function.
We therefore recommend interventions exclusively to those who are familiar with the behaviour of bumblebees at individual colony stages, are able to detect and address any deviations in time.
For intermediate and moderately advanced breeders, we recommend the safe improvements mentioned in the beginner section, as well as choosing high-quality shutter manufacturers, which will solve many problems for you.
Please note that from our experience on forums and Facebook, mistakes are most common when making flaps yourself. We only modify commercial flaps supplied by one verified manufacturer, with whom we cooperate long-term on their modifications, and for example, in 2023, the manufacturer innovated the angle of the flap edge together with our recommendation, so that it would open more easily even for smaller bumblebee species.
Meaning of the flap
How it works
Key features of the flap
Key implementation parameters
The size and design of the flap
Body
Valvular passage
Gutter at the entrance
Door – latch
Correct colour scheme for doors – catches
Bee landing board
Garlic
Side panel
Back of the flap
Canopy
Placement of the flap on the hive
Control
Summary
Technical design of the flap:
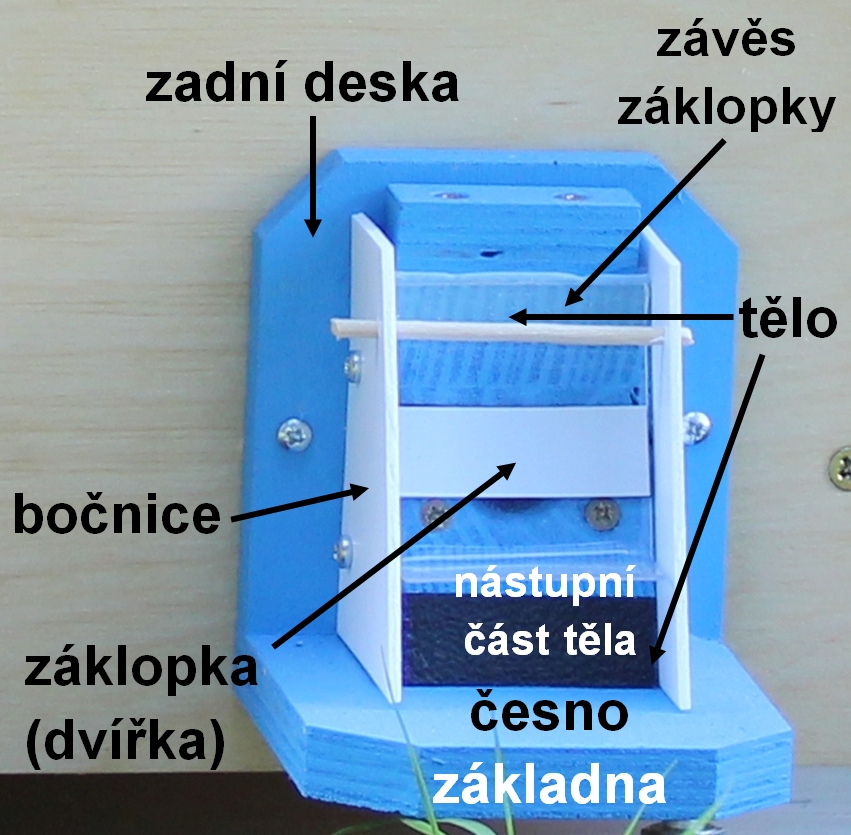
To make sense of the following lines, it is better to first describe such a flap:
The clutch refers to the entire mechanism, which has integral components:
- The flap's own movable part, which covers the entrance to the flap's passageway.
- The frame of the damper – it is a wooden bevelled prism with a passageway bridging the space between the door and the entrance to the hive.
- Entrance wall of the body – this is the front part of the bee’s body, which bees climb towards the opening and where they lift the flap from below. Part of it is free and part is covered by the flap.
- Latch hinge – a mechanism that ensures the movement of the latch
- Base – the bottom plate to which the damper body is attached, protecting the body from moisture
- Garlic – protruding base space where bumblebees land and fly off
- Side panels – body covers and flaps from the side against wind, parasites and rain
- Rear panel - depending on the design, it is the connection point to the hive
- Canopy – protects the damper body and prevents water from getting under the flap (not shown in the photo)
- Certainly – some flaps can contain, for example, side traps for parasites. This is an additional feature in the phase of our testing of its effectiveness. (not included in the photos)
In the following text, we will highlight the essential parts of each component so that the flap serves you well. A detailed description will then be provided in the professional section.
The size and design of the flap
On the market there are more products, of varied designs, but the flap should respect:
- The housing of the flap is robust enough to prevent the flap from collapsing and is made from solid wood (preferably hardwood).
- The body covers the entire width of the flap. The size of the flap is key; the length should be around 42-47mm and the height of the straight seating surface (excluding the edge) 45-50mm.
- The lid can be attached to the hive without having to interfere with the body (it has an extending rear plate).
- The side panels cover the lock from the sides, as closely as possible.
- The flap should be at least 15 mm higher than the garlic, not lower.
- The flap is not perpendicular, but at an angle of 65-70 degrees.
- The entry edge of the body, covered by a blanking plug, has a minimum height of 10mm.
- The lid contains an entrance hole in front of the body's leading edge; the depth of the entrance hole for bumblebees taking off is at least 30mm.
- The flap has a canopy that prevents water from leaking between the flap and the body.
- The flight opening in the flap does not exceed an internal diameter of 16mm.
Throttle body
This is a bevelled prism containing a passageway – a passage through a flap which connects the flap to the entrance of the hive or to the hive's corridor. Often, only the front and top parts are accessible from the body; the other parts (sides, base, and back panel) cover, protect, and strengthen the body.
- The volume (depth) of the body is not so crucial, but it should be strong enough so that the flap does not collapse over time.
- The body should be made of high-quality solid wood – preferably hardwood (oak, beech).
- The front wall of the body is very important – it's the surface on which the flap rests and is usually the only surface visible. There must be no visible cracks in the wood on the body.
- The front wall must be sloped at an angle between 65-70 degrees to the base.
- The front wall of the body must be flat, without unevenness, so that the cover seals on its entire surface and does not lift off anywhere (there must be no gap under the cover).
- Entrance opening and neck
The size of the flap is important, as it forms the actual barrier. The flap should be 42-47 mm wide, and the length of its flat surface should be between 45-50mm.
Hanging mechanism
The type recommended to us has a hinge designed using uhelon 53S. This solution was developed by ourselves, along with the manufacturer (authors O. Hercog and J. Černý).
- The latch is a bit looser.
- Sometimes, with the ring-mounted hanger, the latch on the hanger would „bite“ and stick when opening, or conversely, wouldn't close fully. The Uhelon hanger solves this problem.
- The hinge protects the upper part of the flap from the ingress of parasites.
The older model has a hinge with copper eyelets. These must not rub, and the flap must lift freely. Therefore, the rings must be precisely centred. However, when opening the flap, a gap is created at the top, which parasites can use to get through.
The solution is to replace the hanging mechanism. If you don't have uhelon, you can also use another fabric. It is important that it is not too thick, bends easily, does not fray, and can withstand outdoor conditions. Organza, which is more readily available than Uhelon, can also be used for this purpose.
Procedure for replacing the hinge:
- Using combination pliers, carefully pull the copper rings out. They are only charged, not glued or fixed with screws.
- Cut a strip of interlining precisely the width of the facing.
- First, apply the carbon fibre strip to the outside of the flap. A 1-1.5cm overlap from the top edge of the flap is sufficient. For example, you can use Chemoprene. The hinge must be straight and there must be no waves. The axis of the carbon fibre grid must not be crossed (this is a consequence of gluing under tension). Secure the entire system by applying white electrical insulation tape so that half of the tape is on the carbon fibre and half is on the flap.
- Now position the flap so that it is straight and at the correct height. The lower contact leading edge must remain 1cm long. Trim the uhelon so that it is on the body roof about 6mm from the rear plate.
- Apply a layer of adhesive to the roof of the body and allow it to tack up. Then attach the flap hinge. Be careful to centre the flap correctly. The hinge must be straight and not creased. Secure the hinge with insulating tape.
- Check that the flap is pressing firmly against the body and is not sticking out. If it is, the upper edge needs to be adjusted where the uhelon can be brought closer to the body.
- Check that the damper lifts freely and does not rub against the side panels.
Check valve
weight at least 3g
stickers
- Flap without sticker - (from the front, you can see the entire flap opening) then first, from the outside of the flap, cover the entrance opening with black tape (or paint) so that only the lower part is visible from the inside of the flap (a peephole the size of a pea is sufficient).
Once the paint has dried, proceed to the step below. - A label or coloured finish is only sufficient to cover the entry point. It should be symmetrically centred on its axis.
- CAUTION: All modifications are carried out exclusively on the outer surface of the doors. (flaps). The inner surface of the door must remain smooth, without stickers or paint, and must seat fully against the body.
This section is intended for breeders who already have some experience.