



Introduction
This chapter follows on from Basic information for beginner breeders and supplements them with details, interesting facts, and information for experienced breeders. .
We would be delighted if you would help us to further develop and improve this chapter together. We look forward to your experience.
Hallway meaning
Most bumblebee species require an entrance tunnel/tube because it simulates the entrance to a rodent burrow, where they typically nest in the wild. A typical example of such a species is the buff-tailed bumblebee (Bombus terrestris). .
Some species nest in haystacks, for example the Common carder bee (Bombus pascuorum), they don't need any corridors, but on the other hand, they don't mind them.
You can read more about the nesting methods of individual bumblebee species
From observations and experience, it can be seen that an entrance tunnel is needed where the mother - the queen of a species that nests in the ground - genuinely requires such a tunnel and feels content and safe there. She instinctively expects it and seeks such a nesting place. Nests without tunnels therefore have a lower success rate of settlement with these queens.
However, a corridor doesn't have to be present in the nest constantly. Once the nest is strong or when we move a strong nest (not a small nest with the first generation of workers, e.g. from breeding stock from Troubsko), the corridor is no longer so essential. It can even happen that the corridor becomes clogged with dirt during nest activity, which then causes problems.
The entrance hall is therefore crucial at the beginning of the nest's development, then it can be removed if necessary.
You can read about how to remove the entrance corridor “whilst the building is in use“
The corridor also has for bumblebees defensive meaning. If a stronger intruder (a bumblebee queen, a strong queen of another species, etc.) tries to penetrate the nest, the workers can use their numerical superiority to stop the intruder in the corridor. They will not succeed in the open space of the nest, but they have a chance in the corridor.
Breeders know that bumblebees build from a certain stage of nest development patrols to the air intake. The guard can then, along with other workers in the entrance hall, intervene and overpower the intruders.
About attack methods and o You can find out more about the way of life of the pačmeláci in the chapter
Bee breeders are addressing entrance tunnels as exterior (the corridor leads outside the hive and only opens into it, not continuing further inside) or as inner (the corridor is entirely or mostly within the lair).
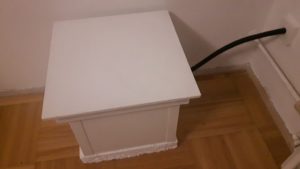
Use of an external corridor for placing an indoor beehive – Photo J. Čížek
Recommendation If you use external hallways, for example when placing an ulcer insideobject, you no longer need to use the internal mechanism. The corridor would be disproportionately extended for the bumblebees.
Owners decide on a particular type of corridor mainly based on, where do I place my fright – inside the object, or outside the object.
You can read about the placement of the hives in the chapter
Some breeders use nooks with short corridors, or to the end without a corridor. This is due to the specific type of bumblebee, which prefers a specific nesting site.
Our recommendation: If you are not targeting a specific species, use a bait with an entry hall, as most species will accept it.
Whether the corridor is located inside or outside the hive is not so crucial; in commercial products, it is made inside due to ease of execution. Its presence is crucial for species that require it (see above).
Internal corridor a basic solution that most beginners will use, and it is also used in commercial products – because of its simplicity of implementation
Entrance hall located outside the hive but can help the beekeeper solve the layout and flight-opening placement of the hive (e.g. hives located inside buildings). A sufficiently long external corridor also has a certain protective/defensive factor, as stated above.
On the other hand, such a solution using long external corridors requires a different method of queen settling.
This topic will be described in detail in this section, in the chapter on seat modifications .
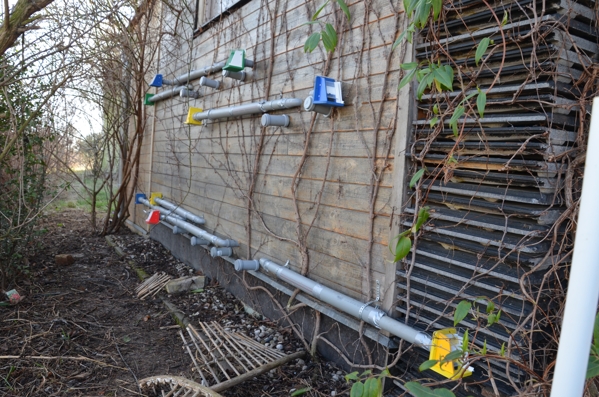
Examples of owl outdoor enclosures located within a warehouse
Photo of Karel Kučera
Key parameters and correct execution of an internal hive corridor
Materials for the hallway
It's not that crucial, a conduit can be made from flexible tubing, from an electrical “gooseneck”, or from PVC, HT pipes. Opinions differ, but most of it works.
However, the inner surface of the corridor should not be slippery, which the conduit seems to meet well and therefore the bee guru Mr. Miroslav Stuchl also recommended it.
Internal diameter of the entrance passage Inside the ulcer, we recommend 25 mm. Brightness We recommend against smaller ones. – can Umpteed. We consider it irresponsible that some manufacturers sell even 14 mm sockets.
If a large species (for example, the buff-tailed bumblebee Bombus terrestris) settles in the hive and the nest is strong, the narrow entrance passage significantly complicates operations, especially if new queen bees are already in the nest.
It is necessary to realise that bumblebees pass through the pipe back and forth. When they meet and cannot fit, they have to turn back. They also lose pollen baskets here, which they can no longer use. This costs them a lot of energy and leads to unnatural delays in operation (traffic jams).
In nests in the wild, bumblebees can modify the tunnel (a tunnel in a rodent burrow). However, this is not possible in human-made hives, and bumblebees often react to such a situation in an unusual way – they gather at the entrance and sometimes even build the foundations of a new wax structure there.
Such a passage can also easily become blocked, for example, by a deceased individual, a bumblebee or a bumblebee.
The situation must then be resolved removal of the hallway, which is an unnecessary intervention in the running of the nest and not every breeder will undertake it.
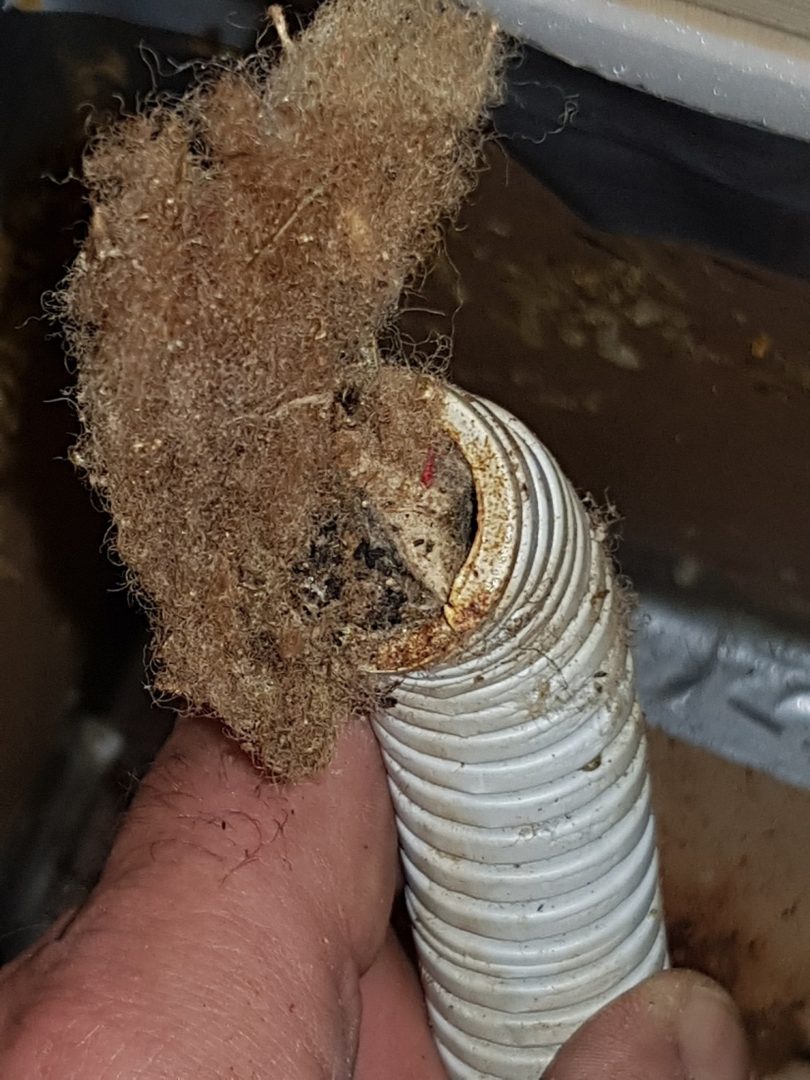
Corridor of inappropriate width, clogged with traffic from a nest - photo O. Hercog
You can read about how to remove the entrance corridor whilst the building is in use
Although Mr. Stuchl recommended a passage width of at least 18 mm for the entrance tunnel, a number of commercial products have an even smaller passage width, as little as 14 mm. Such a tube can easily become blocked, and therefore such products need to be modified. If you imagine the size of a queen bumblebee, for example, she will have difficulty squeezing through a tube with a 14 mm passage.
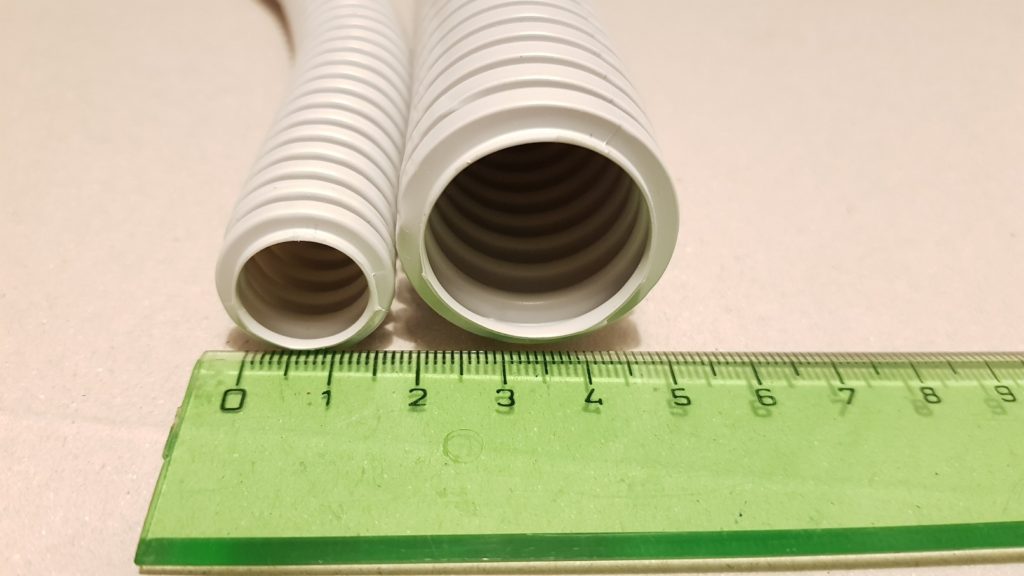
Comparison of the clearance of a commercial product's hallway (14 mm) with the recommended clearance (25 mm)
Photo O. Hercog
Our recommendation: For products with a narrower corridor, it is necessary to replace the original tube with a new one of larger diameter before populating the ulcer. If this is not possible (you do not have the option to drill a hole of the appropriate size in the ulcer body), then use at least the emergency modification shown in the figure.
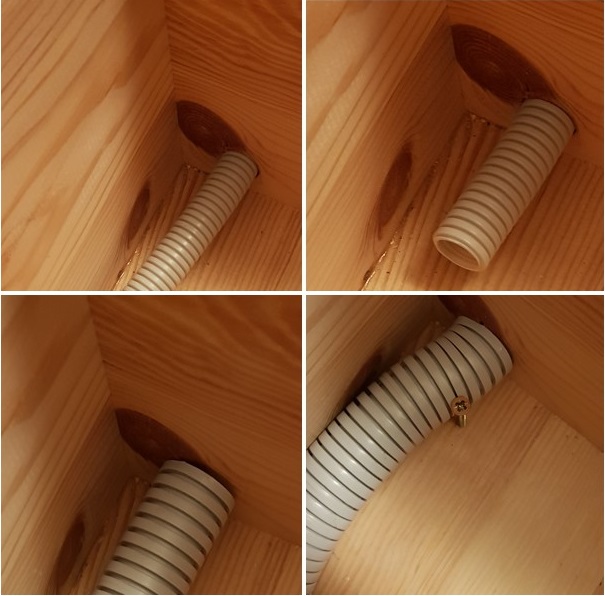
Method of repairing an unsuitable corridor in a bumblebee hive (bumblebee nest).
Replacement of a narrow corridor with a larger one – photo O.Hercog
Warning: However, do not attempt to increase the diameter of the flap's internal opening; it has its purpose, see Protectioná goggles.
For internal solutions for the entrance hall, we do not recommend using a larger clearance than the 25 mm recommended here, primarily with regard to the defensive function of the entrance hall (see protective factor).
Interior corridor solution
The inner passage is entirely hidden within the hive. One end of the passage opens into a protective flap, and the other opens freely into the corner of the hive. The tube should be removable, or at least detachable on the flap side, with the tube then left in the hive. The method of attachment is best shown in the photographs.
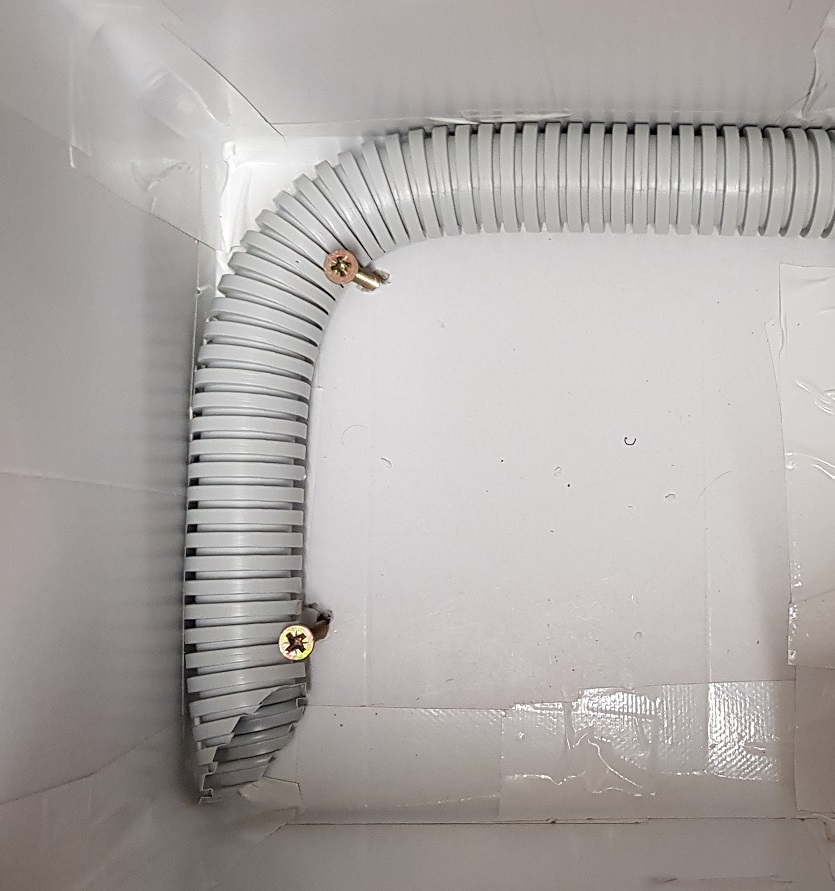
Tube guide in the hive along the walls – photo by O. Hercog
Correct length of the inner corridor
It is advisable for the corridor to start in the front wall, run along the inner perimeter of the side wall, along the opposite one, and emerge in the corner. This results in a length of approx. 50-60 cm for a 30x30x30 cm ullage. Therefore, one right angle is recommended.
The reasons for it are not unified. According to some breeders, the bend simulates the shape of a mouse's burrow. According to other breeders, the main reason is that when the nest is bent, it's not visible into the nest and drafts, to which the mother is very sensitive in the initial phase, are limited.
An important aspect is also Internal layout – the tube should be routed along the sides of the hive, not through the centre. The central space of the hive should be used for the nest and the bumblebees will generally start building there.
The centrally guided corridor then practically prevents any service intervention during the colony's lifetime and inspection of the nest by removing it via the , or removal of the tube in case of blockage, etc.
The end of the pipe in the hive
One of the leading bumblebee keepers today, Jaromír Čížek (the bumblebee guru), recommends positioning the tube’s outlet in the corner of the hive. Through his observations, Mr Čížek has found that in a newly colonised hive, the queen travels along the wall and stops in the corner. She will therefore find the tube leading there more quickly. This reduces the risk of the queen becoming “stuck” in the hive, see ..
Our recommendation: KCut a tube at an angle.. The inlet then has the shape of an ellipse, and the inlet area is larger.
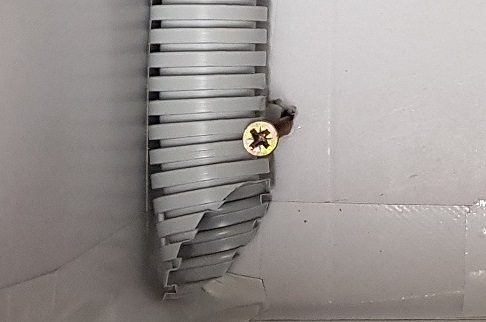
The end of the corridor is diagonally cut – photo O. Hercog
The other end of the corridor leads into an opening in the hive body, to which a protective flap is screwed. The design must be such that no gaps are created for the passage of parasites.
Incorrect solutions – corridor as a cavity in the core
This is a partition between the nesting space and the exit from the hive. You might come across it in some commercial products and old recommendations. The design was either like a vestibule or in the form of a narrow L-shaped corridor formed by the walls of the inner hive.
We do not recommend such a solution and we classify them as faulty. Bumblebees perceive such a space as „a place somewhere outside“ and cheerfully defecate there, carry in dead bodies, or malformed larvae. The whole space thus attracts parasites, mould and rot form here. Bumblebees then carry everything into the nest as they pass through and threaten its healthy development. Thanks to its height, it allows parasites to hide easily.
As a breeder, this narrow yet tall space is very difficult of access. Cleaning, inspection and repairs are complicated and often cannot even be carried out on the 100%. Moreover, due to the high ceiling, the queen loses the sense of security provided by the corridor.
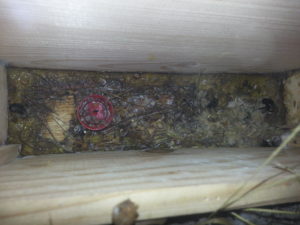
Inappropriate solution – hive with an antechamber. A large amount of waste is visible, which is a source of disease and a shelter for parasites – photo O. Hercog
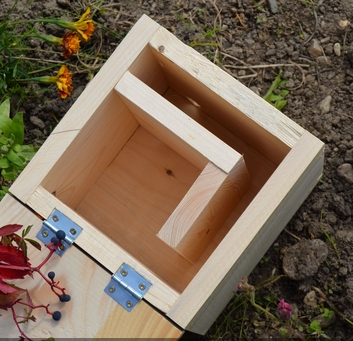
Example of a burrow without ventilation with an internal partition replacing a corridor – the bottom of the corridor will be very difficult to clean. In addition, a very small internal space for a nest.
(internet source)
Old or new tube...
Experienced breeders use old tunnels from the previous season. It is proven that “Scented hallway”is a good attractant and facilitates the nesting of the queen from nature.
The old tunnel needs to be cleaned and disinfected to remove dirt and any overwintering parasites, but at the same time, it must retain its bumblebee scent. Using an old tunnel carries risks (transmission of diseases). However, if you use a tunnel from a healthy nest and clean it, the risk is reduced.
Cleaning procedure Ulcer You can find the corridors .
If you're interested in how the queen marks her territory in the entrance corridor, take a look
Exterior corridor implementation principles
1) Must be pfirmly and stably secured, its outcome cannot be changed during the colony's lifetime, as the bumblebees remember the entry location.
2) Connection and connections must not have gaps, which parasites could penetrate. The connections must be firm so that the tube does not spontaneously disconnect.
3) The material must be Opaque and must not leak into the hallwayt.
4) Inner diameterThe internal diameter (r) of the tube must be at least 25 mm for long external tunnels (1 m and more), but we recommend 30 mm. Bumblebees fill long tunnels with waste and also move nesting material into them. A sufficient internal diameter allows the workers to arrange the material in the tunnel while maintaining passage through it. Smaller diameters risk blocking the tunnel, which the workers will not be able to clear. Solving this problem is then much more difficult than in the case of internal tunnels.
The protective factor of a smaller diameter (the chance of a worker bee meeting a parasite in the corridor) is replaced here by the length of the corridor. The necessary narrowing of the corridor, as protection for the hive, remains within the construction of the flap (the entrance hole).
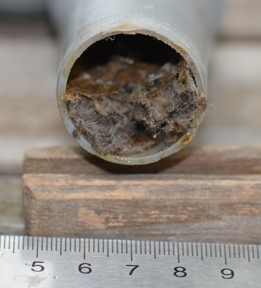
Sample of a typical level of hallway blockage at the end of the season closer to the hive, due to the internal diameter of 32 mm, the hallway did not become blocked –
Photo K. Kučera
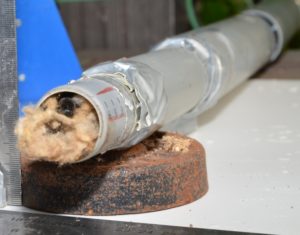
Example of corridor fouling at the end of the season; thanks to sufficient width, the corridor is not completely blocked, and worker bees have created a passage in the lining – photo K. Kučera
5) The spout must always be securely attached Protective flap. However, the flap should be detachable from the corridor for maintenance purposes. A male-female system (flap-corridor) is recommended.
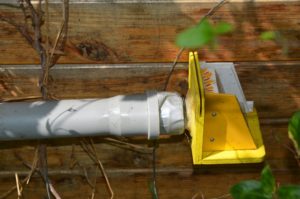
Method of connecting the damper to the external duct. On the damper, a short piece of pipe (male) and opposite, a long duct with an expanded end (female) –
Photo K. Kučera
6) The corridor should be detachable and as close to the hive as possible. Again, the recommended connection system is male-female.
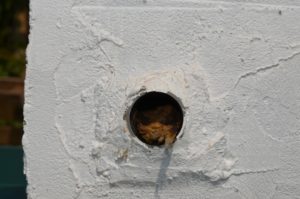
Example solution for a hive corridor. A short „female“ connector is permanently part of the hive here. The outer corridor connects using a male (corridor) - female (hive) system.
Photo K. Kučera
7) The entire construction must allow bumblebees easy passage. A siphon must not form in the pipe, potentially a water level could form.
8) Outer pThe hallway must be shielded, sunlight can heat a dark tube to extreme temperatures above 45°C. For bumblebees, travelling through such a passage is a journey through hell, and many of them then remain in the overheated tube, trying to ventilate.
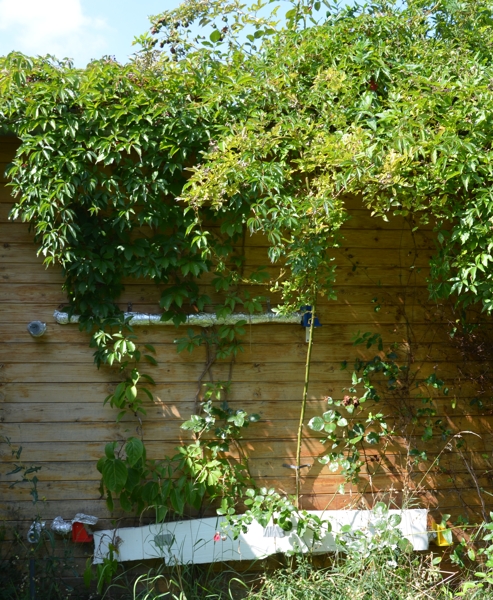
Protection of external corridors against glare and overheating of the corridor.
(External corridor clad in aluminium insulation with additional polystyrene shielding below)
Photo K. Kučera
9) In the case of external corridors, we do not install a corridor inside the hive. However, the passage into the corridor (side passage) should be close to the corner (approx. 4-5 cm from the inner corner of the hive).
Materials recommended for the construction of external corridors:
We recommend the HT sewer waste system DN32. (HTEM PP pipe DN32). This is a plumbing waste pipe system used, for example, for draining wastewater from household sanitary equipment (sinks, etc.). The pipes have male-female ends, secured with a rubber ring. HT fittings are available – elbows at angles of 15°, 30°, 45°, 67° and 87°, as well as couplings and caps. We recommend a fixed passage through the hive using a small section of pipe, where only the part necessary to connect the opposite part of the outer corridor extends outside the hive (male-female system). We recommend a similar adjustment for the slide. The outer corridor is then fitted from both ends onto these short pipes. This method allows for easy cleaning of the corridor, hive, and slide. Components are also easy to store after the season.
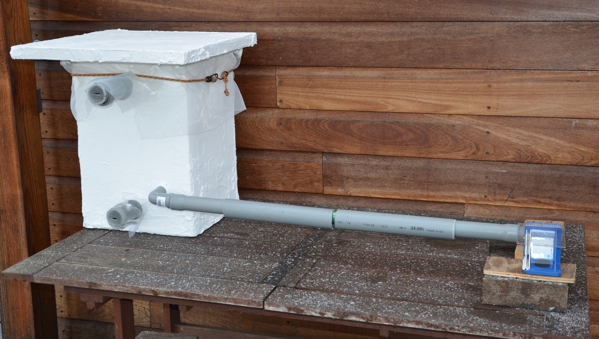
External corridor created using fittings, elbows and pipes from the HT DN32 drainage system –
Photo K. Kučera
Method of flap attachment.
- One of the damper manufacturers produces a type of damper with a side connection to the hive and a side trap. These dampers have an opening designed to connect to a hive of the same bore as the outer diameter of HT DN32, and thus the pipe can be easily and securely fitted to the damper without the need for further modification.

A commercially available flap, with a clearance that precisely fits a 32DN HT – no modifications required –
Photo K. Kučera - For other products, care must be taken during construction to ensure that the inlet opening on the flap body (mainly the part where the movable shutter is) is not widened. From a short piece of HT pipe, we will make a female connector for the corridor. This should ideally be fixed either by gluing (with hot glue) into a pre-prepared notch. Another option is to use an offset wooden block, into which a part of the pipe is firmly seated, and the block is firmly attached to the rear of the flap (as if it were a side wall of the hive). Be careful not to change the internal passage of the corridor in the flap, which must be maintained even when intervening directly in the flap body. We recommend this pipe connector section on the flap to be only as long as it can be safely connected to the long corridor using a male-female system. The reason for this is the maintenance of the corridor flap.
Recommendation It is advantageous for the flapper valve to be on the male side and the long corridor on the female side, as this allows the long corridor to be sealed off with a blanking plate at night if necessary, the flapper valve disconnected, and necessary servicing carried out without disturbing the bumblebees or risking parasite infestation during the servicing period.
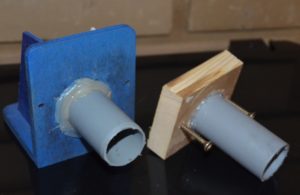
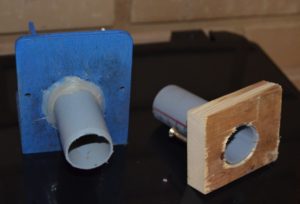
Two ways to connect a flap to an external corridor.
Left by gluing into the pre-milled groove.
On the right, it’s easier to create an attachment that connects to the rear side panel of the flap from behind.
Photo K. Kučera
Adjustment of the flap for installation in a long corridor –
Photo K. Kučera
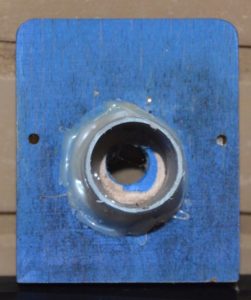
A view inside a short passage on the damper – we do not change the internal clearance of the damper itself, even when milling for a pipe –
Photo K. Kučera
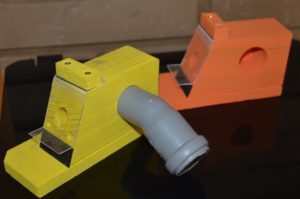
Another option is use goose necks similarly as in internal corridors. However, in these cases, high-quality material intended for laying cabling underground must be used. It is advisable to fix the duct with clamps. The solution for connecting the flap and the passage through the hive is more challenging in this case.