Slipper

Protective flap

What you will learn here
  • What is a protective flap used for
  • What does such a damper look like
  • How to care for a valve

Last updated: 07/02/2024

page abstract

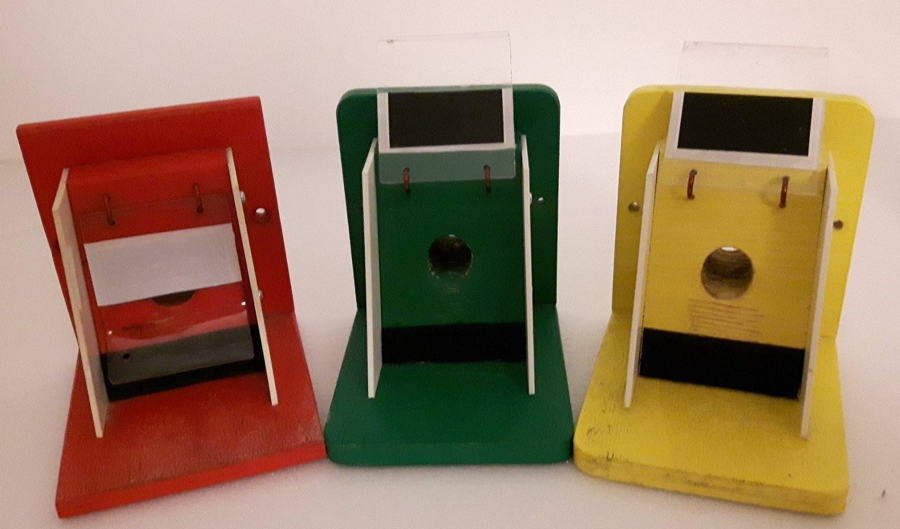
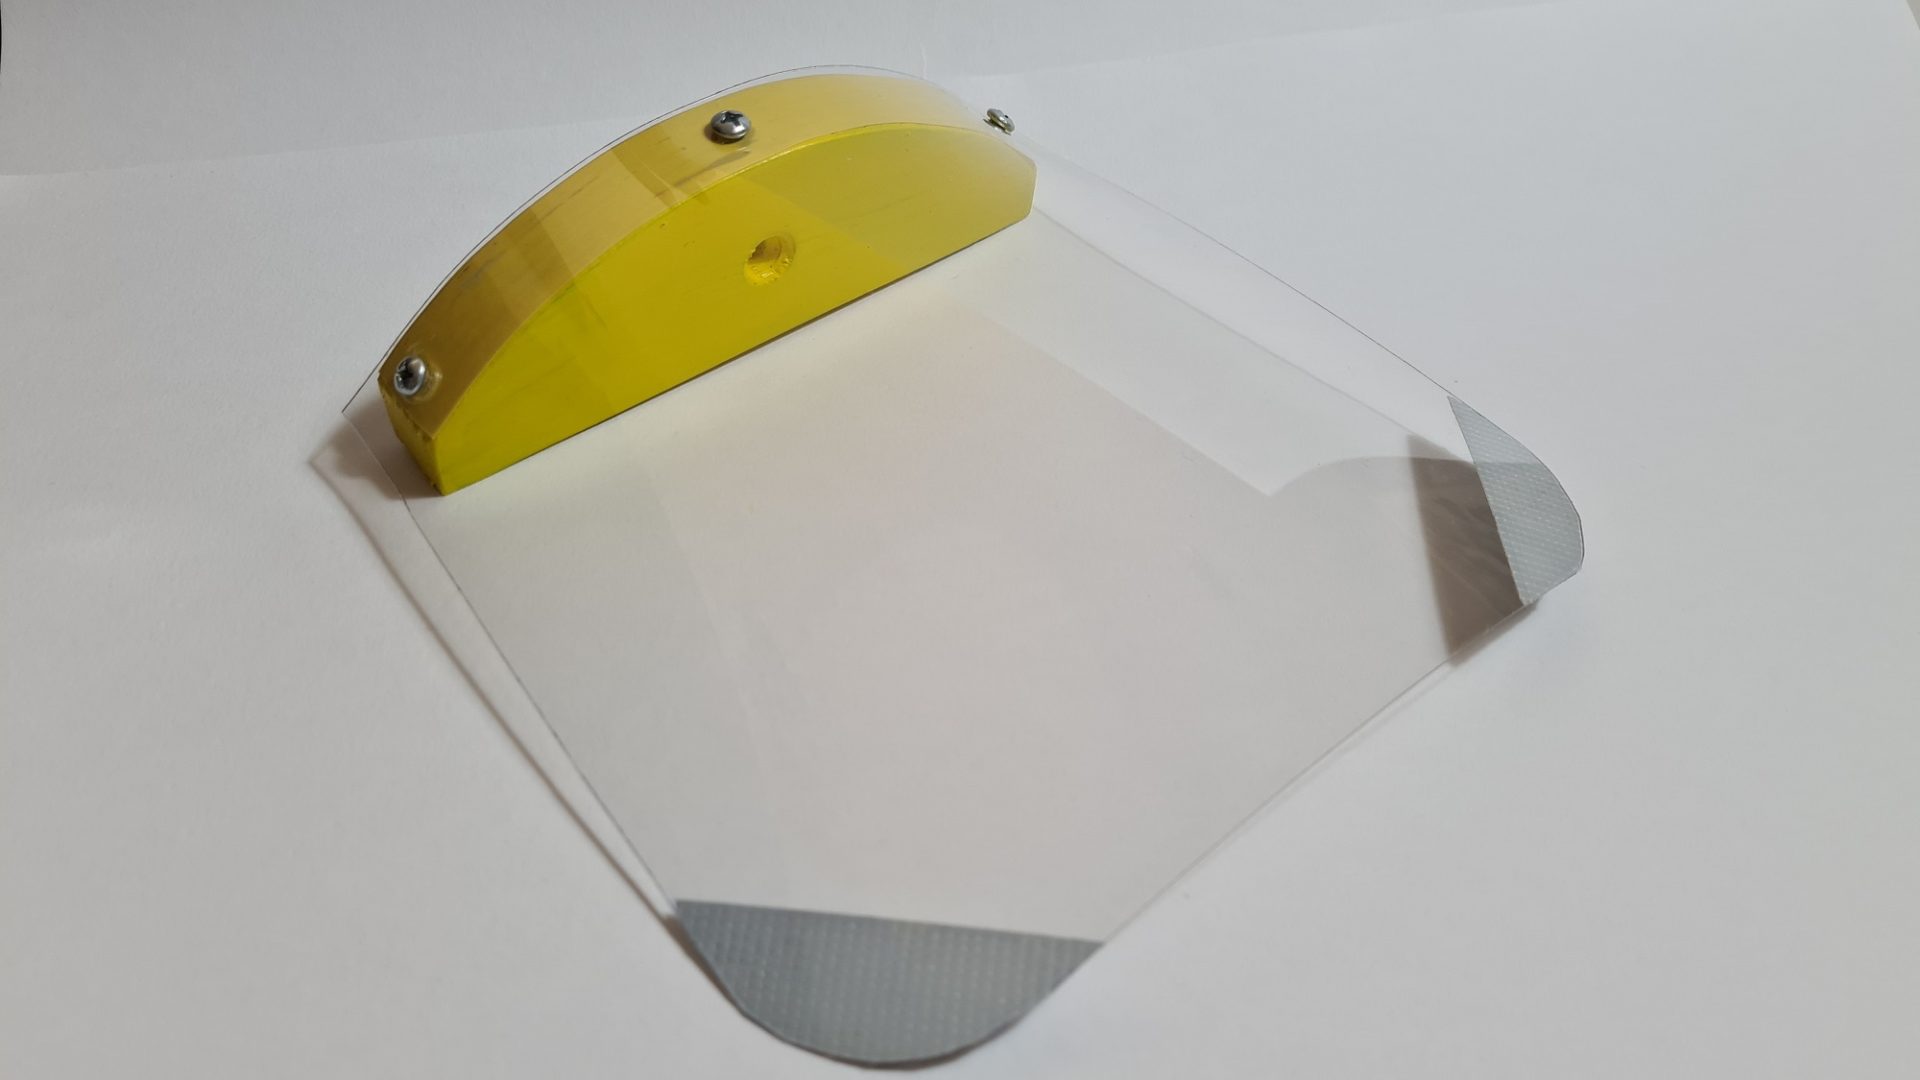
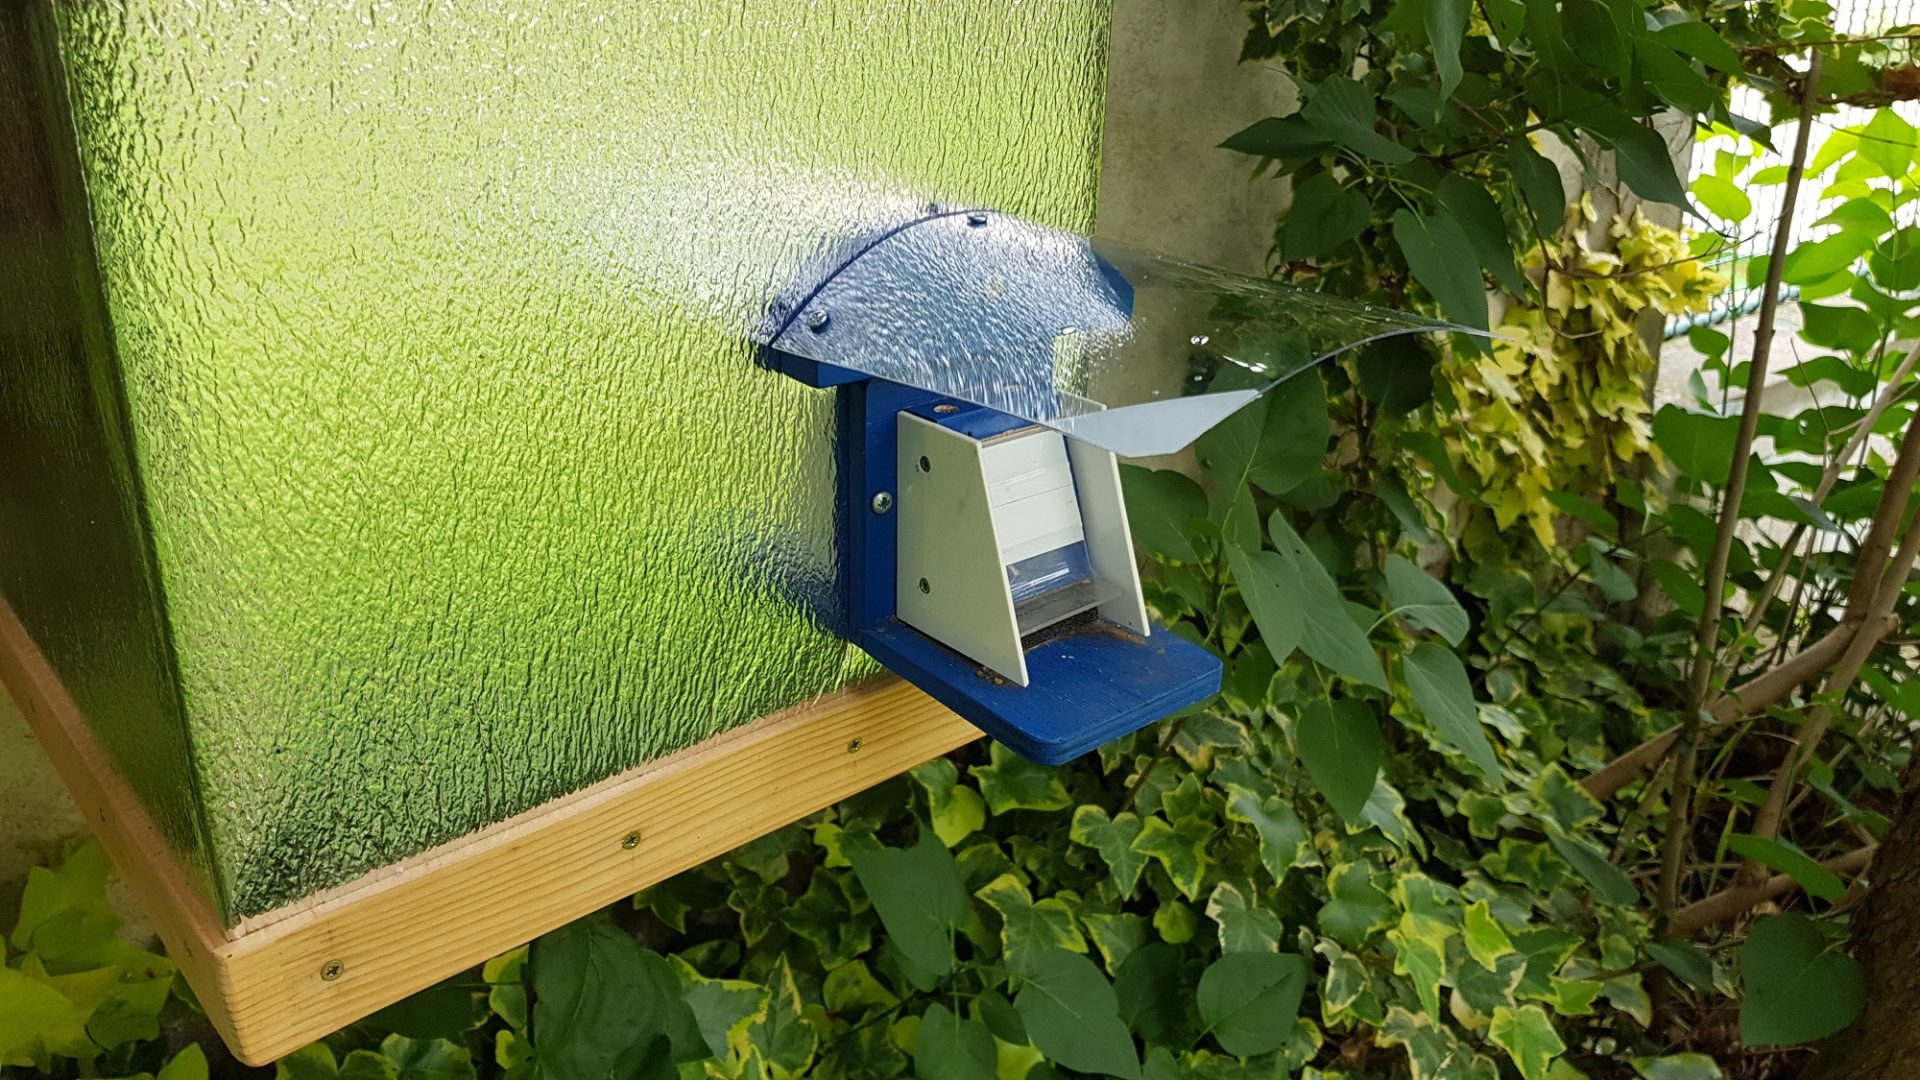
  • Parasite protection: A protective flap shields the bumblebee nest from its parasites and enemies.
  • Install the flap in timeFor the flap to perform its function, it must be installed and lowered in a timely manner.
  • You'd better buy a protective flap: Manufacturing a protective flap is not easy. We recommend that you buy a functional flap from an established manufacturer instead – you will save time, hassle, and money. 
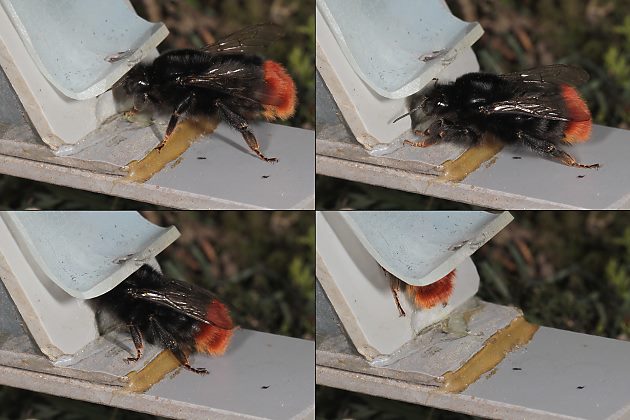
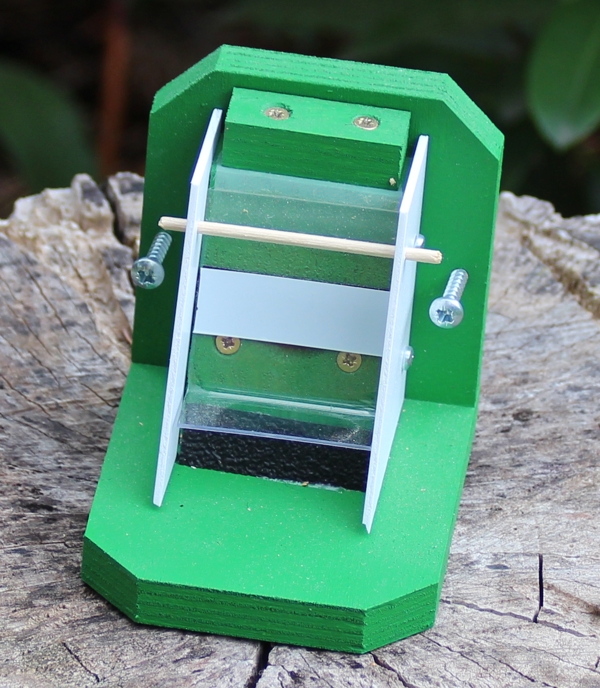
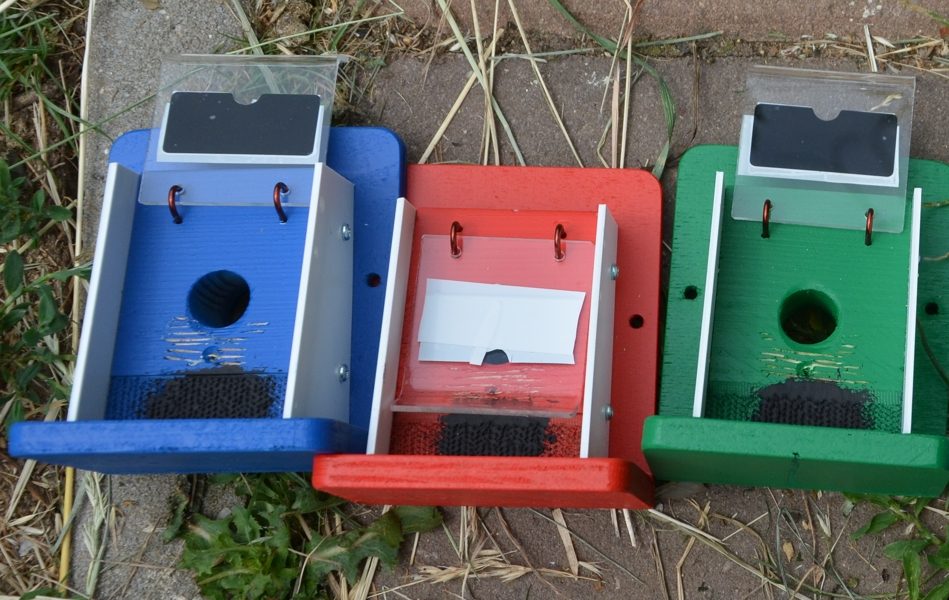
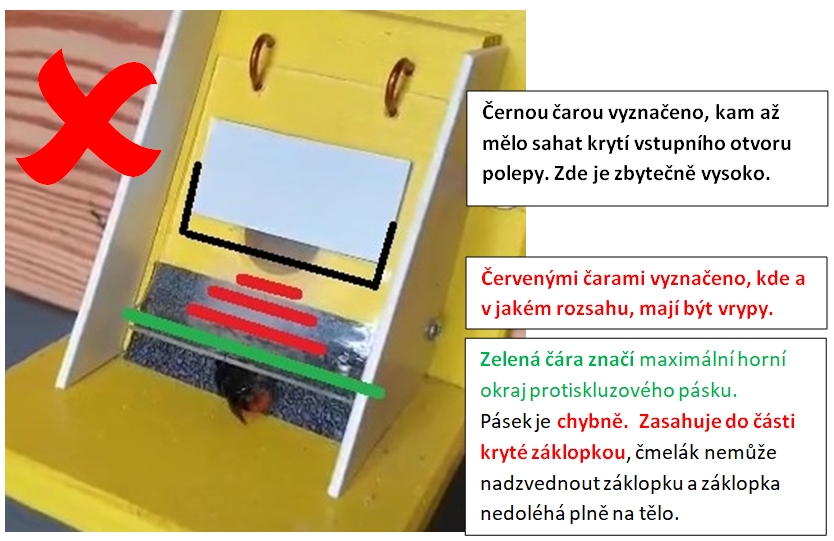
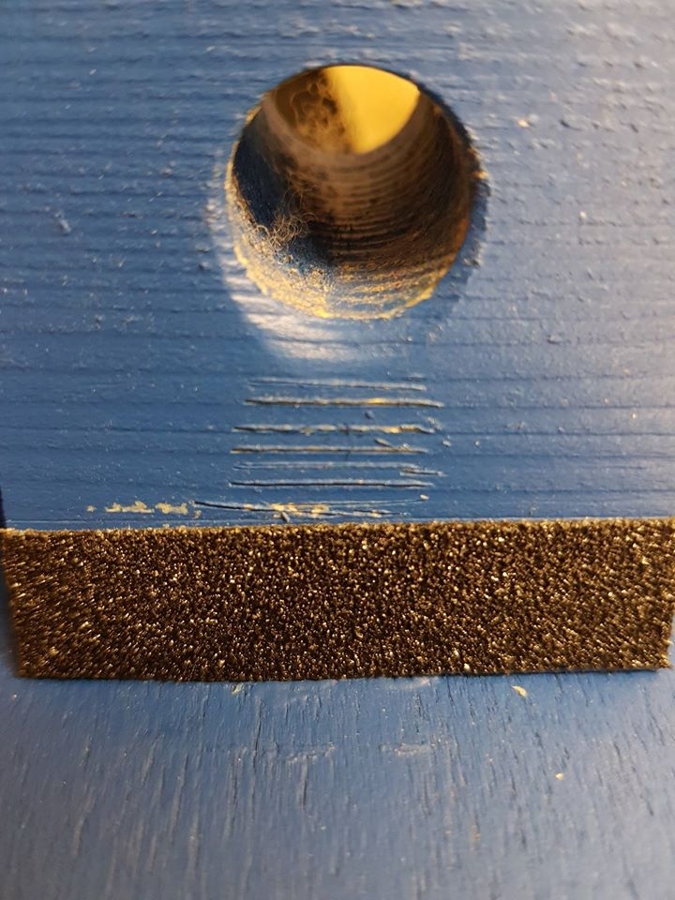
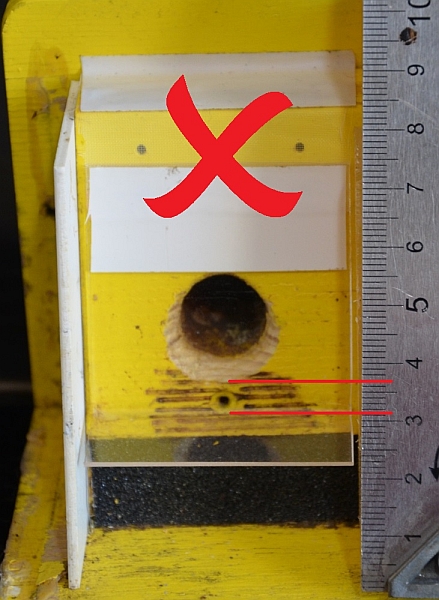
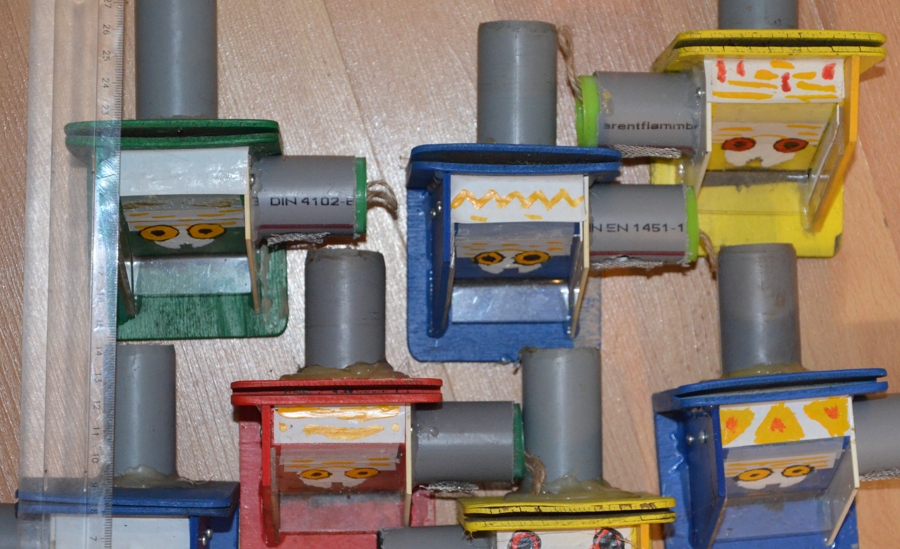
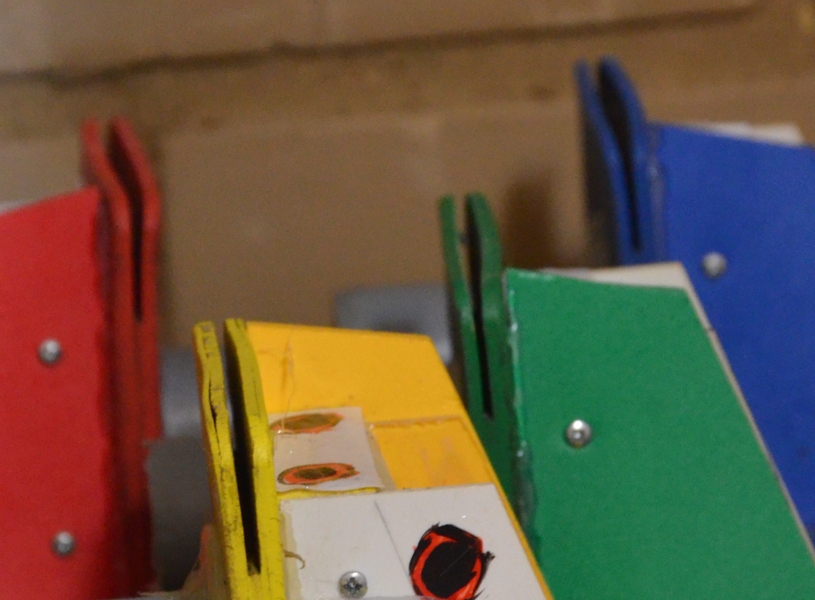
  • Stickers on protective flaps have their meaninghelp bumblebees push on the flap in the right place and lift the flap
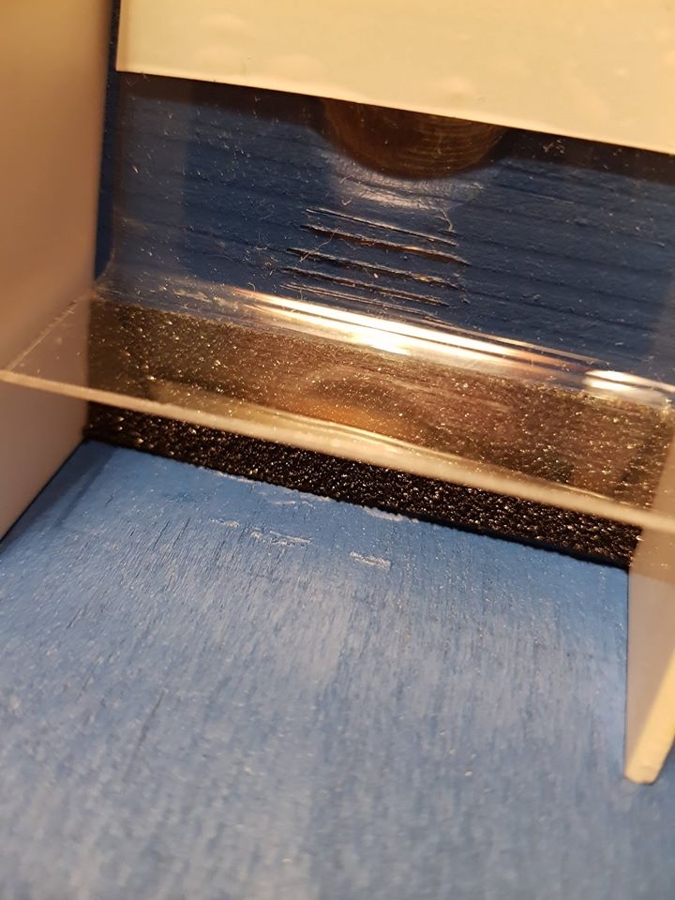
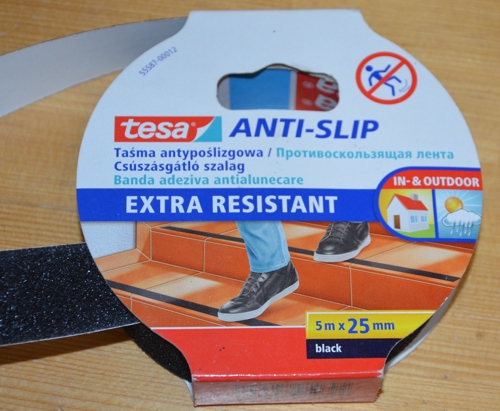
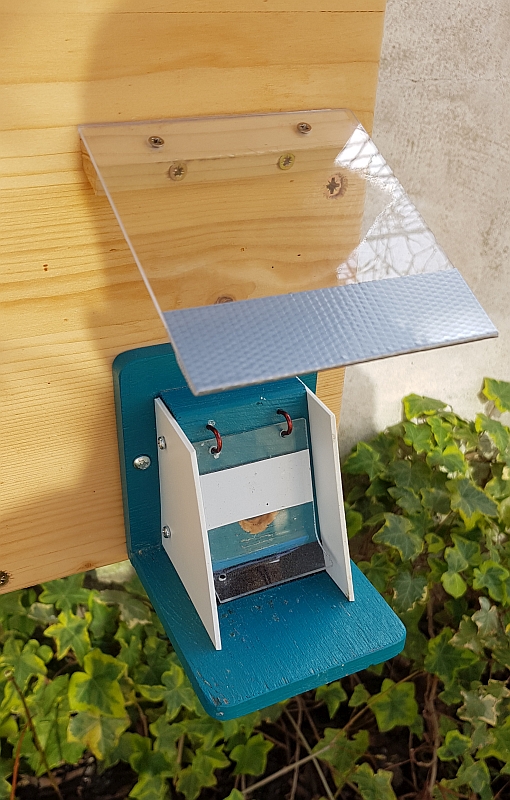
  • Climbing lane A roughened strip on the flap helps bumblebees lift it. 
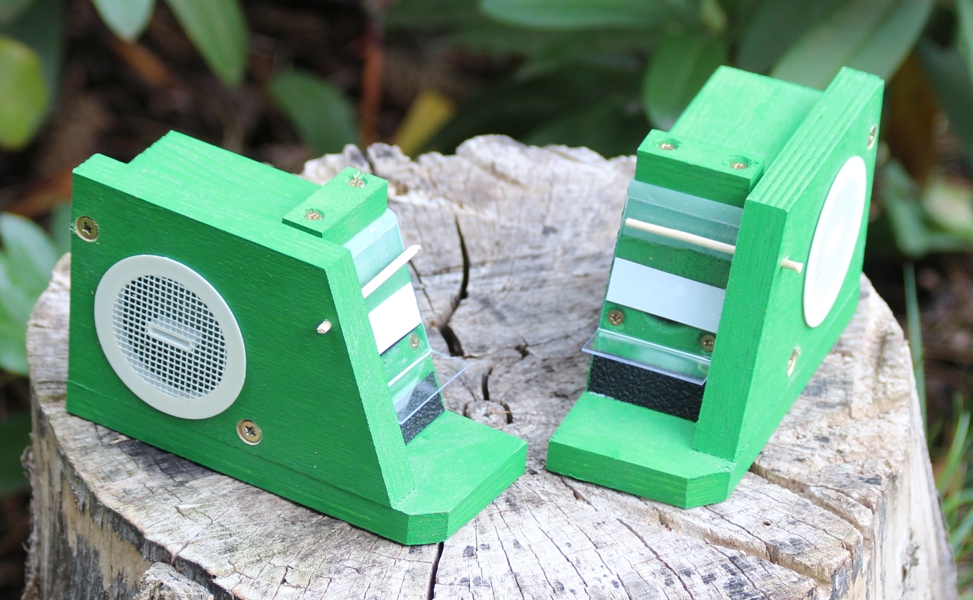
  • The flap's latch must move freely: If the flap catches when moving, the valve is not functional 
  • Bumblebees can manage applause: Mostly, it's the breeder who finds the flap bothersome to the bumblebees
  • Trap is not a problem for bumblebees The cap protects the bumblebees, parasites are the real problem and can destroy the nest 
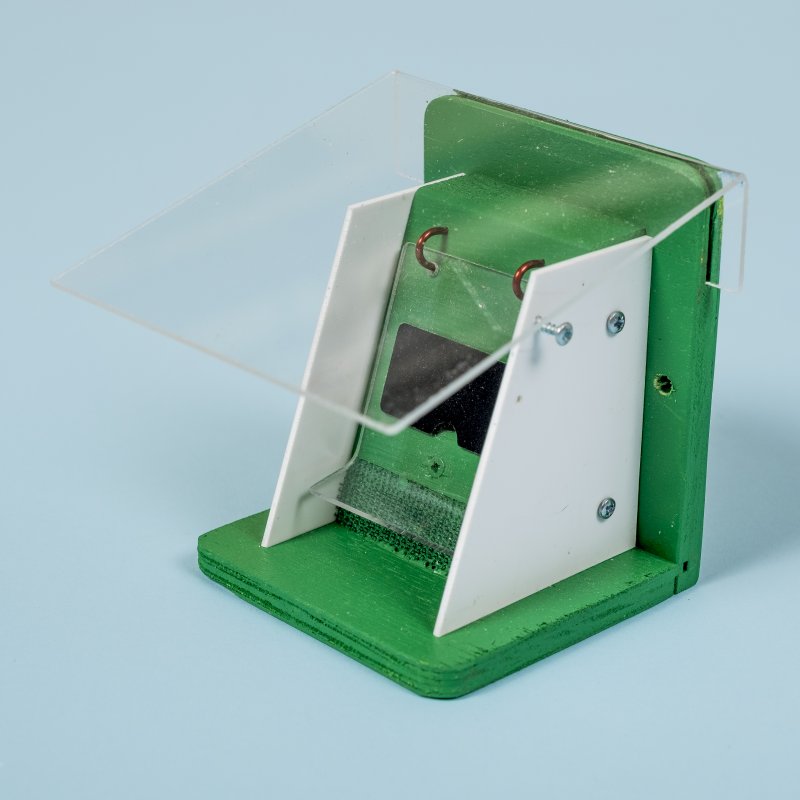
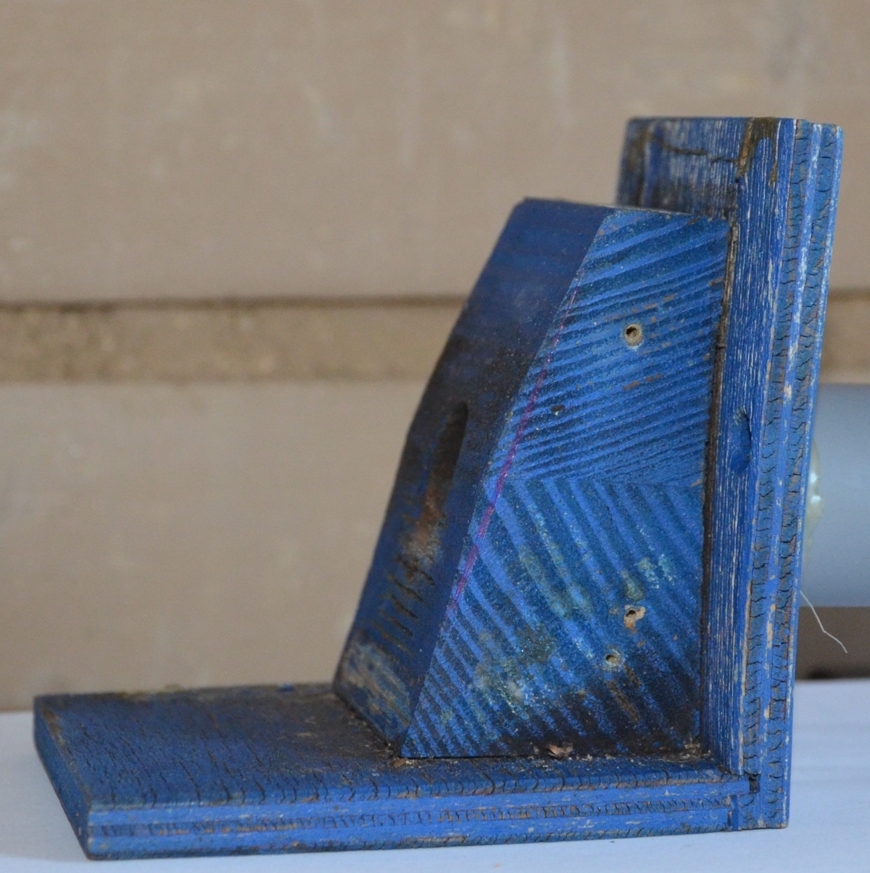
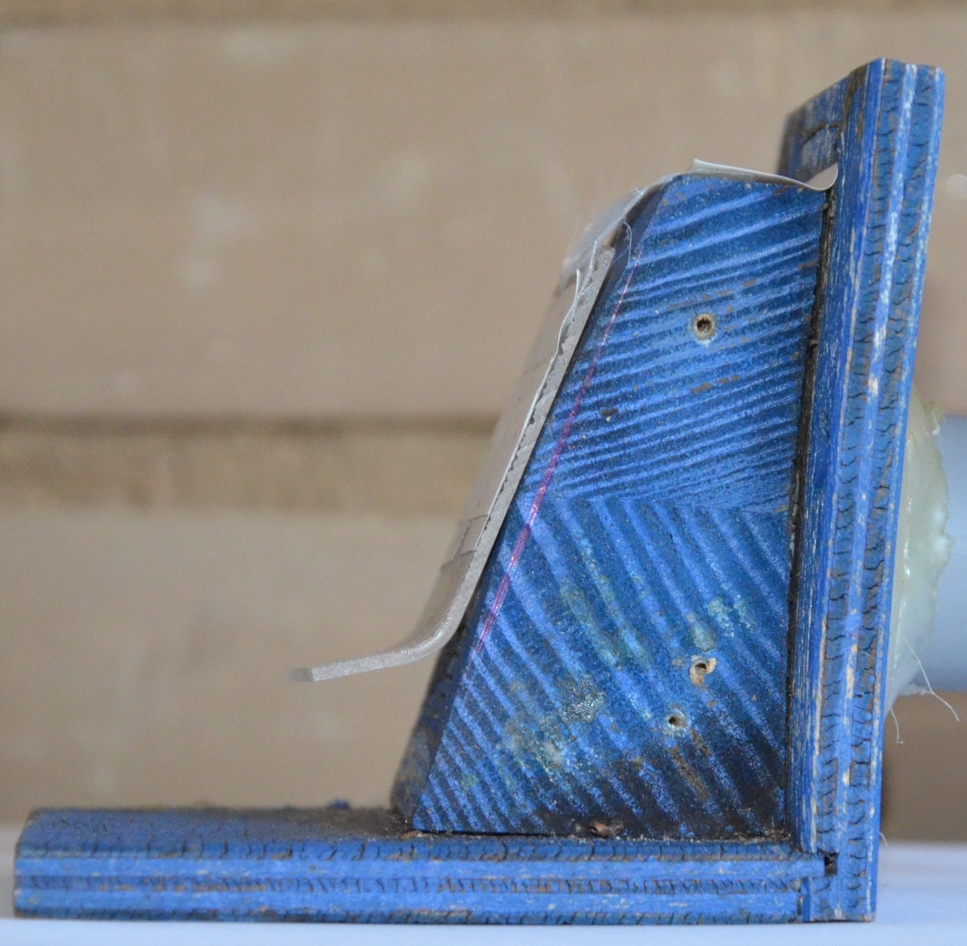
  • Only a closed damper protects the nest: If the flap is not closed, it does not protect the nest
  • Set the trap horizontally: For the flap to function correctly, the base of the hive must be in a horizontal plane
  • Check the clasp regularly: if The flap is contaminated with wax and pollen, it is not functional
  • The tray can be adjusted: If bumblebees lose pollen on the landing board, carefully smooth the edge of the entrance hole with fine sandpaper.
  • After the season, treat the clapboard: The flap is exposed to the weather, so look after it at the end of the season. Maintenance and a protective cover will extend the flap's lifespan.

Introduction

A protective flap is an absolutely essential part of every beehive. Just as a joist must have a roof, it must also have a protective flap.

From our experience, we know how its importance is often underestimated And so, we described it in detail in the section for beginner breeders, so that we could convince them and help them towards a successful first season.

Although we describe the protective flap and a range of its details on our website, you are very For beginner breeders, we recommend buying a flap.. Making your own filter isn't as easy as it might seem and ultimately You won't save money, rather hers You'll spend a lot of time on production and debugging.. Furthermore every mistake in the production of the flap leads to problems that will threaten your bumblebee colony and can lead to an early end to the season.
Not even the creators of this website make their own beehives by hand, and we ourselves make all sorts of things for bees. 

That Some manufacturers ignore the significance of the protective flap., proving the low quality of their products and their general attitude towards the interest in breeding outcome, or breeding as such. If the manufacturer sells stoats without a flap, it is The first sign that something isn't right (see How to choose the right shock absorber).   

Bumblebees PLUS - Examples of unsuitable nests without a protective flap

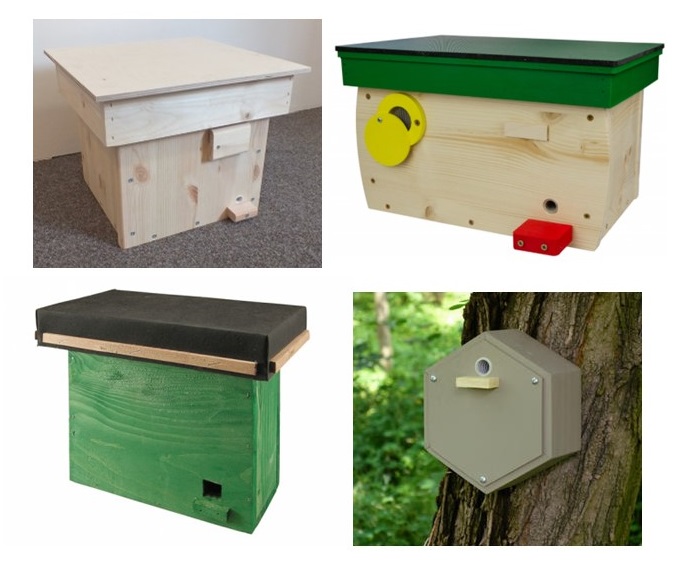
Examples of inappropriate wells without protective covers
eShop Sellers Source

 PBeekeepers very often sell hives without protective flaps.

While it's true that some recommend a baffle at least somewhere in a long text to describe the hive. However, if the purchase is made online from an e-shop, such a recommendation is very easily overlooked and a novice beekeeper rushes into trouble. Yet, it would be enough to take a photo of the hive with a baffle, put it in the e-shop, and supply the hive as standard with the baffle.

Generally, however, if a seller offers you a bumblebee nest without a protective flap, they know nothing about bumblebee keeping.

If someone already has a flap, they can remove it from their order at their express request (i.e. with one „click“ on the eShop). Or instead of the text „Free filling“It could also be written„Protective flap required„.

We've been telling pest control manufacturers about this small thing for several years, which would help a great deal; some have understood, others haven't. We then deal with bumblebee nests that have been affected with their clients, and they cry down the phone to us that no one warned them.  
Perhaps even this manufacturer will understand one day, it would be a small thing and real help for bumblebees

Any reasonably skilled carpenter can make and sell a nice box with a hole and a gooseneck hinge at minimal cost. The protective damper is, on the other hand, the most technically and financially demanding part of the unit. – requires precise and high-quality material processing. This is why we pay considerable attention to its correct execution. 

It very often happens that a breeder buys a protective flap, but For some reason, she doesn't use it, or it takes fright too late. Beginners often feel sorry for their bumblebees, that they are „struggling“ with the colony and They will leave it open for them. Sometimes, new breeders decide to save a few hundred crowns and  They won't get a laptop at all. We have encountered a number of cases where Seller the customer of its necessity overlooked and he could have easily sold him the fright without it (see above).

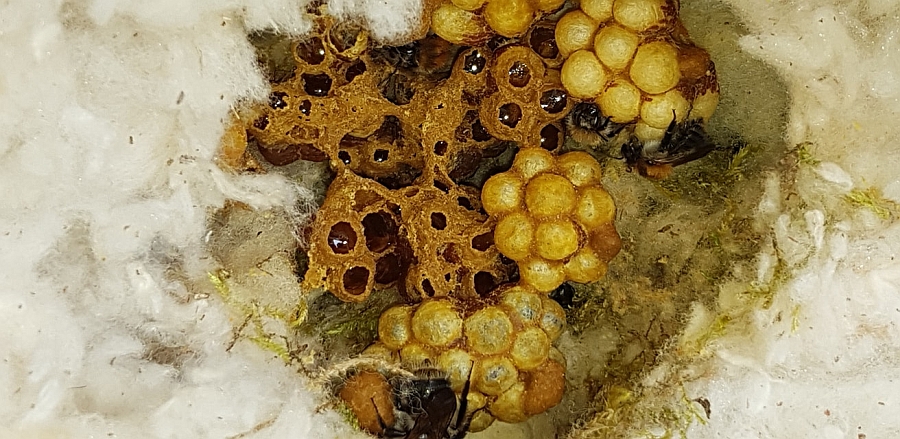
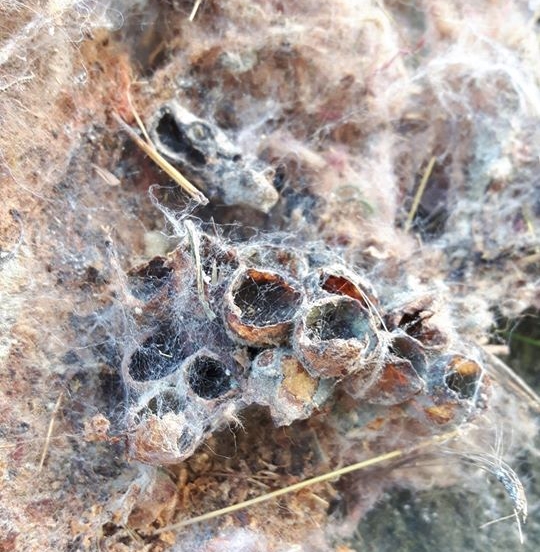
All these breeders/sellers  expose bumblebee nests to a risk equivalent to certainty. A hive without a protective cover will sooner or later be attacked by parasites, the nest will be weakened and mostly cease to exist prematurely – no further generations of sexually reproducing individuals (queens and drones) will be born in it.

Bumblebees PLUS - Open flap of the protective cover as an open path for parasites

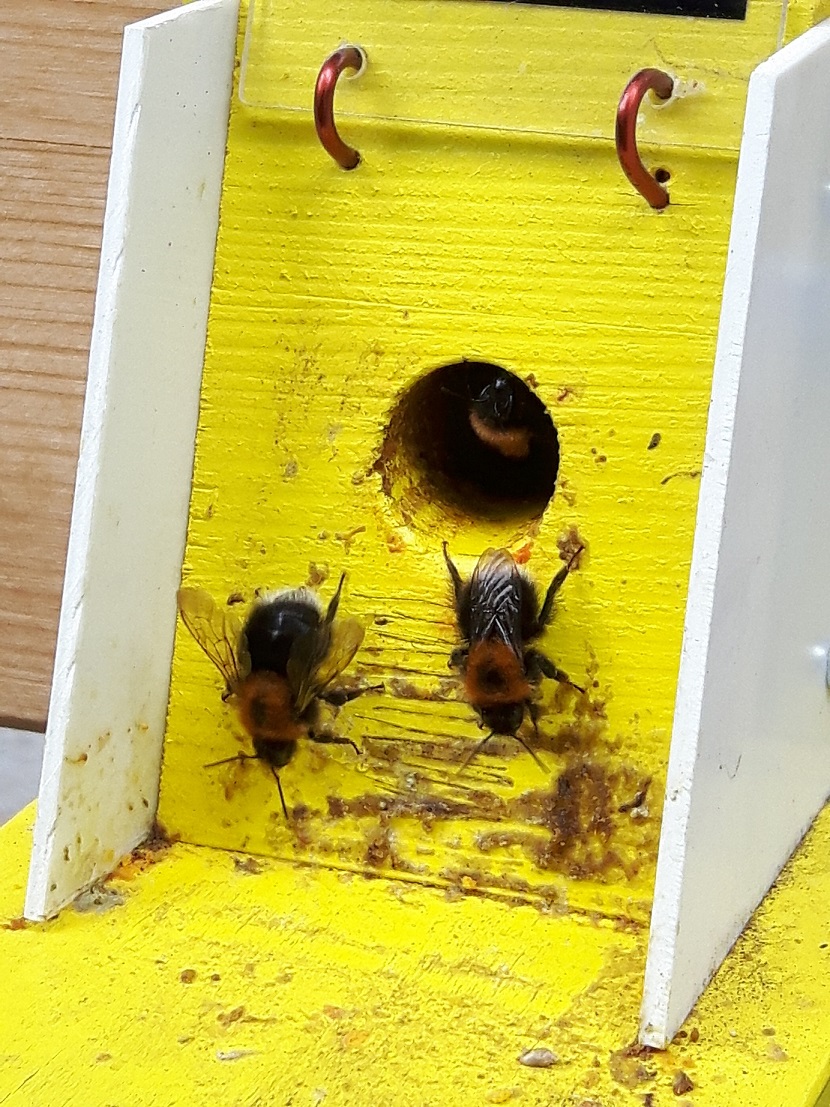
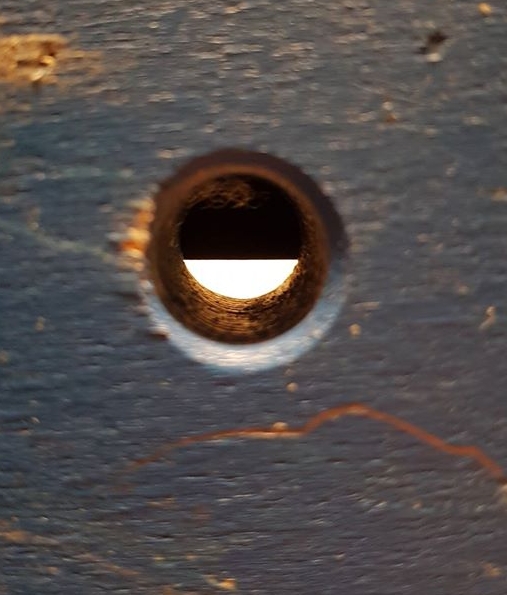
An open cover flap as an open path for parasites.
Photo O.Hercog

Bumblebees PLUS - Protective flap clogged with pollen baskets and wax

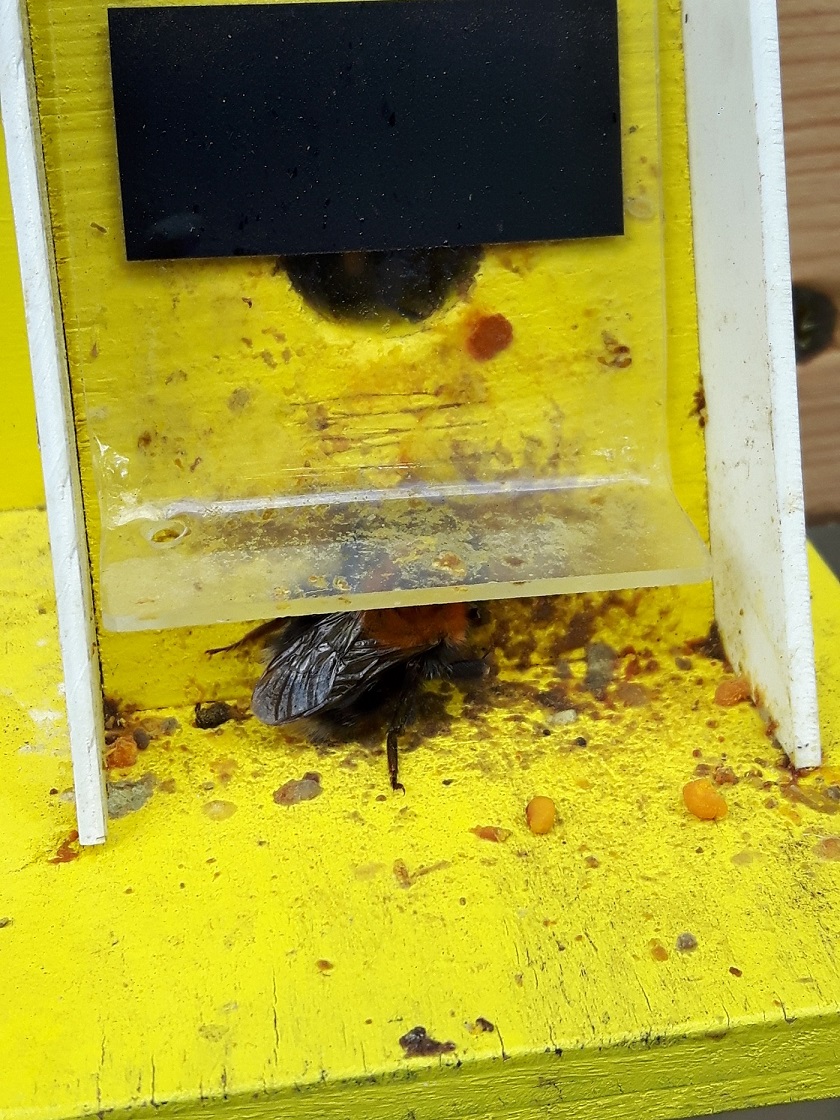
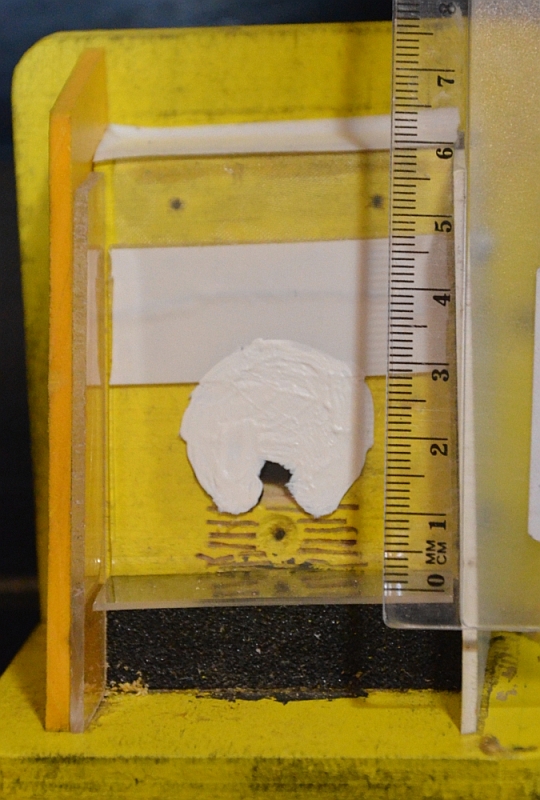
Protective flap blocked with pollen clumps and wax
Photo O.Hercog

Also, keep in mind that The protective flap must be fitted immediately as soon as you install it and you have to to enjoy right from the start. Lap

protects the queen mother in her solitary phase  against intruders and other mothers who would want to occupy her nesting space! 

The training of bumblebees is primarily important for the queen. She must learn to use the entrance flap after nesting. This is because when she flies out, the nest is not yet fully developed. Without training, there would be a risk that she might abandon it, or while trying to figure out how to get past the flap without training, she would spend unnecessarily long time at the entrance and fall victim to predators (birds). All other bumblebees, guided by the scent of the nest, can already manage with the flap. Making it easier for bumblebees to get through the entrance means opening the door to parasites and reducing efficiency.

You will learn how to get bumblebees to fly into a hive, how to manage them, and how to maintain them during the season in the beekeeping chapters titled "Season Begins".  The page dedicated to the use of the flap is HERE.

You must also not forget that you must check the flap's functionality check regularly.  The landing board can sometimes get stuck, and bumblebees often lose their pollen baskets or wax parts of it on the flap. If the flap does not close properly, the path into the hive will be open to parasites. We will also provide you with procedures for checking the flap later.

You can read more about the protective flap, its development history, more complex modifications, etc., in the chapter for advanced breeders. We are still creating the chapter and will announce the final version in due course.

Our recommendations and texts here represent a consensual opinion from our breeding team, not that of a single individual. Therefore, the final version of an article takes longer, as a panel discussion first takes place regarding the draft. .-)

We recommend again:

1. Acquire a proven model of protective flap And resist the temptation to make your own flap. It's better not to get involved in making or more complex modifications. You'll have plenty to deal with in your first season, and above all, if there's a problem, you need to know that you have a good foundation = a reliable decoy and a proven flap. Without this, it's very difficult for an inexperienced breeder to find the cause of a potential problem in breeding.

2. Use the flap from the start, check it and protect the nest bumblebees in the hive


The meaning of the protective flap

Each beehive must have an entrance for bumblebees, but this is also a critical point for parasites to enter the hive. The protective flap is the only truly functioning part of the hive that has a chance of stopping a parasite at this point. 

It must be admitted that even a hive fitted with a flap is not 100% secure. This is because pests have several ways of getting into the hive. The protective flap significantly reduces the risk of parasite ingress to the bumblebee nest.

Part of the overlap is attributable to the breeder. If the flap is to function, the flap must remain closed, the flap must seal against the wooden body, and the functionality of the flap must still be regularly checked.
Sometimes a parasite still manages to get past the flap, but the probability of a successful attack is much lower, and therefore the chances of the bumblebee colony surviving are greater than with hives without a flap.  

Why does that happen? Parasites orient themselves primarily by the scent of the nest or they watch the returning worker ants and here one must realise the fundamental difference compared to natural nests. Man-made shock is an enclosed above-ground space from which odours are released only through leaks and penetrations. This creates for parasites a clear and distinct trail, which can be smelled far and wide.

U natural nests This is different. Some bumblebee species have nests underground, where the soil acts as an absorber (absorbing scent) and a diffuser (dispersing scent). With underground nests, workers can also adjust the entrance as needed, which isn't possible in a hive; at most, they can close the hive entrance with bedding. Some species have natural above-ground nests, but even there, the dispersal of scent into the surroundings is greater than in the case of hives. A parasite will find these natural nests too, but usually later than a hive, meaning there's a greater chance of breeding and producing sexual individuals compared to a hive. Study Moreover, they show that most natural nests are destroyed by parasites.

Some breeders/sellers promote their strategy of offering bumblebees as a deterrent and leaving everything to nature – but we disagree with this approach. A sudden fright can thus happen and breeding ground for parasites. 
If we offer bumblebees a nest, we are responsible for them and must look after them – see the above-described issue of finding a nest by its scent..  If we don't do this, the nest will be attacked, weakened, and most likely destroyed before a sufficient number of new queens and males can develop. Whoever wants to leave it to nature can adapt their garden for bumblebees, but it's better not to get a hive as an artificial structure – then you will genuinely be helping the bumblebees, not harming them. For this reason, hive sellers without flaps are not happy. Their goal is usually just to sell as many hives as possible, and they don't care about the rest. But we are not here for their businesses, but for the bumblebees. We all use flaps, including beekeepers who are capable of detailed nest inspections and treatment in case of parasite infestation. 

Added traps, auxiliary protection methods (e.g., attempts to mask the smell of a boil with aromatic plants), These are all supplementary options that increase the overall protection of the ulcer, However, they cannot be considered equivalent replacements for a valve.

Ancillary benefit of protective flap:

  • protects against draughts in the cot,
  • It limits the penetration of light into the hive when the hive has no corridor.,
  • The panic will allow it to close if you perform an action on or near it.
Healthy strong bumblebee nest of the field bumblebee

A look into the nest, where a flap is consistently used.
Photo O. Hercog

Destroyed nest of the bee moth Aphomia sociella

And it was left here without a cap in nature. The nest was eaten and spun by Aphomia sociella caterpillars

Operating principle of the safety flap

The protective flap, they are actually light Latch were not landing board, which will cover the entrance to the hive (flight opening). The flap prevents bumblebee parasites from entering the nest and harming the bumblebees.
Bumblebees get used to it quickly for the flap to be lifted and to slip under it, and furthermore, they must get into their home. After a while, they safely go along the pheromone-scented path to and from the hive.  
A parasite that can't correctly lift the trapdoor lacks the strength (e.g., the feared bee moth or parasitic flies). Alternatively, they have the strength for it (bumblebees, wasps), but lack the „nerve“ – to learn and wait; they simply didn't anticipate such an obstacle. They don't know how to deal with the trapdoor, so they „give up“ and fly away empty-handed, looking elsewhere. Yes, a bumblebee sometimes lifts the trapdoor, but it at least deters some of them from attacking the nest.

Bumblebee PLUS - Protective Flap - entering Stone Bumblebee (Bombus lapidarius)

Guard flap – entering red-tailed bumblebee (Bombus lapidarius)

Photo http://www.wildbienen.de


On this video you can see, jif bumblebees are passing through the flap. For the purposes of creating the video, we used transparent side panels for the flap, and here we had a side panel removed. 

Technical design of the damper – most important components

For better orientation in the following texts, it is better to first describe such a flap:

The clutch refers to the entire mechanism, which has integral components:

  • Check valve (door) the movable part that covers the entrance to the damper passage.
  • Throttle body This is a wooden bevelled block with an entrance hole and a passage into the hive.
  • Entrance body part – this is the front part of the hive entrance, which bumblebees climb to reach the entrance hole and where they lift the flap from underneath. It has a part that is free and a part that is covered by the flap. Its dimensions and design are important as it is also a place through which a parasite can enter the hive.
  • Latching hinge – mechanism providing flap movement
  • Base – baseplate, on which the damper body is mounted, protects the body from moisture 
  • Garlic – protruding base space where bumblebees land and take off
  • Side panel in other literature post-traumatic stress disorder) – body caps and latches from the side against wind, parasites and rain
  • Backplane – according to the method of execution, the connection point to the hive is
  • Canopy – protects the flap body and prevents water from getting under the flap (not in the photo)
  • Past – solution for capturing parasites attacking the nest in the hive (not in the photo)
 
 
Bumblebees PLUS - Description of a bumblebee flap, what is the entrance, the landing board, the side panel, the body

List of parts of the flap
Photo by J. Černý


Description of the protective flap's key features and its application

For the flap to serve its purpose, it must:

  • To be Made from quality materialsand withstand weathering for several seasons.
    The flap should be robust and painted with water-resistant eco-friendly paints.
  • The flap should have the option Flap stroke control.
    This solution is needed for „training“ bumblebees to lift a latch. 
    Regulation doesn't necessarily have to be on the flap, but we consider it the optimal solution.
  • Ventilation opening (the flap's body passage) should have a diameter (internal diameter) of no more than 16 mm.
    Do not adjust the diameter of the inlet opening in the flap. The flap also functions as a diaphragm and should not allow larger individuals, e.g. mice, to pass through.
    Our proposals for renovation of the entrance hall (entrance pipe) only concern the hall that is connected to the flap.
  • Ventilation opening should have a slight rounded edges and should have smooth surface Coating.  
    Thanks to this measure and less roughness, the bumblebees lose less pollen baskets here. 
  • Landing area of the flap bodyy should conversely be roughened so that bumblebees can climb on it better and can lift the flap with their backs.
    The manufacturers are providing this surface with Velcro or notches as per our recommendation. The surface should also be blacked out. But the best is to use black anti-slip tape, which, in addition to a roughened surface, directs bumblebees to land on the underside of the hive entrance (see further text). 
  • The latch must close fully onto its base.
    The flap must not be ajar, otherwise parasites will use this gap to lift or crawl under it. Bumblebees dirty the flap. Pollen pellets can get stuck there, they often wax up deposits on it, or they move out part of the lining – all of which results in the flap not closing properly.
    The bellows need to be checked and cleaned, preferably every evening after dark.
  • The doors must lift freely and settle freely.. The door must not jam, stick or snag.
    The latch needs to be checked.
  • The latch must take a load, so that parasites cannot easily lift it. 
    Note: Various instructions occasionally appear on the internet on how to reduce the weight of the flap to make it easier for the workers to get through. A light flap doesn't pose any difficulty, but it also offers no protection.
  • The latch is on the outside equipped covered in black with tape/paint so that it covers the upper approx. 2/3 of the inlet opening when the flap is closed (lowered onto the flap body).
    Light into the hive then shines only on the underside of the entrance opening (view into the flap from the hive side). 
    This is important for bumblebees emerging from the hive – at that moment, they are looking for a way out towards the light. The solutions force them to push into the lower third of the opening, where they open the flap with the least effort.
  • The latch is From the outside is equipped with covered in white tape/paint
    This is important for bumblebees, which are returns to the hive – at that moment they are looking for the dark surface of the inlet. If Will you cover this black tape/paint with white tape/paint, The arriving bumblebee navigates to the dark surface of the flap's landing area (onto the anti-slip tape). It lands here and begins to push and lift the flap.
    So, it's two strips of tape stuck over each other. Please look at the photos „Lid adjustment. Sticking black tape over with white tape“ which will illustrate the description for you 
  • The space that bumblebees must get through by crawling under the flap, must be at least 10 mm in length for the flap to fulfil its protective role.
  • The latch must be kept closed at all times.
    Examples of the most common „out of sympathy“ mistakes:
    The flap is used only at night. 
    2. The flap is left ajar for the little workers, or for lost dowels.
    3. The flap is not used at all.
  • The protective flap should be sheltered by an awning water-resistant.

We are buying a flap valve – what to focus on when choosing a flap valve

There are more products on the market, in various designs. We have tested the following three and can comment on them.

Currently, the most perfect Product (A) shown in the picture. It is robust, weather-resistant and, thanks to our group's designed hinge (Uhelon), ensures smooth operation without the risk of jamming. Furthermore, the hinge eliminates parasites attempting to enter the flight opening from above. The polycarbonate flap's canopy is firmly attached with screws to the flap's body.  

Product (B), as an alternative from which Product (B) originated. The model is widely used. It is by no means a bad product, just outdated in some respects. However, it can be easily modified.
However, we have recently noticed a problem with the durability of this product, particularly if it has been soaked by rainwater.
A polycarbonate canopy, cleverly inserted into the flap's body, is a good idea. However, if water gets in here, the flap collapses. Often, the canopy also blows off in the wind, and then it rains directly onto the flap. The older model had an external canopy, which was more advantageous from this perspective.

Product (C) The new model of the side flap is inspired by a German design. The model also includes a side trap for catching parasites. It uses the same hinge as Product (A).
The polycarbonate flap canopy is permanently fixed with screws to the flap body.  
Note: The effectiveness of this trap has not yet been fully verified. However, the flap's function is unaffected by the side trap, meaning it could also be included among top products.

We do not state specific manufacturers with regard to our Code, but you can find them on the Internet.

The described types of protective flaps are shown in the figures: 

Some manufacturers use Uhelon hinges on the louvres. This is a solution from Čmeláci PLUS, which they provided to them free of charge. See HERE

Protective flap for bumblebee boxes. For top model bumblebee boxes requiring no modifications.

Product (A) Recommended model based on the competitive flap. Incorporating the latest recommendations and insights.
Photo: Manufacturer's website

Protective flap for bumblebee nests from one of the manufacturers

Product (B). Older, but fully functional and widely used model. We recommend a few modifications.
Photo taken from the seller's website

Protective flap for bumblebees, supplemented with a side trap for parasites, from one of the manufacturers

Product (C) A new development in hive flap technology. A side-mounted hive flap has been enhanced with a parasite trap positioned near the flap. The trap's effectiveness is currently under testing.
Photo: Seller's website

Comparison and recommendations for adjusting protective flaps

Flap stickers

All types of protective flaps shown herein meet the requirement to cover the top 2/3 of the entrance hole and have a black tape for shading the entrance hole on the flap, see Description of the protective flap's key features and its application.

Repetition: A bumblebee returning to its nest looks for a dark spot that reminds it of an entrance to a dark tunnel. An external black covering (additionally with a bottom landing area that is not colour-differentiated) directs it to the landing board. It cannot get through here, and what's more, if it sits on the landing board, it makes it difficult for other bumblebees to get out, as it weighs down the landing board.
This is why it is really important for the sticker to have two layers – a black one underneath and an outer white one, or one the same colour as the entire flap, so that the sticker doesn't confuse the approaching bumblebees.

Solution 

  • if the flap is fitted with a flap black sticker This Don't rush. Cover it with white tape or paint so that the underlying black sticker is completely covered. 
    Careful leave the slot at the bottom free. You apply the colour or wrap to the existing one and always only to outer side latches to ensure the latch closes properly
  • If you decide on wraps, the ideal is Electrical insulating tape sold in hobby markets or electrical shops.
  • If you decide to Colour, are suitable water-based acrylic paints used in model making.
    The layers must be applied gradually, allowing each previous layer to dry.
  • If the latch has no label, please visit the advanced breeders section, where it will be described in detail how to apply the labels correctly (in preparation).
Easier replacement of the bee flap cover stickers

Adjustment of the flap. Covering the black strip with white tape. Only the lower viewport to be left.
Photo O. Hercog

Correct execution of the rebate using the flap for bumblebees

Final coating of the flap and check of the correct width of the body boarding area.
The dark spot below the white mark is an unpainted area, = visibility into the entrance hole. Photo K. Kučera


Electrical insulating tape

Electrical insulating tape

A bumblebee's view into a bumblebee flap

This should be seen by a bumblebee when it crawls out of the hive through the flap.
Clearance only in the bottom third of the corridor.
Photo O. Hercog

Surface roughness of the throttle body landing area

When bumblebees land on the entrance, they push with their heads and backs against the flap and crawl up towards the flight hole beneath the flap. They lift the flap and gradually slip underneath it until they get inside. It is advisable to make this slightly easier for them. roughen the climbing surface, so that they can climb better and lift the flap more easily.

The roughness of the boarding area is only carried out between the notch and the bending of the flap. At the same time, this area should have a dark finish, especially the part under the opening to the flap, as this helps bumblebees orient themselves for the correct approach to the flap.

If everything is handled correctly, then:

  • The worker bee with pollen baskets doesn't waste time looking for the correct entrance.,
  • Mask losses are decreasing,
  • The possibility of waxing and the mask getting stuck in the contact area of the body and the flap is reduced.

Note: loss of pollen masses always occurs, but this is how they can be reduced

Part of the valve covered by the flap (the surface on which the flap or valve rests) is a very important part of the hive because This surface forms a barrier to the parasite's penetration. 

Solution

  • The breeder would her should not reduce e.g. by excessively enlarging the inlet opening.
  • If you have a flap with a damaged valve, contact the manufacturer or look for solutions in the section for advanced breeders (coming soon).  

Products (A) and (C) meet these requirements. In the case of Product (B), hook-and-loop fastener is used, where we recorded instances of workers' legs getting caught in the hook-and-loop fastener. Nevertheless, the hook-and-loop fastener works and if it is painted over, it is not dangerous to bumblebees.,

Solution

  • We recommend using black anti-slip tape for the edges of the stairs. Tesa ANTI-SLIP tape has proven to be the most effective.Self-adhesive anti-slip stair tape from the hobby market.
    In terms of its coarseness, it's a material similar to sandpaper. However, compared to sandpaper, the belt is adapted for moisture and abrasion. 
  • We do not recommend carbon paper. for in damp conditions it loses its strength, crumbles and detaches.
  • Replace the Velcro strip with a non-slip stair tread strip. Use the same dimensions and placement as the original strip.
  • If the flap does not contain a strap, add one as per the recommended products.
  • Warning: the strap must not encroach on the flap's fold or even the part covered by the flap! 
    The bumblebee must be able to push its head under the rounded part of the flap and the strap/Velcro – this means a gap of approximately 5 mm. In the bend of the flap, it would be more difficult for the bumblebees to lift the flap, and in the case of the strap, even under the flap, the flap would not fit properly.
  • If you do not wish to change the Velcro strap, we recommend painting it black at the level of the entry hole. This creates a mark to guide the bumblebees when they fly through.
    The mark should not encroach on the mouthpiece, as this area is better left unobstructed for cleaning the valve.

Advantages:

  • the black surface directs the bumblebees to the correct flap landing spot
  • a rough, only granular surface makes it easier for the flap to adhere to the body, while at the same time not leading to a loss of fluffs
  • Easy tape cleaning
  • Unlike Velcro, there's no risk of a bumblebee getting stuck on the hook-and-loop fasteners.
 

Alternative solutions:

  • If you do not have anti-slip tape available (recommended), or hook-and-loop fastener tape (the part with the hooks), shallow horizontal climbing notches can be created in the landing area with the tip of a knife.,
  • however, notches should not extend below the flap so as not to reduce its protective function,
  • We recommend repainting this surface black (a dark colour), to guide the incoming bumblebees.

.

Bumblebee flap correct execution of tape and notches on the body's landing surface

Correct installation of the anti-slip strip and notches. The strip ends under the cover. The cover sits flush with the body. The notches are shallow.
Photo O. Hercog

Tesa anti-slip best tape for anti-slip strip at the flap's entry area

Recommended material for replacing the Velcro on the boarding surface of the flap body

Repair of the colour scheme for bee boxes

Repair of the coloured design of the latch using white electrical tape.
Colour repair of hook-and-loop fastener to a dark landing patch.
Photo K. Kučera

Unsuccessful modification of the decals and anti-slip tape on the bumblebee flap

Unsuccessful damper adjustment. Errors described in the image.
Photo: K. Kučera and A. Ungerová

Further recommendations

For the flap to function correctly, its geometry (dimensions and angles) is important. Therefore, we recommend that breeders purchase a flap that has been tested in practice and we are deliberately not publishing the instructions for its manufacture.

The products listed above have these characteristics, yet we have a small recommendation for easy adjustments/checks.

  • Product (B) model has located under the inlet opening a countersunk screw.The screw is intended for operating the flap during queen bee training. The manufacturer placed it there and wouldn't heed advice that placing the screw this way would bother the queen bee and, in extreme cases, her head could be injured by the sharp edge of the screw. It's a bit like putting a fence post right in front of your house's front door... ;-)“  
    Solution
    – remove the screw, fill the hole and repaint it
    – instead of a screw, there are other methods for regulating the damper that do not damage the flap with additional holes see Damper Control and How to teach a queen bee to use the flap (in preparation)
    – if you insist on learning with screws, then the screws should be higher up and only on the sides, not under the entrance hole, see photograph. In detail in the advanced section.
  • If you are using an old, previously used flap, check before the season to see if moisture has caused damage to the flap body and loss of contact area.
    Solution
    – it is good to temporarily remove one side panel and perform a visual inspection from the side.
    – if the flap is warped, exchange it, or repair it so that the flap closes correctly
  • If you use a flap for more than one season, can wire hinges cause me Clutch wear 
    Solution
    Replace the flap (plastic part) with a new one
  • If you have contaminated flap surfaces and abrasive tapes, Clean the flap and fit new straps
  • Vent if you don't have torecoat with new paint The smell of the trap with bumblebees acts as an attractant for other bumblebees.
Correct execution of the front installation surface of the flap body for bumblebees

This is what the valve body's seating surface should look like.
Shallow non-contact nicks and Tesa anti-slip tape.
Photo O. Hercog

Bumblebee flap example of faulty execution

Poor execution of the damper adjustment. Grinding the groove has reduced the protective area of the entry part of the body, which is covered by the flap.
Photo: K. Kučera

Moisture damage to an old bee house damper

Example of why we recommend removing the side panel and checking the body on older flaps. Collapse of the body due to water ingress onto the flap.
Photo: K. Kučera

Failure of the bee flap valve due to water damage

Once the side panel has been removed, it is evident that the flap barely touches the side panel. This flap is not functional. Damage caused by moisture.
Photo: K. Kučera

Flap cover and side panels

Just like the side panels, the flap's canopy is very important – prevents water ingress to the valveYou.
If Namaste throttle body at the flap location, The flap adheres by capillary forces firmly to the base and the bumblebees won't lift it.

Canopy, as well as the side panels prevents the wind from lifting the flap.

The polycarbonate (plexiglass) canopy is supplied separately for commercial products, or as part of a single package together with the protective flap.


Possible solutions:

1. Lid with a separate visor

The canopy is mounted on the box above the flap. This solution was used by older models of the Product (B).

When fitting the canopy, position it so that it covers the flap, but at the same time allows the latch to be lifted (ideally fully to a vertical position). .

2. Flap with a hood attached by screws to the flap body

If you have a robust slide body, such as Product (A), then a thin polycarbonate roof can be screwed onto the slide body. The roof is thin and flexible, it will flex on its own and water will drip away from the entrance.

3. Flaps with canopies slid into the recess in the flap body. 

The new model of Product (B) unfortunately doesn't have a very well-designed canopy. Although the intention was good (the canopy is easy to remove and slots into a recess in the back wall), the execution couldn't have been adequately tested in practice. Otherwise, the manufacturer would have realised that Water is entering the groove in the backplate.. It stays there and loosens the backboard. As a result, not only does the roof either not hold or cannot be fitted. There is also a risk of damage to the backboard, which may then not sit precisely on the hive and that is a big problem – parasites can enter the hive through leaks between the hive and the backboard. In addition, there is overall Valve deformation and reduced lifespan.

Solution
  • The roof connection needs to be at least temporarily secured. protect against water ingress.
  • We recommend covering this spot with a high-quality water-resistant textile tape so that water cannot flow under the inserted roof along the back plate. Therefore, stick the tape like an outer corner from the roof to the hive.

You can easily make an elegant canopy that will protect the flap very well. You'll find instructions HERE

Bumblebees PLUS - Roof mounted on bracket

Bumblebees PLUS - Roof mounted on bracket
Photo O. Hercog 6/2020

Bumblebees PLUS - Canopy over the droplet

Bumblebees PLUS – A roof over the drop
Photo O, Hercog 6/2020

The correct placement of the roof on a bumblebee nest with water protection

Correct placement of the canopy protecting the flap. The tape edge improves the canopy's visibility while also shading the entrance.
Photo O. Hercog


Inappropriate solution for the bee home's flap roof

Rear wall adhesion due to water ingress into the canopy notch. One season of use.
Photo: K. Kučera

Structurally inappropriate solution for anchoring the roof to the hive's flap

Side view of canopy notch damage. Flaps Product (B) after one season.
Photo K. Kučera

Storage of protective flaps

When out of season, we recommend storing the flap in a dry place.

Bumblebees use a protective flap on their nest

Don't worry about the bumblebees with the flap bothering you. They will manage it And it's up to them.

The only bumblebee that is It's necessary to help (teach her) at the beginning., so to get it used to the flap Queen bee and this soon after settling in.

The sooner you get the queen bee used to the excluder, the sooner she will be protected., For example, in front of another mother who might want to settle in the nest and drive away/kill the original inhabitant.

The mother needs some time to get used to the click.  

The procedure for teaching her to use the flap can be found HERE

Conclusion

  • A protective flap is a vital part of the bumblebee's nest And so we've been using it since the very beginning.
  • To start breeding We recommend one of three commercial flap valves provided.
  • The most important part of the flap is the body's landing area covered by the flap and the flap itself.
  • The parts listed above must be uto keep clean and check, whether the flap fully seals against the body.
  • We never leave the flap open or ajar.
  • For the type where the suspension mechanism is handled by rings, Check that the latch is not sticking..
  • Canopy must be above the flap so that it prevents water from leaking between the flap and its body.