Checks and work in the alcove
What you will learn here
- Why and whether to inspect a hive at all
- It has advantages and disadvantages
- As controls to be carried out
- How and when to carry them out
- What to check at the hive inspections
- Basic procedures for resolving findings
Datum poslední aktualizace: 2/4/2026
Contents
Introduction
Why do we recommend inspections when the hazard is fitted with safety devices?
Co jsou to "kontroly hnízda" a s jakými riziky jsou spojeny? 🤔
So is it necessary to check the nest and when should one get on with it?
Types of internal controls for bumblebee nest condition
Basic routine nest check
Deep nest inspection
Cleaning the nest and hive
Cleaning the nest
Ulcer cleaning
Lining replacement
Return of the nest to the hive
Introduction
For some, it is a controversial topic, but the practice of many breeders shows that toControls are a way to proactively and promptly resolve problems in the hive.. Checks in the ulcer help in protection against parasites, but during checks, you can investigate and resolve other problems, for example, the beginnings of mould, etc.
Checking the contents of a hive is usually a problem for beginners: „The hive is full of buzzing bumblebees and I'm supposed to stick my hands in there and even look at it? I'll never manage that!“
Yes, it looks wild at first glance, but it's not as difficult as it might seem. It just requires a bit of overcome fear and use the correct technique And that's what these pages are about.
It's also important to consider When should you start checking. It certainly makes sense when Something strange is happening in the nest. For example, when the activity of a strong nest weakens even before the departure of sexual individuals, or when another anomaly appears. It's no use to inspect the nest in the solo phase, or withgenerations of workers.
Why do we recommend inspections when the hazard is fitted with safety devices?
Warning
- All procedures and practices apply to a developed nest with at least one generation of bumblebees.
- Checks and interventions in the solitary phase (the mother-queen is alone) are unnecessary and harmful – they would disturb the mother, damage the nest, and it would perish.
- So, only carry out the first routine checks when workers appear in the nest.
Although Will you provide safety equipment for the fright., and parasites can get into them, or there a problem may arise that you will not detect in time. Parasites (apart from the bumblebee), It attacks gradually and stealthily. Even if a parasite penetrates an ulcer, you won't notice its action immediately. You'll recognize it only later from various symptoms and often only when it's too late to save them.
As an example, the action of the hawthorn tubeworm (Aphomia sociella) can be seen HERE If you find it in time, you can prevent damage to the nest. If you wait until the larvae appear on the surface of the bedding, it's usually too late to save them.. This is the final stage, in which the bumblebee nest is often consumed.
Just as beekeepers look after hives with bees, we need to look after hives with bumblebees. Do you remember spring and our slogan „Buying a beehive is just the beginning..Bumblebees Plus simply cannot agree with the “get bumblebees and forget„ approach. If you get a bumblebee nest box, it needs
Don't be afraid of the inspections in your apartment.. We can assure you that you will be inspected on your first attempt. However, everything can be managed and you will gradually gain practice and confidence.
Co jsou to "kontroly hnízda" a s jakými riziky jsou spojeny? 🤔
Some breeders fears opening the beehive with bumblebees and get down to checking.
Other breeders argue that during the inspection Damage the nest or doesn't carry out checks, or only carries out routine checks – by looking at the lining.
Yes, when checking the nest you can cause certain damages.But they are always smaller, than if you don't do them and it gets into the nest parasite and cause actual damage there.
For example, you might carelessly break open a waxen dome on a nest and damage the cocoons or waxen cases hidden beneath. This operation too but it can be managed carefully no damage will occur.
Sometimes breeders say that they During an inspection, the wax seals will open/be damaged and larvae will emerge from them, which will weaken the nest.
Yes, it can happen, especially the first time You are opening the wax ceiling above the nest. Cases located here but they practically always only contain male larvae. These cells are built in so-called beams and are often waxed to the wax ceiling of the nest. When the ceiling is opened, the beams can be damaged and some larvae may fall out. The wax casings of queens and workers are usually not connected to the ceiling and therefore will not be damaged.
However, the loss of male larvae is not a problem for the nest. Bumblebee nests, you see, almost always produce a surplus of males. Sometimes, the workers themselves reduce their numbers and carry them outside the nest. Furthermore, at a certain stage of the nest, workers can lay unfertilised eggs, from which males hatch. Additionally, males can mate repeatedly, so there are always plenty of them.
Well gentlemen, in the realm of bumblebees, the male is on the back burner...
Interesting fact
- Bumblebee larvae that fall out of their wax casings are not rehabilitated; they are taken out of the nest as larvae with no chance.
- Jaromír Čížek observed that only in the buff-tailed bumblebee (Bombus subterraneus) did rehabilitation occasionally occur, and workers continued to care for larvae that had fallen from their pupal cases.
The nest check has one more Specific risk. The point is, if the fright oopening outdoors, it can practically to sneak in unnoticed parasites. It could be the parasitic fly Brachycoma devia, or the small but insidious wasp Mellitobia acasta.
Proto We recommend carrying out inspections indoors., where you take the fright after closing and open it in the dark and red light. Quick visual checks can also be performed Evening outdoors, when these parasites aren't flying. Deep, or ongoing checks a Interventions We always recommend performing Always indoors.
So is it necessary to check the nest and when should one get on with it?
On our pages We recommend carrying out checks, At least you basic. Because a basic check won't tell you anything about the condition of the nest in time., we recommend combining them with occasional in-depth checks.
We understand, however, that for some breeders, carrying out checks is a problem. However, we have presented the arguments for carrying out checks – checks are a preventative measure and the path to successful breeding. So it is up to you how you decide. PIf you decide not to carry out inspections, that is your decision and we respect it. In that case, form your own opinion and gain your own experience. Those breeders who they lost their nest after an attack by a moth/parasitic wasp on this matter they are clear.
When willinspection of the nest
- Quick preventative checks They're quick and easy – do them each or at least every other day since the first generation of workers appeared in the nest (checking the solitary phase is possible, but not necessary)
- Deeper checks are more demanding, do them
– as a preventative measure when the oriental fruit moth appears(from the warm spell in May)
– as reaction to the situationand when Something non-standard is happening in the nest
Unusual situation for example:
- the moment when the activity of a strong nest significantly weakens even before the departure of the reproductive individuals
- On the garlic, listless/dead individuals are appearing
- Parasite traces are appearing in the nest
- Bumblebees do not go in and out of the hive.
- other anomalies.
There's no point in attempting an in-depth inspection of the nest if
- it's in him mother in a solitary phase
- The nest contains one generation of workers
Warning
Opening a bumblebee nest during the day and in daylight carries the risk of the parasitic wasp *Melittobia acasta* flying in. It is so small that you cannot see it with the naked eye. It is attracted by the scent of the nest and unerringly follows its source. Just one individual is enough to practically condemn the nest to destruction. You can read about this bumblebee parasite: HERE.
Therefore, we do not recommend opening the enclosure unnecessarily and for extended periods in daylight; it is safer to carry out inspections at night, preferably under red light.
Types of internal controls for bumblebee nest condition
a) Standard routine preventive check-up
– View into the nest on the lining after opening the roof
b) In-depth check
– Nest condition (wax comb) check after uncovering the lining
Basic routine nest check
Objective of the inspection
- Basic indications of nest and ulcer status
- Visual inspection and olfactory check of the nest lining surface
- Ulcer examination
How often should the check be carried out
- We recommend doing it daily, or every other day
How long will it take
- A standard check will take you 2-5 minutes.
When and where to carry out the check
- We recommend carrying this out in the evening when checking and cleaning the flap
- We recommend conducting a more thorough inspection and intervention indoors, or limiting the inspection time to the absolute minimum; a hive left open for too long carries the risk of parasite infestation (the parasite is attracted by the scent of the nest, which emanates from the hive).
What equipment will you need?
- Beekeeping catchphrase
- Plug/bung to close the flight entrance
- Long tweezers
- Red lantern/headlamp
- For those with bee venom allergies, we recommend beekeeping gloves and a veil for protection.
Tools and their descriptions can be found HERE
Inspection process
Opening the hive
- Seal the air intake – secure the closed flap with a peg, or close it with a stopper, for example a cork stopper
Note: if checking after dark, or if traffic at the ferry is light, do not close the entry gate - Carefully Take off the roof, If you can manage it without jolts, the bumblebees won't even notice.
- If in use, remove the moisture wicking cloth / protective mesh
- At a red light please check
- If any individuals emerge from it, remove them with a bee escape into a jar and, after the inspection is finished, tip them all back into the hive.
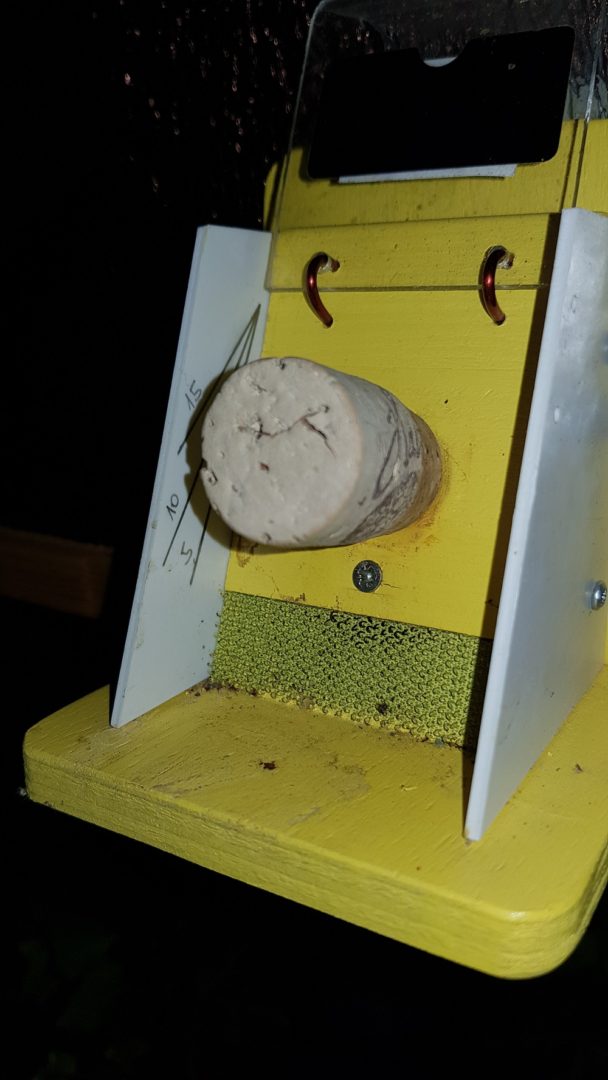
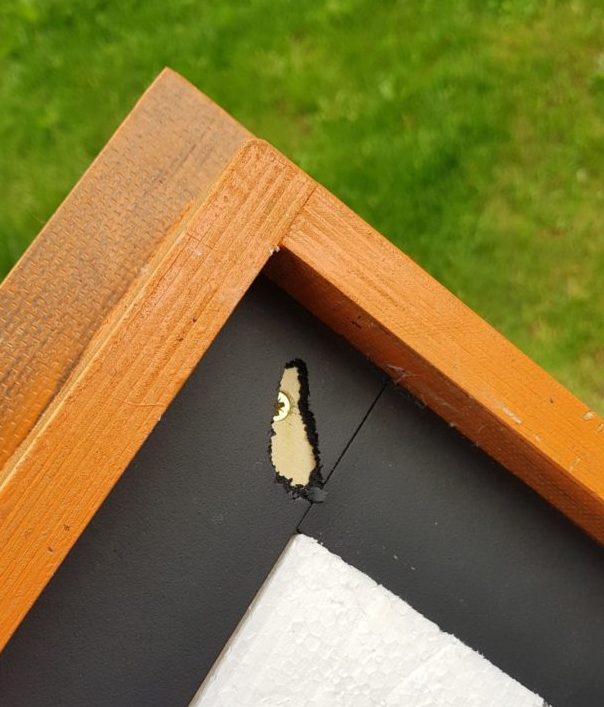
Sealing the owl's flight hole with a ground cork stopper
Beekeeping catchphrase
Lining surface inspection
- Look under the roof, on the lining and in the corners of the hive, checking for excessive mould formation (mould can also be smelled). The presence of a small amount of mould is not a major problem if the hive is ventilated through a vent.
If so, it is necessary to ventilate more intensely. - Lining it can be damp, it shouldn't be completely wet
If it is wet, you need to ventilate more intensely and use and change the absorbent cloth. - On the lining, under the roof, in the corners of the nook, on a wet rag, etc. Parasites shouldn't be – moth tortrix, parasitic wasps (size up to 2mm), flies, fly larvae, or dead bumblebees
If so, a thorough inspection, cleaning of the nest, cleaning of the hive, and replacement of the bedding are required. - Nest by should not smell(sometimes the smell of damp moss can be detected)
If so, and at the same time you see dead bumblebees, larvae, or parasites on the lining, a thorough inspection is necessary to find the problem, and the nest and the surrounding area must be cleaned. - Ventilation opening should not be covered with bedding. However, bumblebees often cover it with bedding if they feel a draught
If the ventilation opening is covered, it is advisable to push the lining aside with your hand or long tweezers - Lining should cover the entire bottom so that the bumblebees don't defecate there
If there isn't enough lining, top it up and cover the bottom of the nest box; create a pocket/cavity for the bumblebees to enter the nest box – see HERE
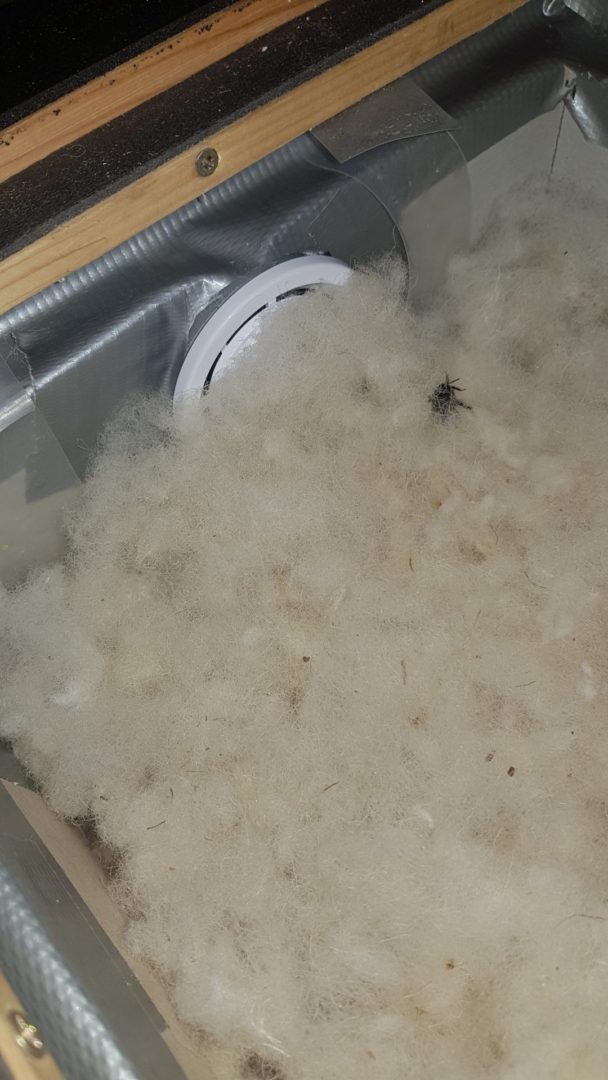
Ventilation opening covered by lining
Internal ulcer check
- Take a look seal ulcer, so that it is not damaged (bumblebees sometimes gnaw through it)
- Look around roof, so that it is not twisted and fits well
- Take a look Ventilation grille, so that it is not gnawed or waxed
- If you find any faults, rectify them as soon as possible.
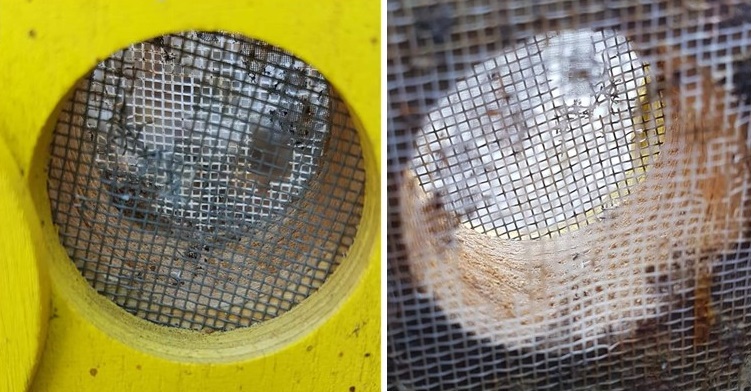
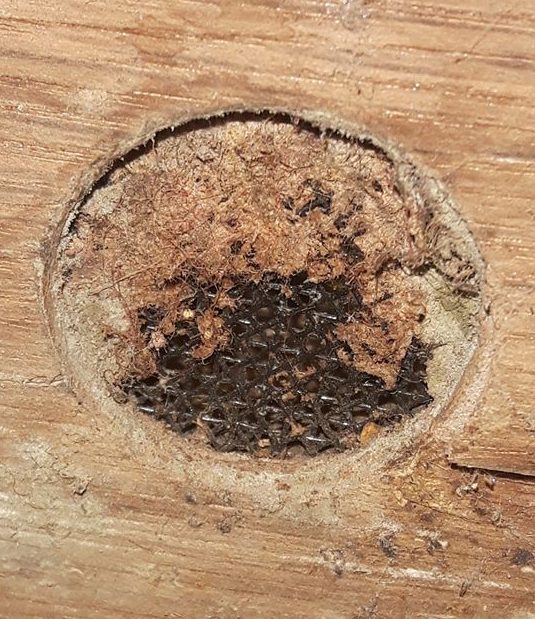
Ventilation of a hive sealed with wax
Sealing under the roof chewed through by bumblebees
Ulcer closure
- Cover the shock absorber (rag, protective net), close the roof
- Verify that The hive roof has settled well and is sealing.
- You can also check how agile the nest is – after tapping it (once you’ve closed it), the nest should respond with a strong buzzing sound. Nests with problems often respond apathetically.
- After the ulcer has healed release the air intake; but leave the flap down (folded) – as in normal operation
Deep nest inspection
Objective of the inspection
- Visual and olfactory inspection of the nest lining
- Ulcer examination
- Discovery of a nest and verification of its condition by sight, sound, and smell
How often should the check be carried out
- We recommend carrying out this at least once a month, ideally once every 2-3 weeks during the period when pests such as moths appear (from May onwards).
How long will it take
- The check will take you 45-90 minutes.
When and where to carry out the check
- We recommend doing it in the dark
- Carry out the check strictly indoors. A lockable room with no light ingress is highly recommended, preferably a bathroom with a bathtub.
- We recommend carrying out the check in a bath from which the bumblebees cannot climb out. An alternative is another container with a smooth surface.
What equipment will you need?
- Beekeeping catchphrase
- Plug/bung to close the flight entrance
- Long tweezers
- Red lantern/headlamp
- Hard case for nest cover
- Bumblebee glass with funnel
- Sugar water feeder
- For those with bee venom allergies, we recommend beekeeping gloves and a veil for protection.
Tools and their descriptions can be found HERE
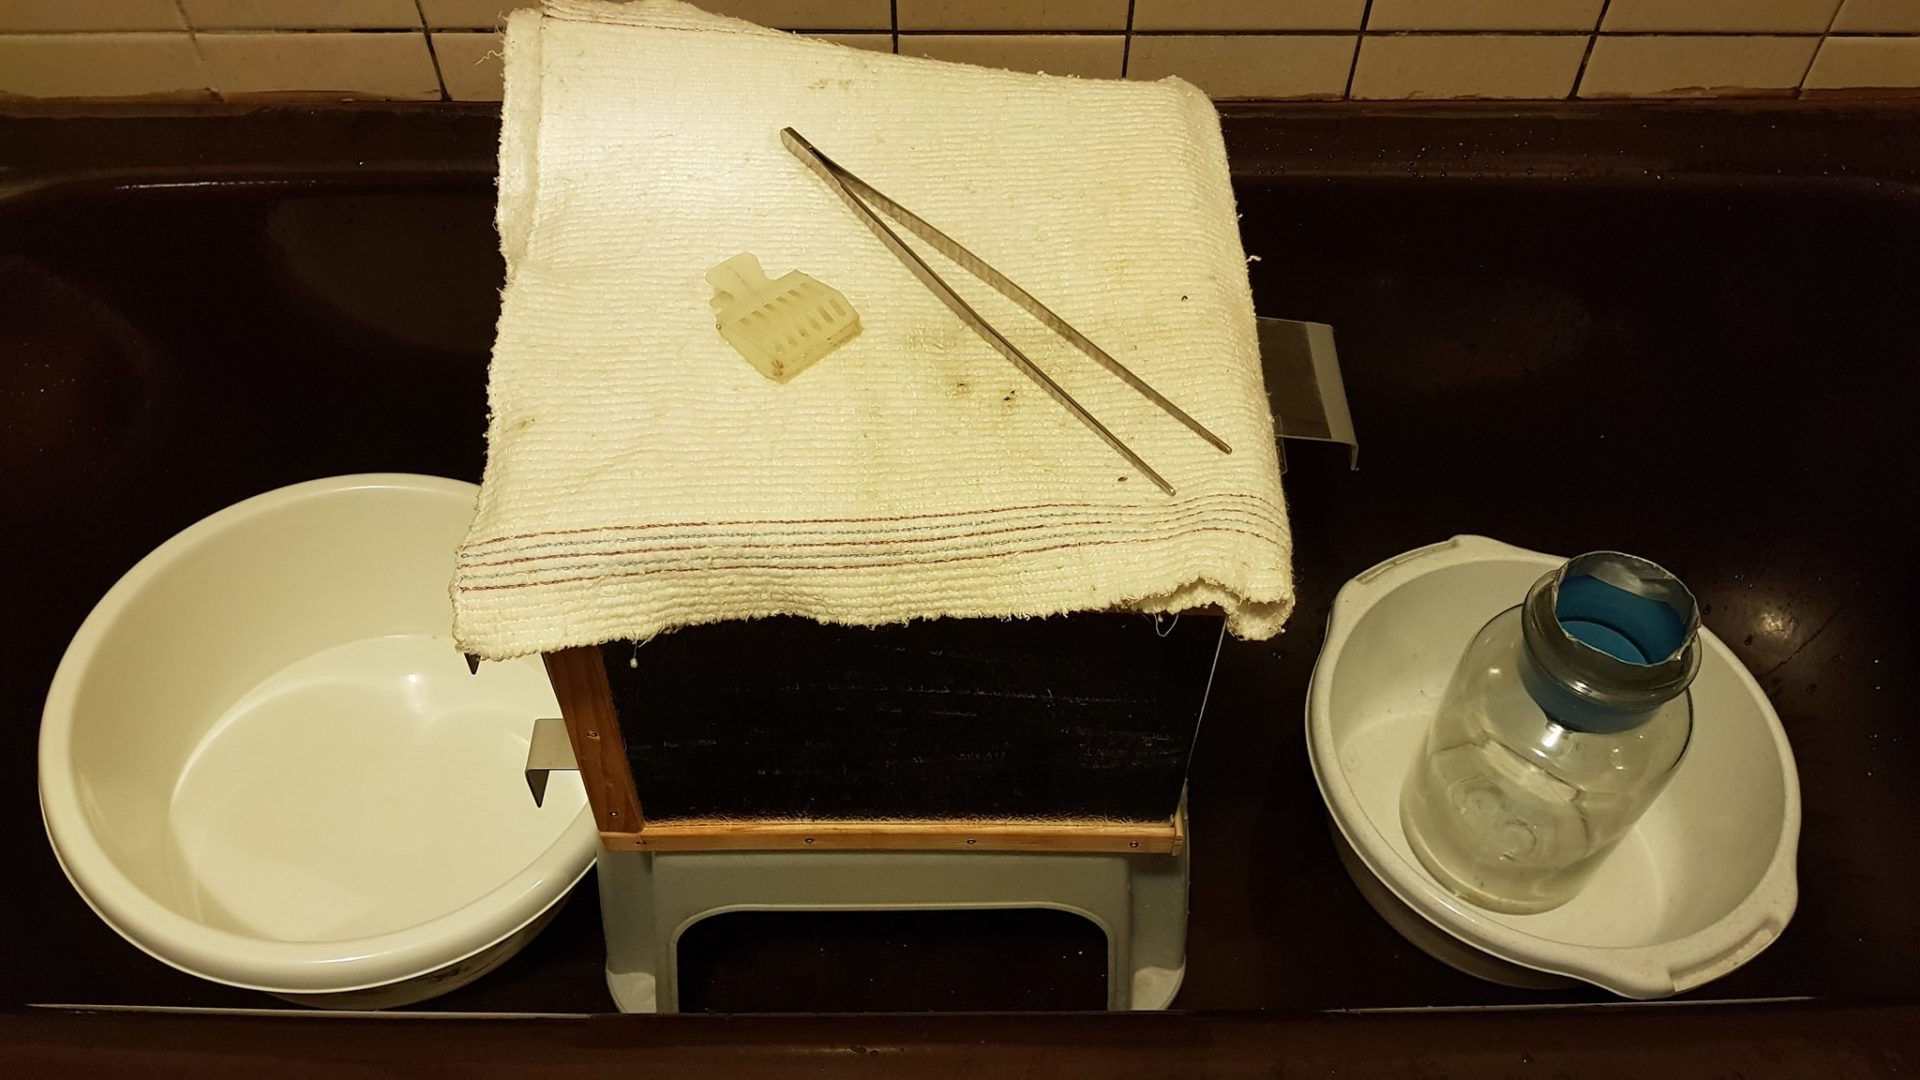
Deep nest inspection
Photo O. Hercog (2019)
Inspection process
Opening the hive
- Close after dark, the flight opening – secure the closed flap with a peg, or close it with a plug, for example a cork
- Bring the awe indoors to a dark and preferably sealable room
- Place the perch in the bath, or in another container with a smooth surface
- Please wait Nest calming, In the meantime, prepare everything you need
- At the bottom of the bumblebee catcher jar, we recommend adding a bit of lining such as „Airbag“(if you use lining from its nest, bumblebees will be known to calm it)
- At the red light Carefully remove the roof; if you manage it without jolts, the bumblebees won't even notice.
- If in use, remove the moisture wicking cloth / protective mesh
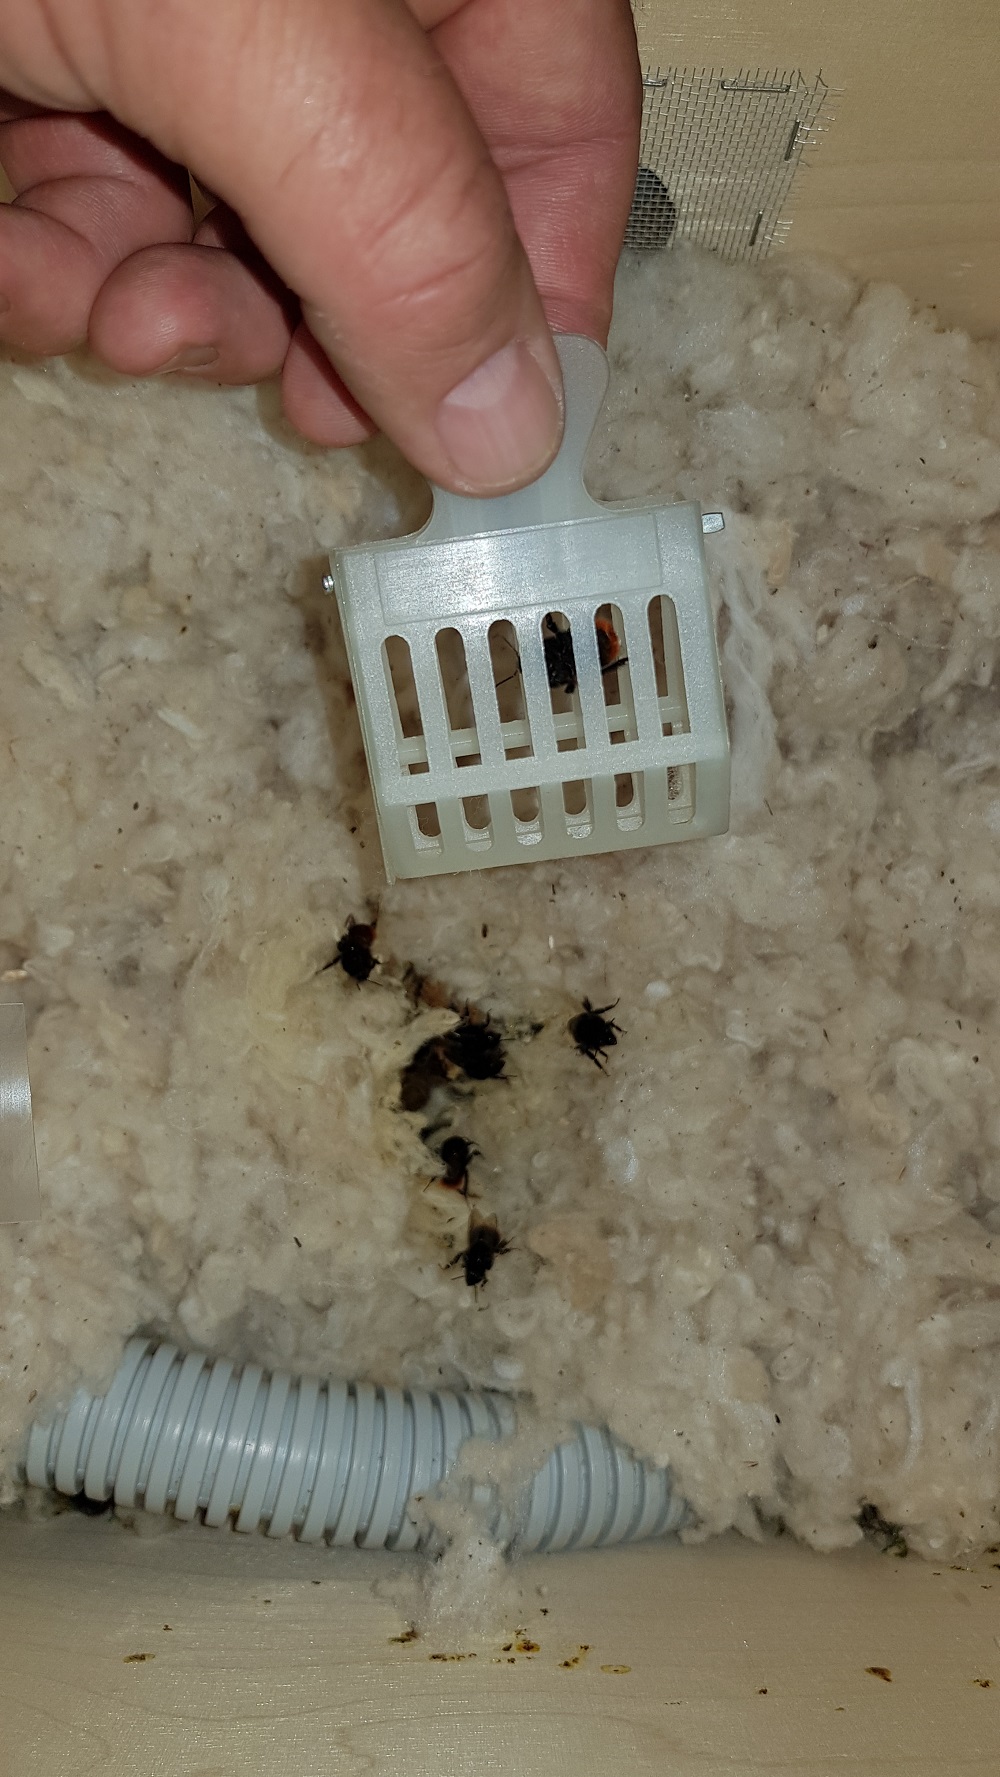
Catching individuals
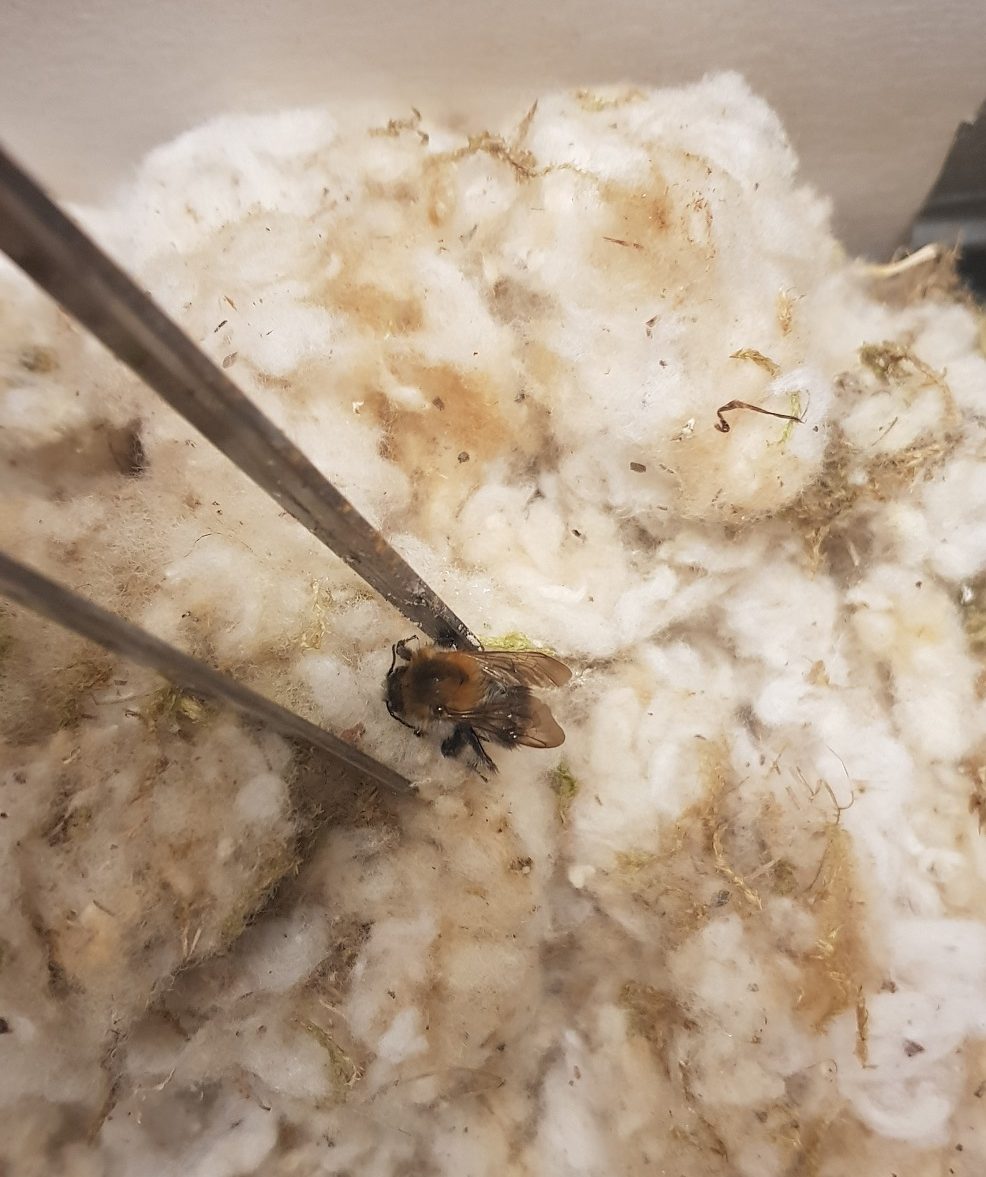
- Using a beekeeping lure Catch individual bumblebees on the lining
- Throw in the bumblebees into a jar with a funnel, so they don't climb out
- Gently and bit by bit with tweezers Remove the liner and catch bumblebees as they appear
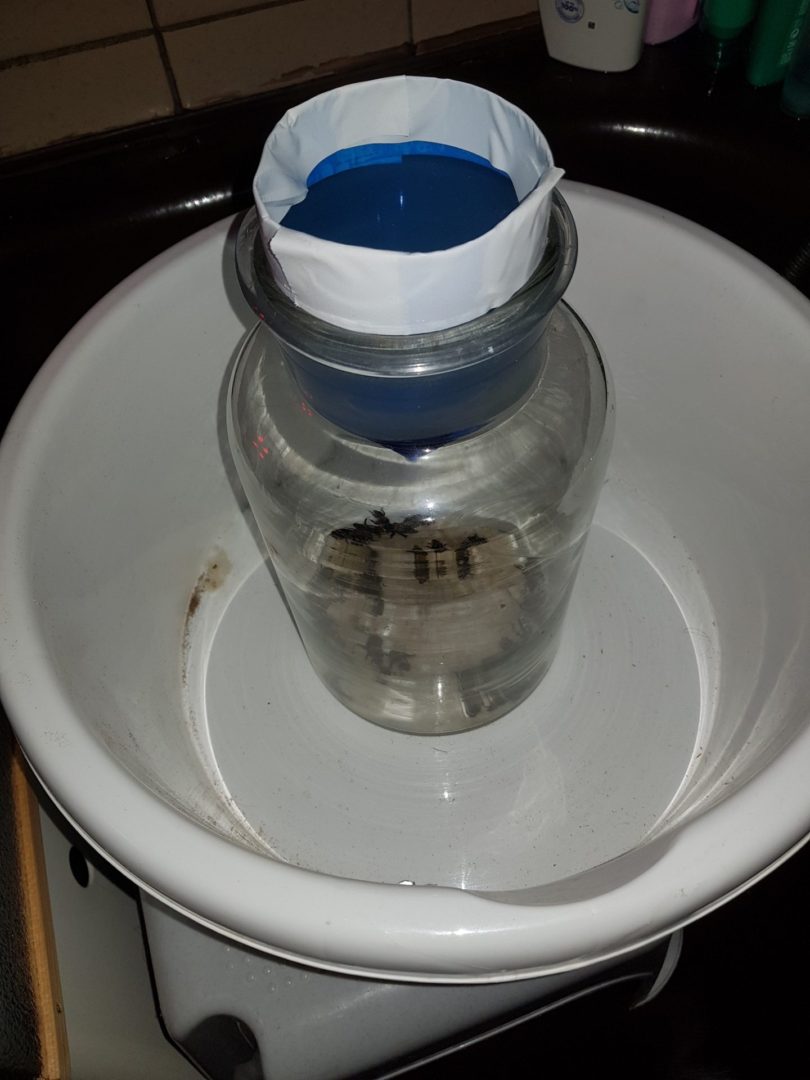
Bumblebee relocation jar with a PET bottle funnel
Lining inspection
- The procedure is the same as for a basic routine hive inspection.
Nest opening
- Gradually remove the lining until you reach the wax cap of the nest (not all species have this),
- Carefully open the clamp with tweezers and spread it to the side.
- If more workers/individuals emerge, catch them and put them in a jar
Wax nest of the large earth-bumblebee (Bombus ruderatus)
Wax nest lining of a large earth bumblebee (Bombus ruderatus)
Wax nest of the large earth-bumblebee (Bombus ruderatus)
Photo O. Hercog (06/2020)
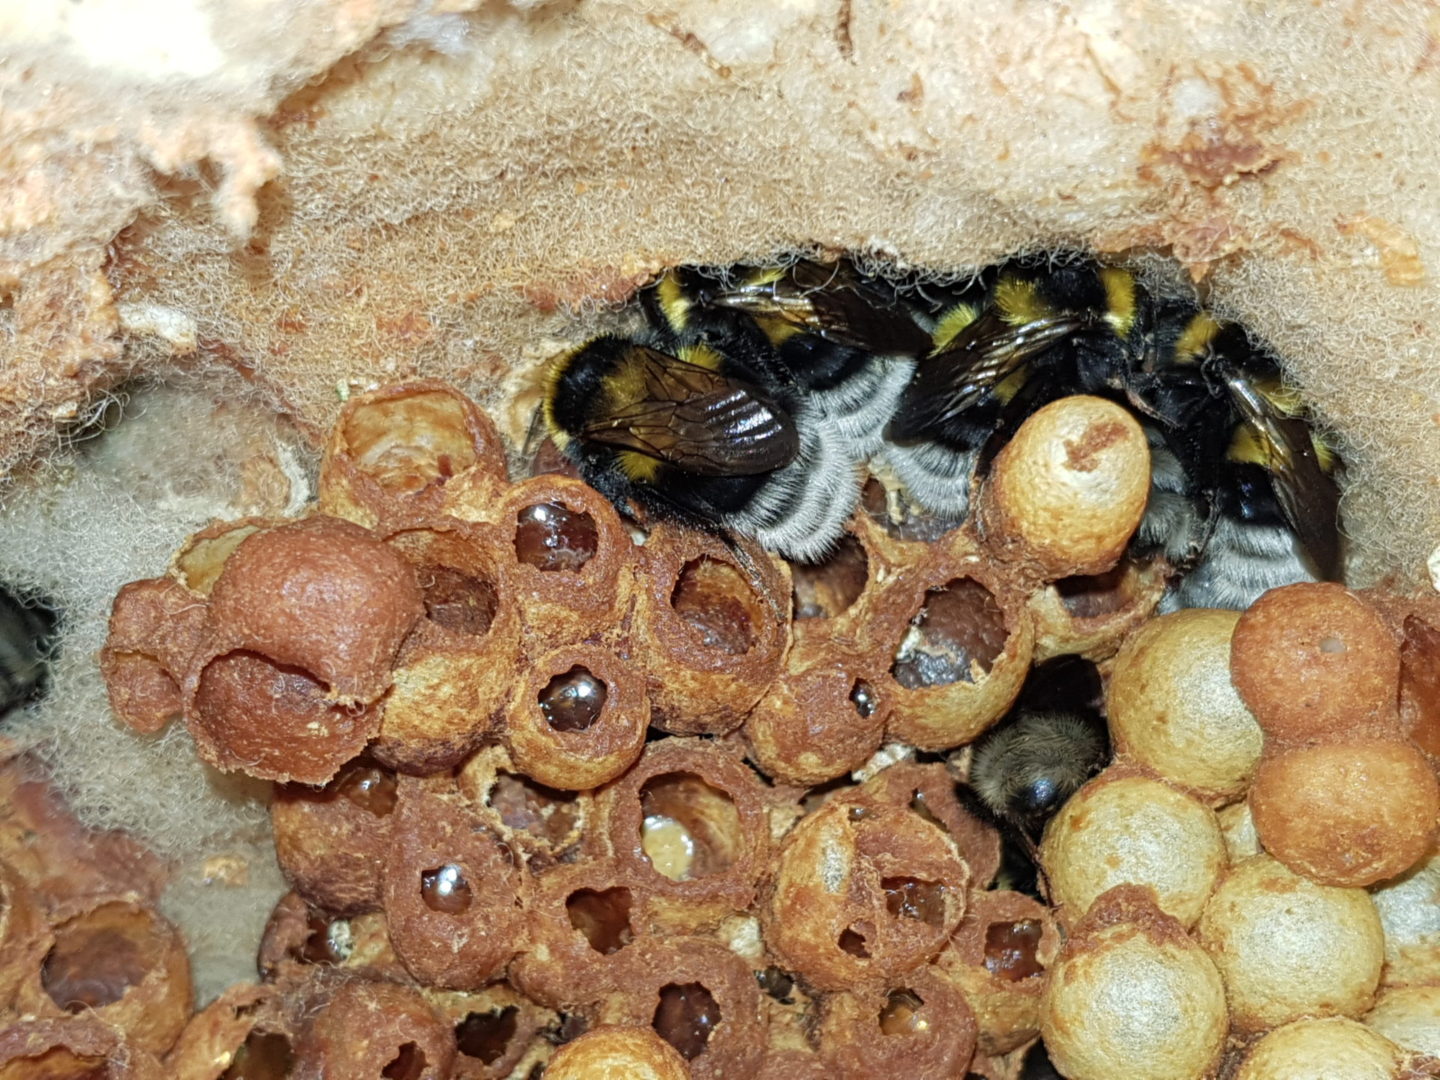
Young buff-tailed bumblebee mothers hide under the nest
Photo O. Hercog (06/2020)
Nest check
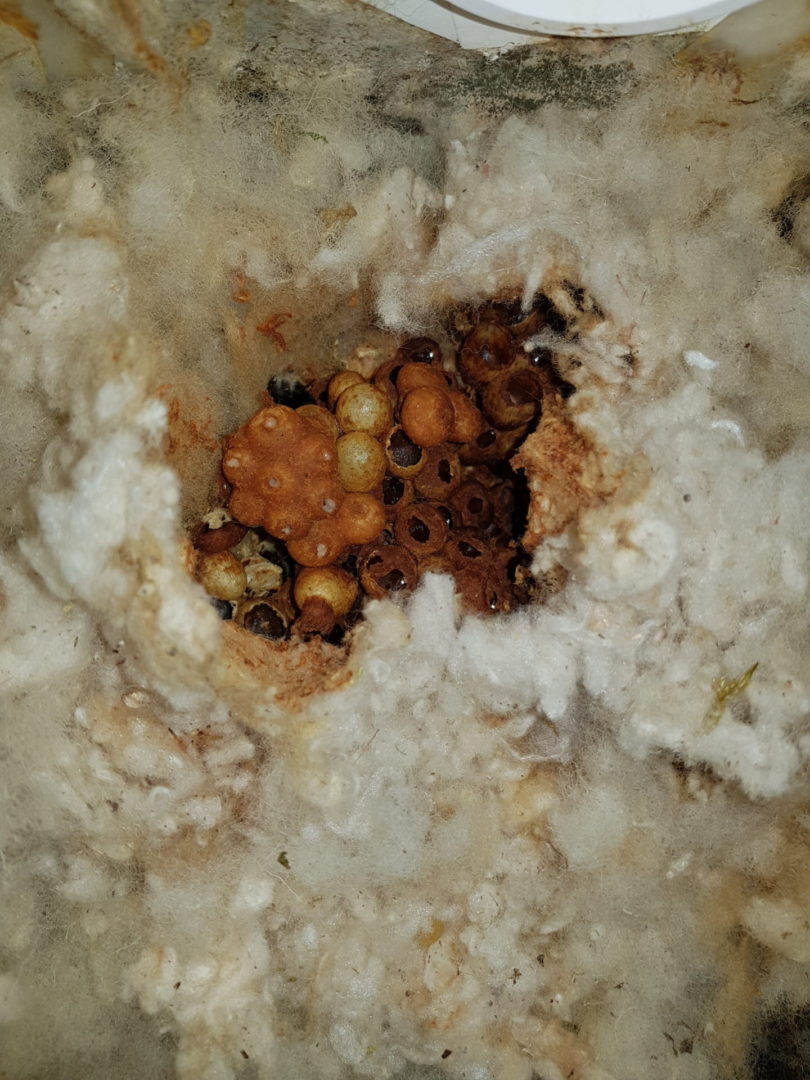
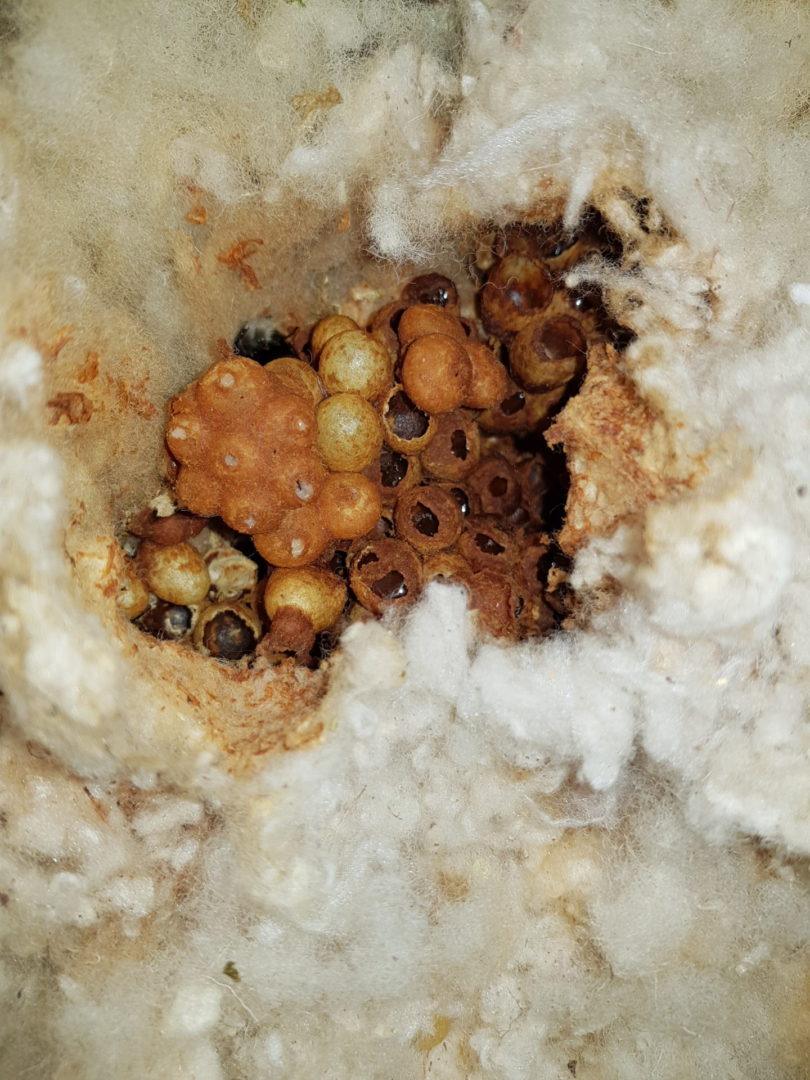
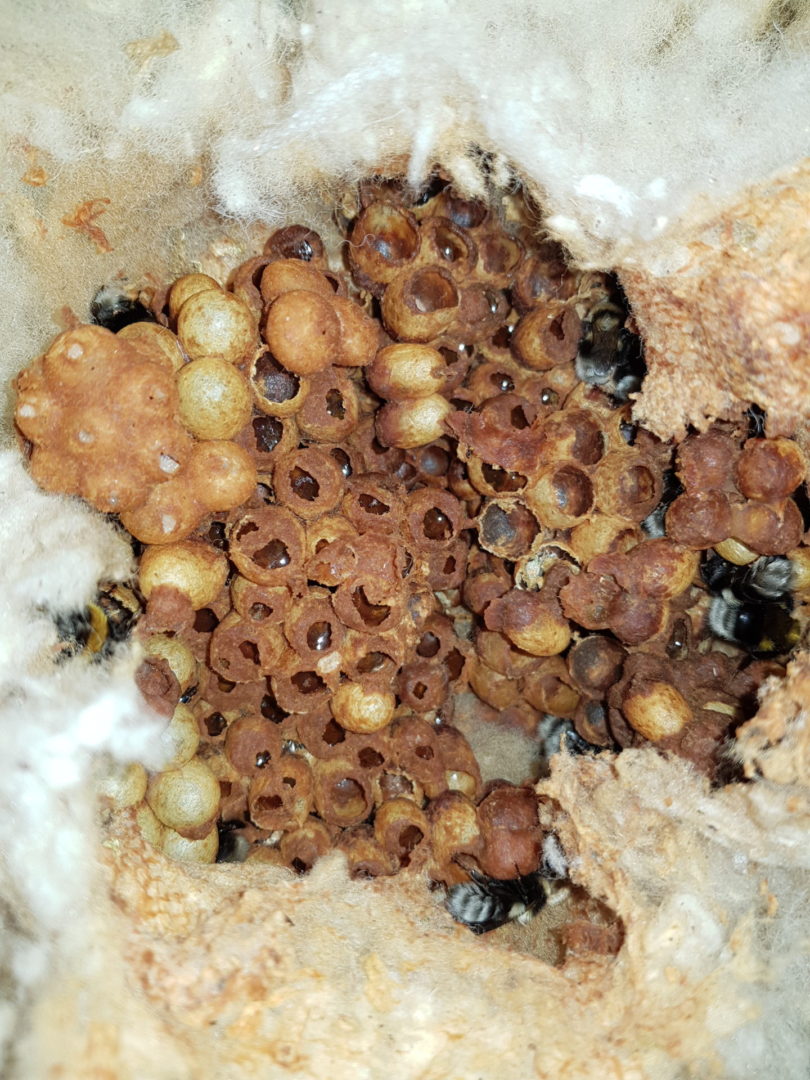
- To see in the nestand wax works, cocoons, laying, worker bees. The queen mother / young mothers will mostly hide under the nest, or will buzz intensely and threaten you.
- Podívejte se, jestli mají čmeláci v zásobnicích nektar – sladinu
Pokud ne, podejte jim v období sucha Weaning. - Look and search for anomalies
- Watch carefully, to see if you can spot in the nest adult parasites, or his Houseflies(e.g. bumblebee wax moth Aphomia sociella), its chucks (parasitic flies, braconids, etc.), larvae or pulpous Much appreciated.
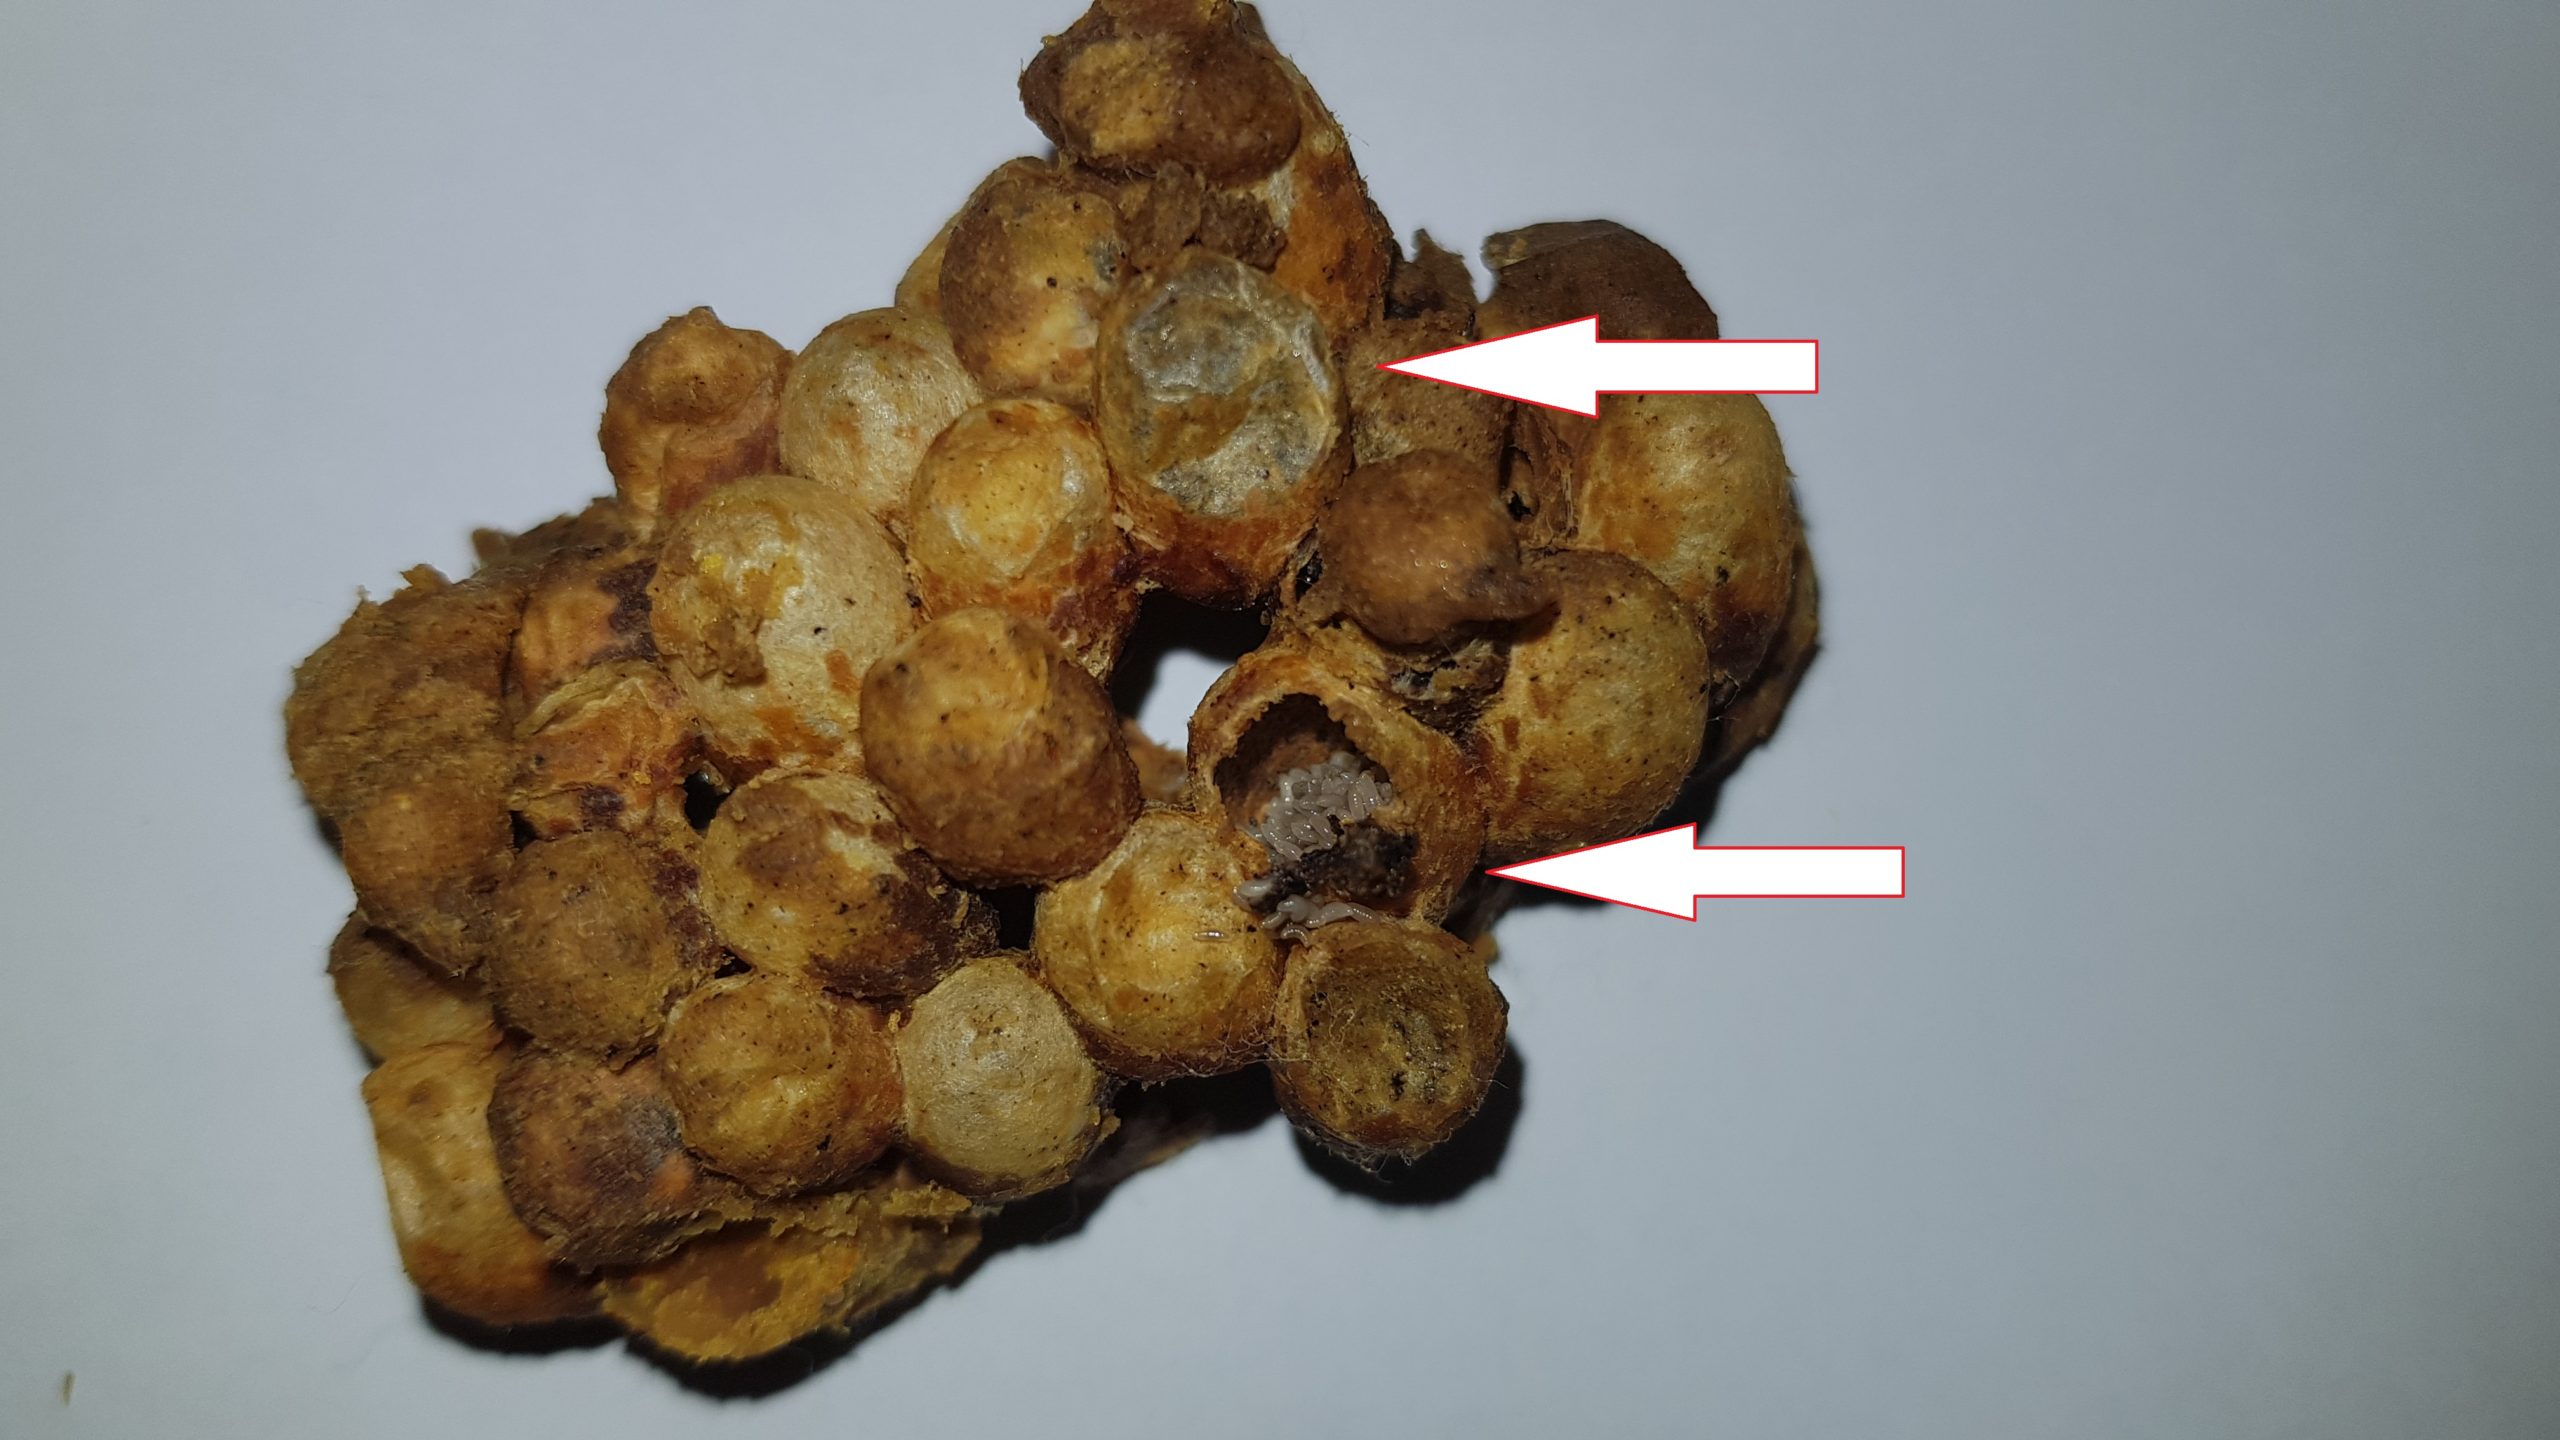
If so and the nest and the fledgling need to be cleaned with long tweezers and the nest and ideally transferred to clean bedding - Watch carefully, to see if you can spot in the nest signs of parasitic infection:
– clothes moth larvae fibres,
– openings in the sides of cocoons / wax casings,
– voraciously eaten beeswax work,
– cocoons / wax casings eaten by larvae of the parasitic wasp Melottobia acasta
– movement of small creatures in a wax work
If yes, and the nest and the young need to be cleaned and the nest moved into clean bedding - Nezapomeňte – udělejte si nějaké fotografie vnitřku hnízda a ty si později prohlédněte.
Budete mít srovnání, jak se hnízdo vyvíjí a také se bude schopni v klidu podívat, zda-li jste něco nepřehlédli.
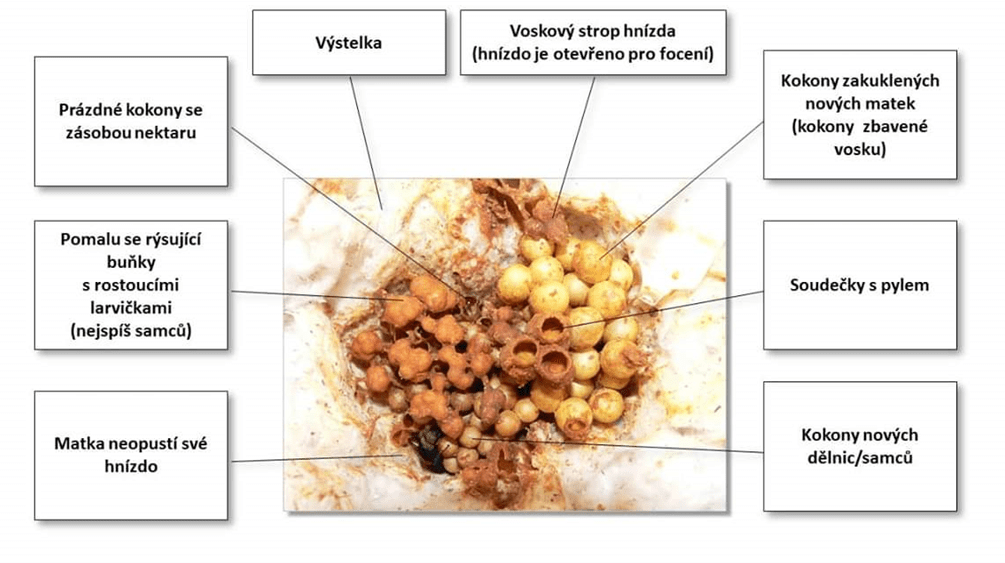
Description of a bumblebee nest
Photo: O. Hercog
.
Mají čmeláci v zásobnicích sladinu?
Nest raid demonstration Spindle moth (Aphomia sociella)
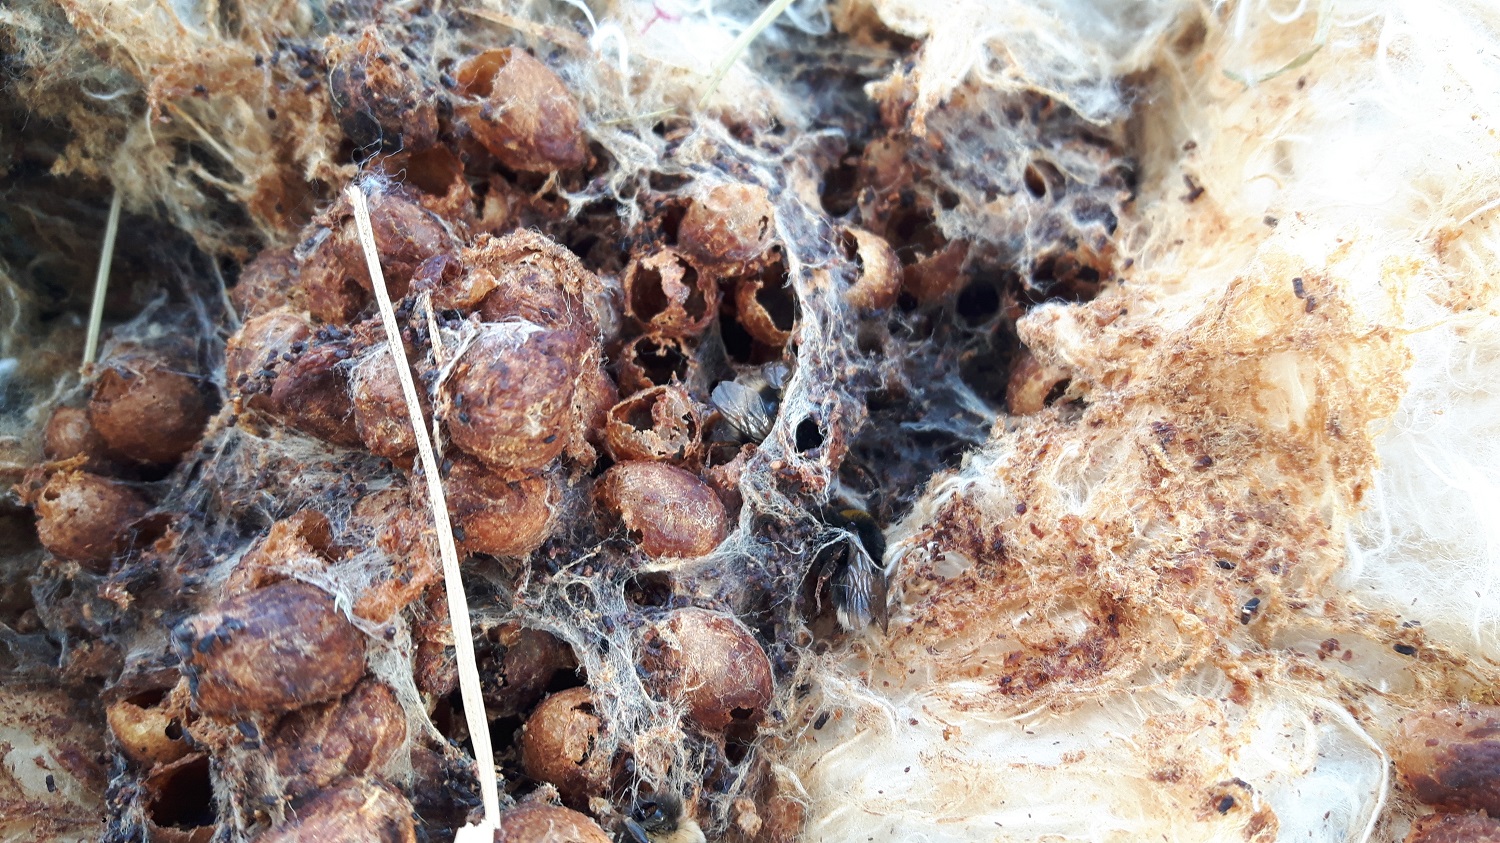
Lesser wax moth (Aphomia sociella) – nest infested by moth
Photo O. Hercog (2017)
And here it was left to nature. The nest was eaten and spun by Aphomia sociella caterpillars.
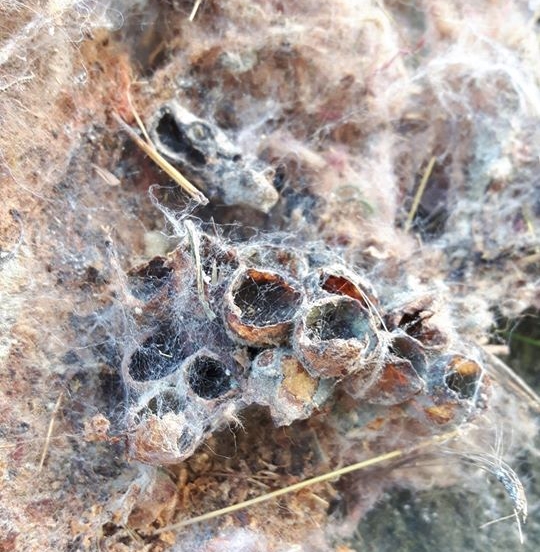
Nest raid demonstration the parasitic wasp Melittoobia acasta
Melittobia acasta – Infested bumblebee cocoons
Photo O. Hercog 6/2019
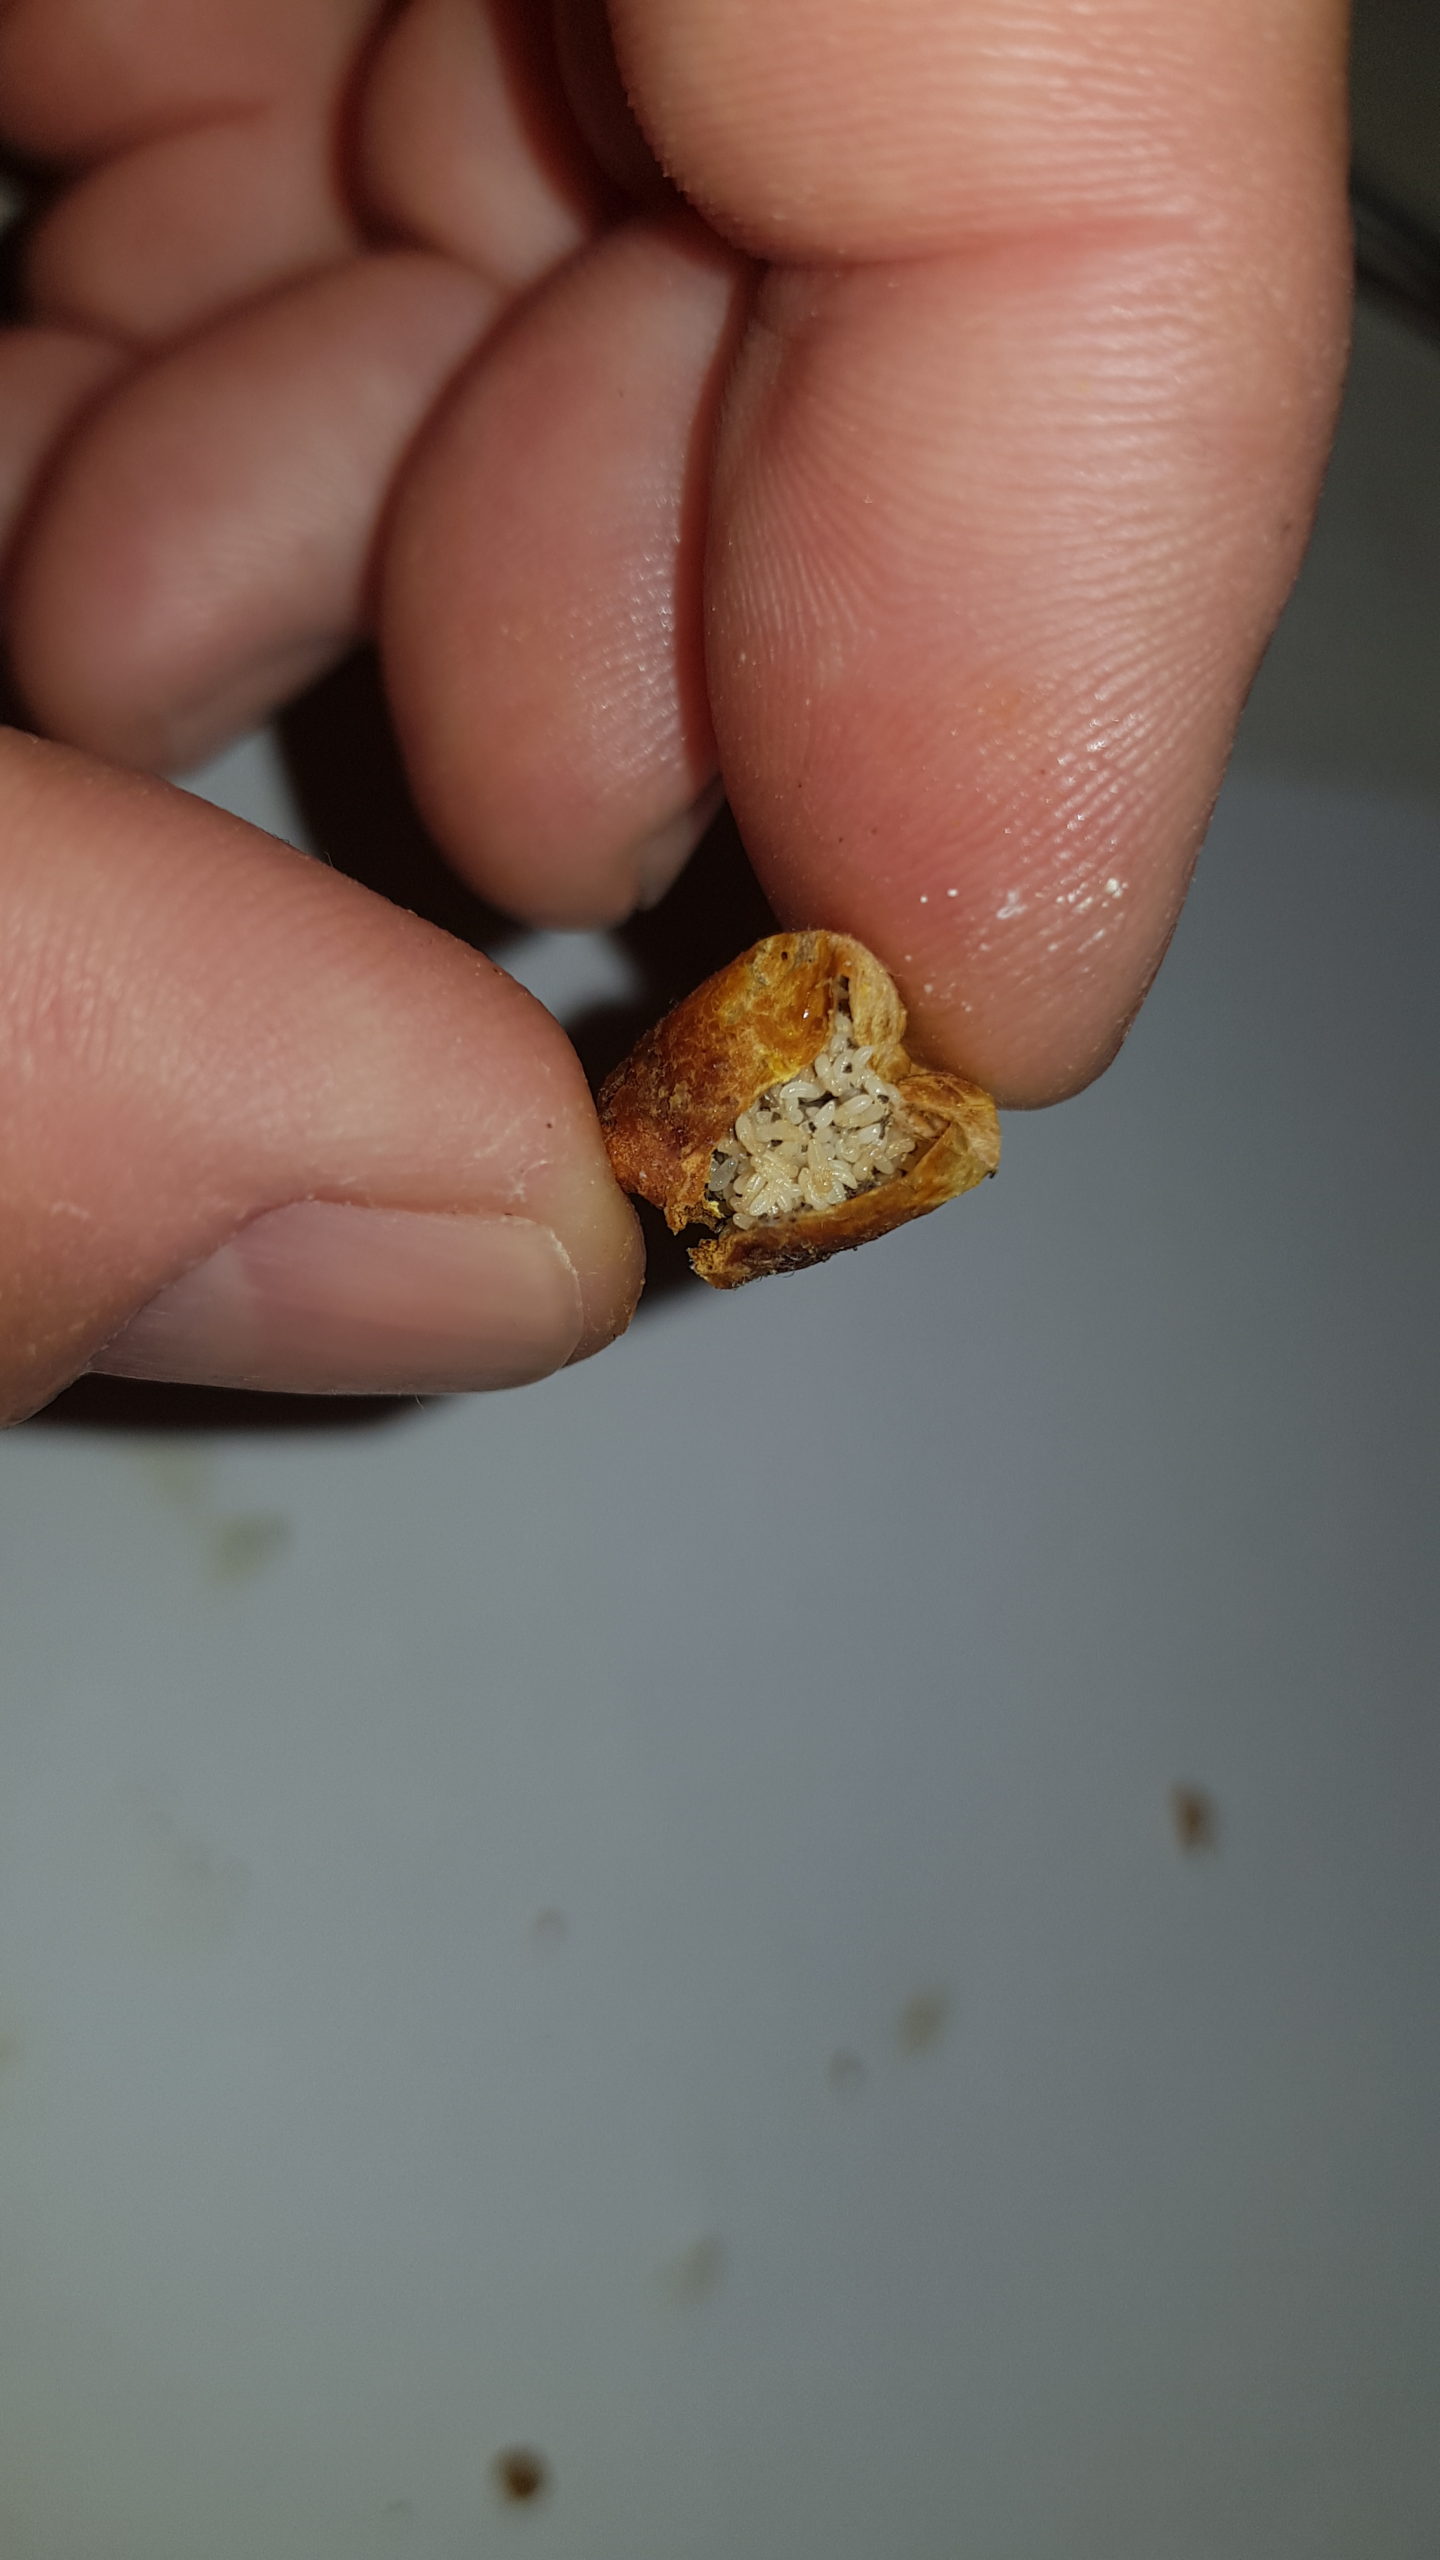
Melittobia acasta – infested bumblebee cocoons
Photo O. Hercog (06/2019)
Oh.
Nest closure
- If you accidentally changed the position of cocoons during inspection, you need to use tweezers Return to original position (yellow side up)
- If you have collected pollen and if you feel the need to reinforce the nest, place it in the cap of a PET bottle as close as possible to the nectar and pollen stores; Only here will the female workers collect it and use it to feed the larvae; otherwise, it will be consumed by female workers and young queens (this applies to bumblebee species of the "pollen storer" type, such as the buff-tailed bumblebee).
- Carefully cover the wax work with a wax ceiling – use tweezers
- Carefully lay on the waxed ceiling layer of lining
- Line it up to the ventilation opening – do not compress the lining!
- Lay out the lining sugar water feeder, which will strengthen the bumblebees and, as a result, they will calm down / start carrying nectar to empty cocoons)
Internal ulcer check
- Check the hive entrance seal for damage (bumblebees sometimes chew through it)
- We'll inspect the roof to ensure it's not warped and fits well.
- Inspect the vent grille to ensure it is not gnawed or waxed.
- Also check the inside of the ulcer for any issues that need addressing.
- If you find any faults, rectify them as soon as possible.
Ulcer closure
- Tip the bumblebees out of the jar where you previously collected them onto the lining.
- Immediately cover the shock (cloth, protective netting), close the roof
- Check that the roof of the hive is well seated and sealed.
- Transfer the fright back to its original place
- After clearing the hive, open the entrance (leave the landing board down as in normal operation) – It's best to open the hive entrance in the morning.
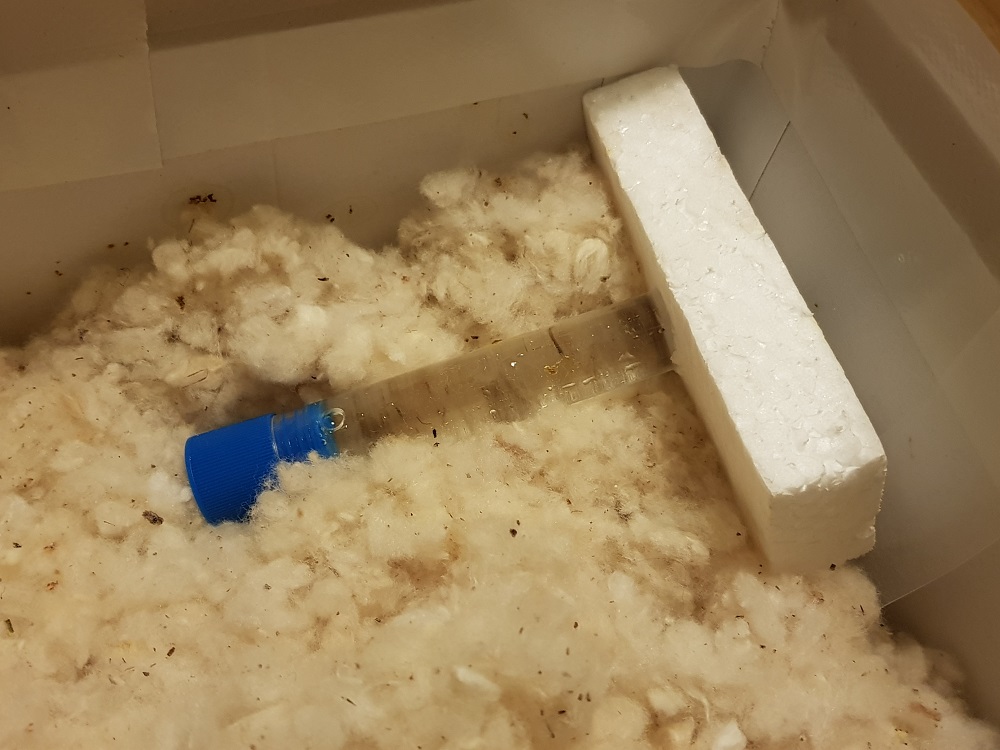
Test tube feeder – tilted position
Photo: O. Hercog

Bumblebees PLUS – PET bottle cap feeder with cotton wool insert – SUITABLE
Cleaning the nest and hive
Cleaning the nest
If it is necessary to clean the nest of parasites, You have several options.
Can you use long tweezers, or to carefully remove the entire nest from the hive.
b) If you have equipped your hive with a bumblebee lift, take advantage of the options Removal of wax work using curtains. Otherwise, it will be very difficult to remove the nest without damage, and it's best not to attempt it.
If you had to remove the nest, keep it safe during the intervention. make plastic boxes, to remain in it Remaining workers and mother. If the mother and workers do not remain sitting on the nest, put it back with the other bumblebees. However, the mother usually stays in the nest; there is no need to forcibly remove her.
Then you can examine the nest up close and remove ticks with tweezers. Parasites often holding directly under the nest. And you can collect them there, or at least reduce them with long tweezers. However, it is better to perform a vacuum lining.
The bumblebee lift is very well suited for removing a nest. You can read about it HERE
In the event that the nest was attacked Crambid moth (Aphomia socilella), You won't always see all the wax moth larvae (caterpillars). They will be hidden under the nest (hence changing the bedding), or directly in the honeycomb. It's worth taking your time and inspecting the work thoroughly, then removing the caterpillars.
We then recommend the bottom of the wax work treat with Lepinox Plus.
Recommended procedure:
- Apply the remedy only when the nest is attacked – not preventatively
- Then sprinkle a little of the preparation onto the lining where the wax comb nest will be placed, as well as its immediate surroundings.
- Treat the underside of the wax model – ideally, a fine brush can be used to „dust“ the underside of the wax model“
- Do not apply the product to other areas.
- Apply only the necessary amount of product
- Do not apply the product to bait stations
- Do not apply the product to wax work or to bumblebee larvae – avoid sprinkling the work with the product!
- Check the nest after application; you can repeat the application of the preparation after 10-14 days.
Apply the product the same way when rescuing an open or disturbed nest, for example as part of a Bumblebee Rapid Response action.
You can read more about this product HERE

Lepinox Plus
Source: Manufacturer
Tweezers
Clean the nest with tweezers
Bumblebee lift in action
Photo O. Hercog
Ulcer cleaning
If the hive has been invaded by parasites, or the hive is mouldy, it it is also necessary to clean itIn practice, this means To prepare a scare, as if for a new seasonsee instructions HERE
Don't forget that Parasites can hide in poorly accessible areas of the ulcer – in the corners under the roof, in the inlet pipe, etc.
The cleaning is therefore necessary, including cleaning the walls and changing the cardboard lining the nucleus. Parasites can hide behind it too (especially when it's unsuitable honeycomb cardboard).
When cleaning the hive We recommend sanitising the hive walls by heating them. (not by burning) with a hot air gun.
If you haven't already, don't forget to install a bumblebee lift.
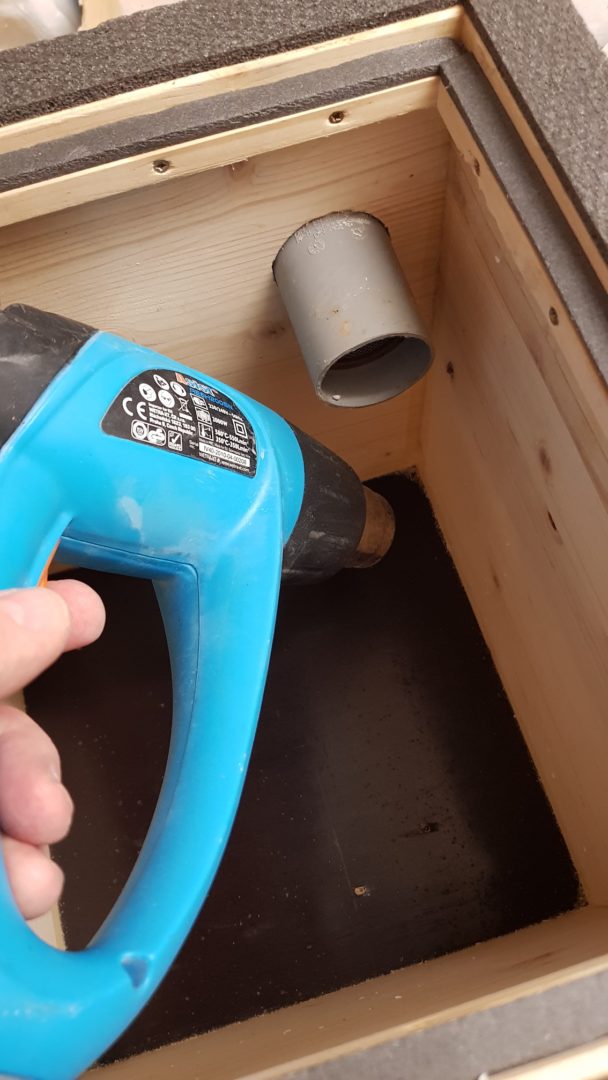
Treat all corners with a heat gun (parasites may be hiding there).
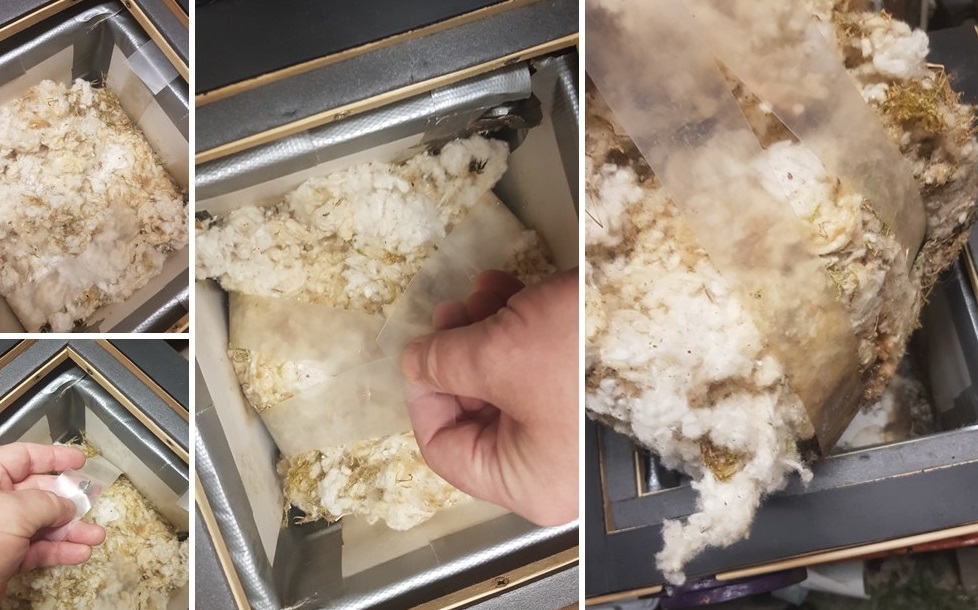
Lining replacement
Lining replacement, or at least its affected parts is Recommended.
If the hive has been invaded by parasites, or if you have found a wax moth female in the hive, then Certainly The lining needs replacing.
If Female moth they did not lay eggs directly on the wax comb, you can instead prevent the eggs from hatching and infest the nest see HERE

In the first lining layer, at the point where the tube ends, an entry pocket is formed. This is created by laying another layer of lining over this spot.
Return of the nest to the hive
- If you were forced to remove the nest, return it to the hive now.
- First, adjust the bottom of the hive. Then, insert the cleaned nest into it and adjust it back to its original state and position.
- Carefully cover the nest with bedding, preferably in several layers, do not compress them.
- Don't forget to create an entry pocket at the opening of the entry tube.
- If you have removed the nest from the hive, it is definitely necessary to provide them with supplementary feed in the feeder for lining.
A view into the glass into which the bumblebees were transferred for in-depth inspection.
The video also shows several large new mothers, approximately 2 days old.