Construction instructions for a do-it-yourself bumblebee hive made of polystyrene
What you will learn here:
- advantages and disadvantages of polystyrene hives
- essential design of the hive
- analysis of the necessary knowledge and equipment to consider whether to go into construction or not
- detailed design
- preparation of the hive for the season and the specifics of its use during breeding
Contents
- Advantages and disadvantages of polystyrene hives
- Characteristics of the hive
- Video tutorial on preparing the hive for the season and user recommendations for care during breeding
- Fundamental design implementation
- Minimum technical skill required for successful hive construction or should I start building?
- Material list
- List of tools
- Custom design process
- Attachments – cutting drawing and video documentation of the workflow
Last updated: 17/4/2026
Advantages and disadvantages of polystyrene hives
Advantages
- Easy design
- High construction accuracy and tightness of the hive
- Excellent protection against parasite penetration when the design is maintained
- Age stability, hive lifespan
- Low weight compared to other hive types of the same size
- With proper construction, excellent thermal insulation properties allow the hive to be placed anywhere in the garden (full shade is not necessary)
Disadvantages
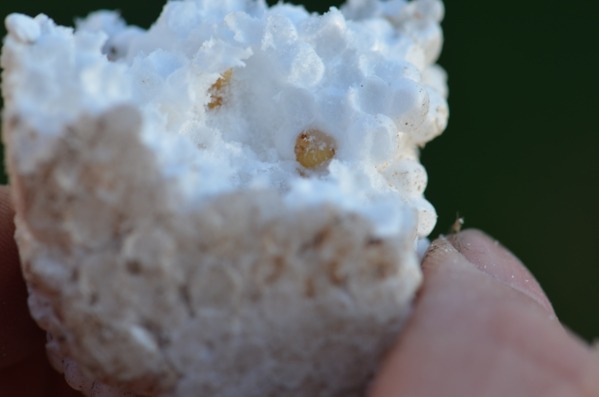
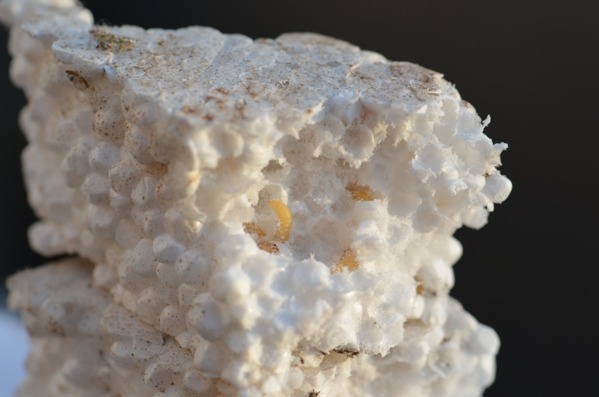
- Polystyrene is a nutrient material for the most common bumblebee parasites – the larvae and caterpillars of Antherophagus pallens (nigricornis) and Aphomia sociella
- Lower resistance to impact and falls compared to wooden versions
- Walls cannot be rehabilitated with heat/flame, it is done with water
- The hive must be stored out of reach of rodents in a place where there is a lack of food for them. It can be left outside all year round.
- Initial price costs are rather higher compared to wooden designs
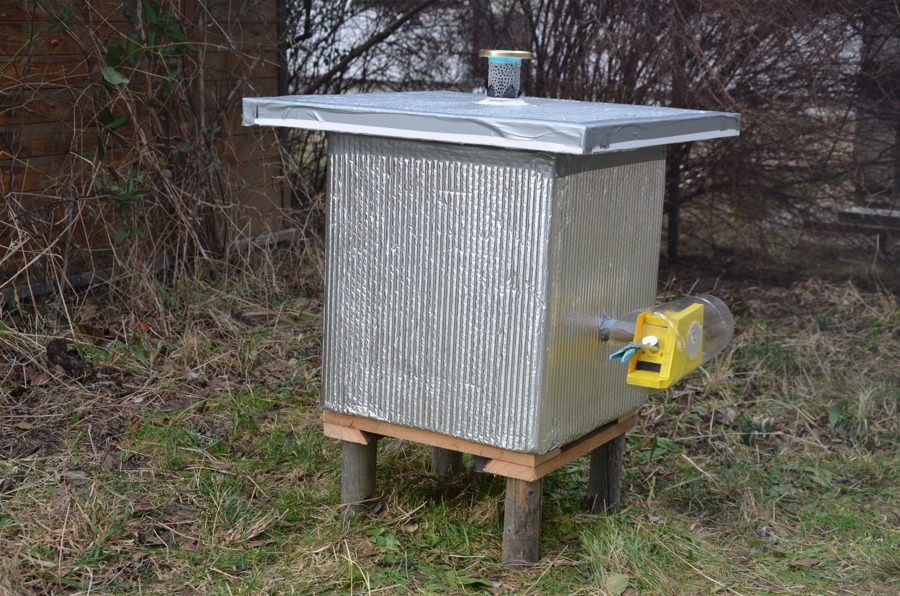
Characteristics of the hive
Insulation properties:
- A multi-layer wall system with a closed air pocket ensures maximum possible thermal insulation properties. The wall composition is from outside to inside: aluminum reflective foil for the radiant heat component, insulating bubble foil, protective concrete screed 3-4mm, 30mm polystyrene layer, 20mm closed air pocket, 30mm inner polystyrene layer, inner concrete screed with a thickness of at least 4-5mm. This is a multi-layer system with a total width of almost 90mm.
- The internal concrete screed protects the polystyrene, acting as a strong accumulation surface for moisture, which improves the microclimate. The external screed protects the perimeter structure and ensures its stability.
- The system is hermetically sealed, except for the structural openings, and is not subject to thermal and moisture expansion.
- In the case of a very cold spring or spring frosts, a warming gel pad (a bag with gel that gradually releases heat when heated) is placed on the upper grate. In this way, the hive will safely maintain the internal temperature for at least 12 hours without the need for additional heating or other thermal protection, moving the hives into rooms, etc
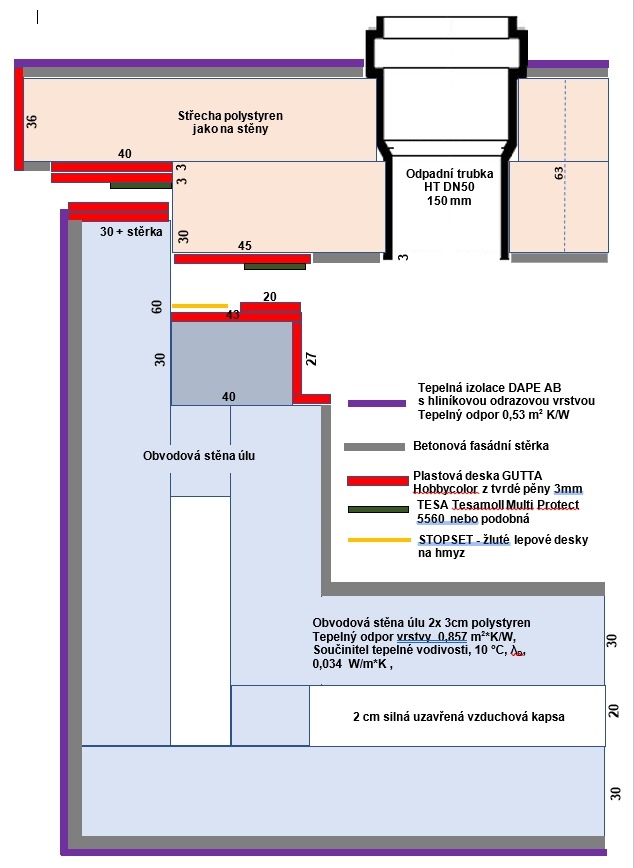
hive layer diagram
missing internal equipment
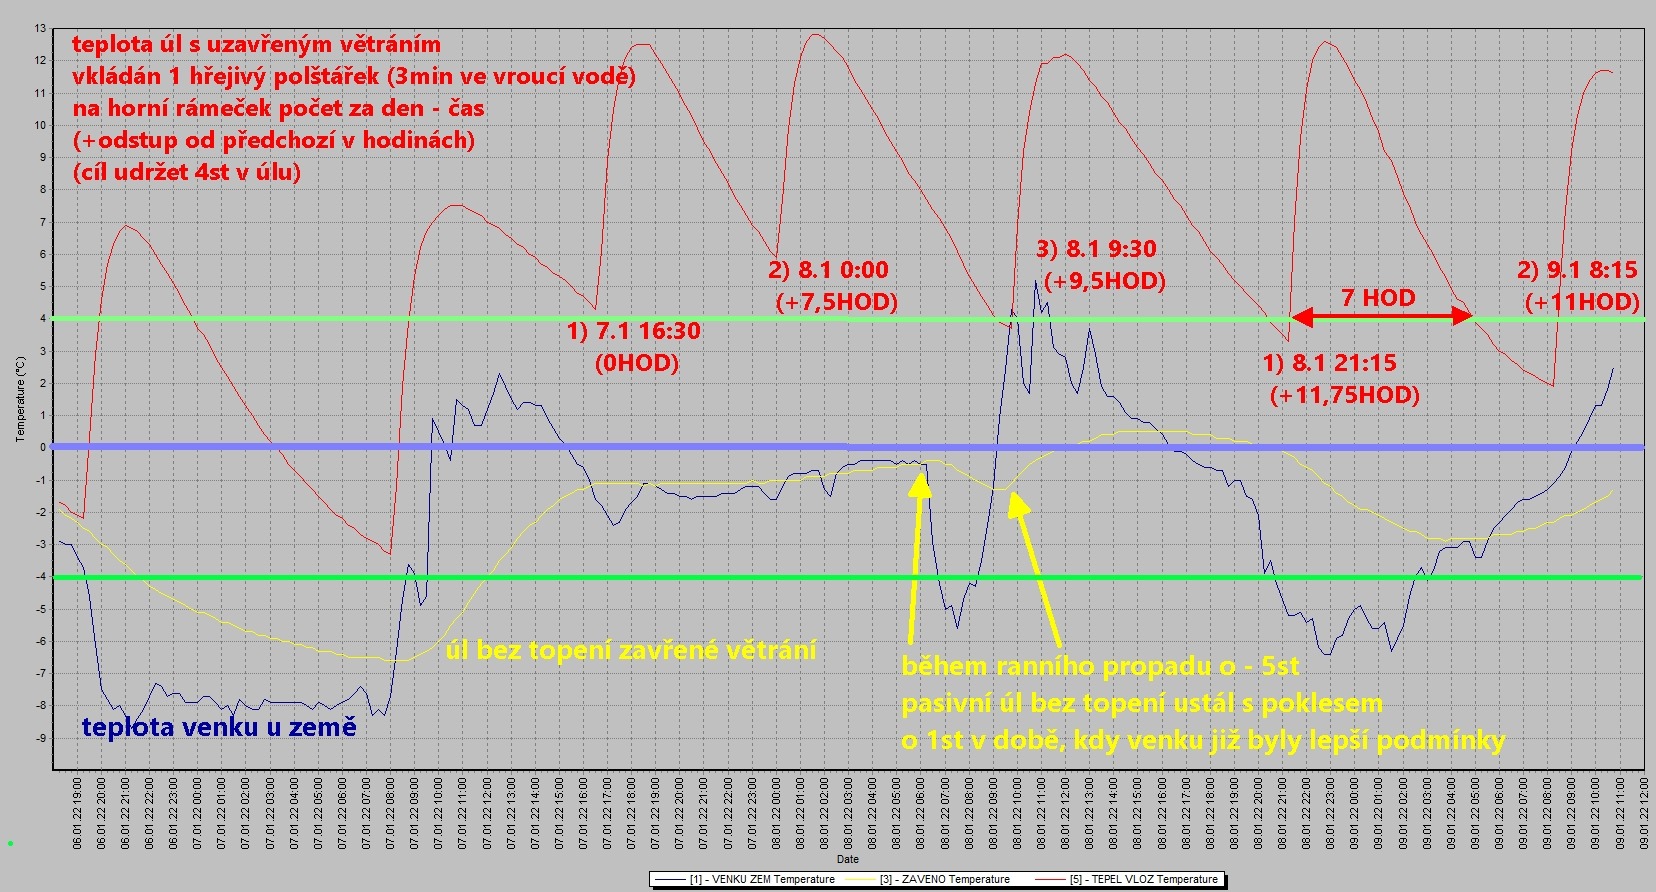
Test of hive behavior in frost in January.
One gel insert heated for 3 minutes in boiling water was inserted.
With three changes every 8 hours, the temperature in the hive could be maintained above 4 degrees Celsius even in January.
Antiparasitic and sanitary protection:
- Breeding takes place on a fine wire grid, where condensation water, small waste and some parasites (typically mites, Antherophagus nigricormis larvae and fly pupae) fall to the floor, where there is a sloping waste channel in the middle with the possibility of cleaning even during the life of the colony. The grid also serves as a bumblebee elevator in case of in-depth inspections of the nest.
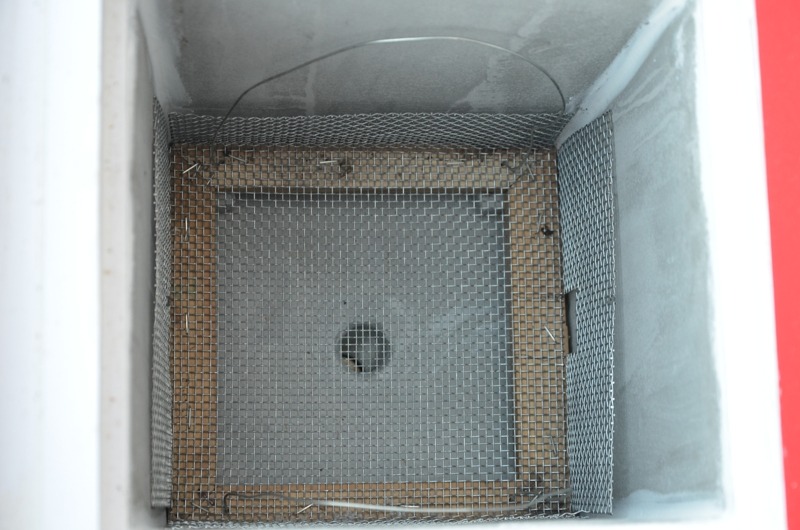
Breeding grid
unique combination of breeding mat and safe lift for nest inspection
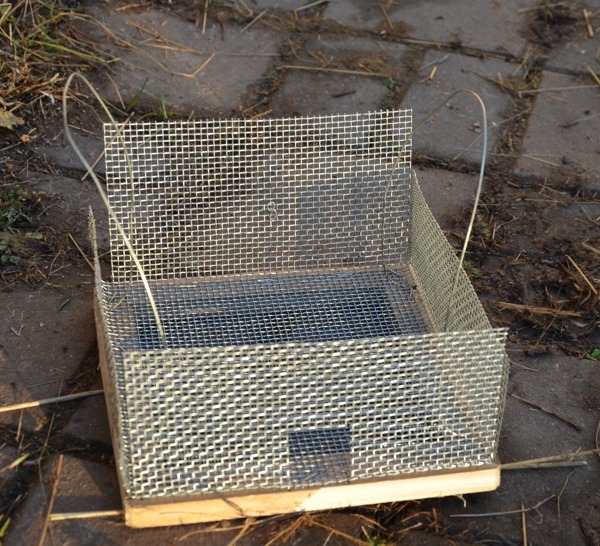
the breeding grid is also a safe bumblebee elevator
out here for inspection
- The roof access is solved by a stepped structure of the lock type with multiple protection including a sticky trap. The parasite would have to overcome several obstacles. The system eliminates the escape of odors (smell traces). The upper protective mesh prevents the penetration of bumblebees for ventilation.
- Ventilation protected by a replaceable Uhelon 53S mesh, complemented by its fine mesh protection against larger parasites.
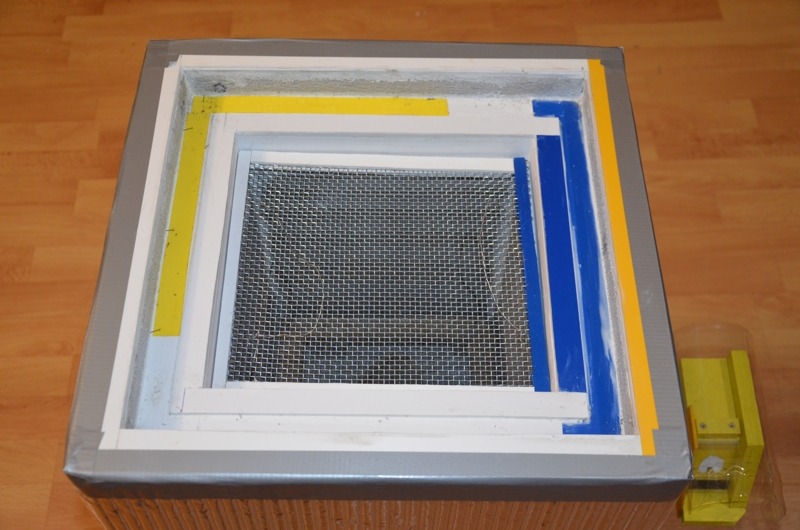
upper solution of the hive
lock protection, yellow adhesive strip in the corner
nest protection net
roof version
multiple protection
- All penetrations made of smooth, easy-to-wash parts, accessible even while the colony is running.
- The interior space is as accessible as possible, cubic in shape for easy maintenance, cleaning or inspection.
- All internal components removable.
- The legs of the lower grate of a 2x2x2cm cube made of residual polystyrene serve as an accumulator for Antherophagus nigricornis larvae (they are disposed of after the season).
- Minimum length corridor for optimal maintenance. The pipe system is designed so that it can be firmly grasped by hand in case the couplings become stuck (this prevents the pipe from loosening in the hive). The transparency and straight design prevent the risk of the corridor becoming clogged, allowing for easy cleaning even during the season.
- After the season, the inner hive is filled with water and left to stand until all parasites and mites are drowned. The inner walls are easily washed with a dishwashing sponge
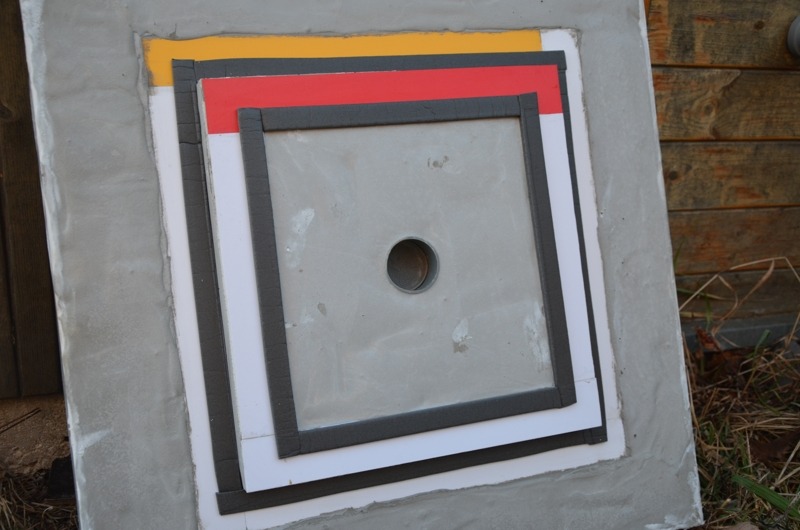
Hive ventilation
- Ventilation is conducted through the roof for maximum efficiency and easy cleaning during the life of the colony. All ventilation components are easily visible, removable and quick to clean even during the life of the colony.
- Free upper grid providing ventilation protection, can be supplemented with an external grid with a corner for night cooling of the hive with an open roof.
- Lower waste channel connectable to a hose buried in the ground, serving as a ground exchanger (cooled air) increasing ventilation efficiency if necessary.
- The ventilation system is designed to take place in the largest possible area of the hive (bottom - roof without the possibility of bumblebees clogging it).
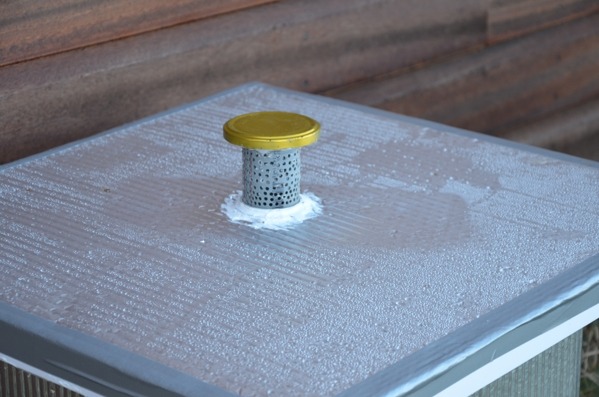
hive ventilation
easy to clean during breeding
with parasite trap and with protection of the hive on both sides
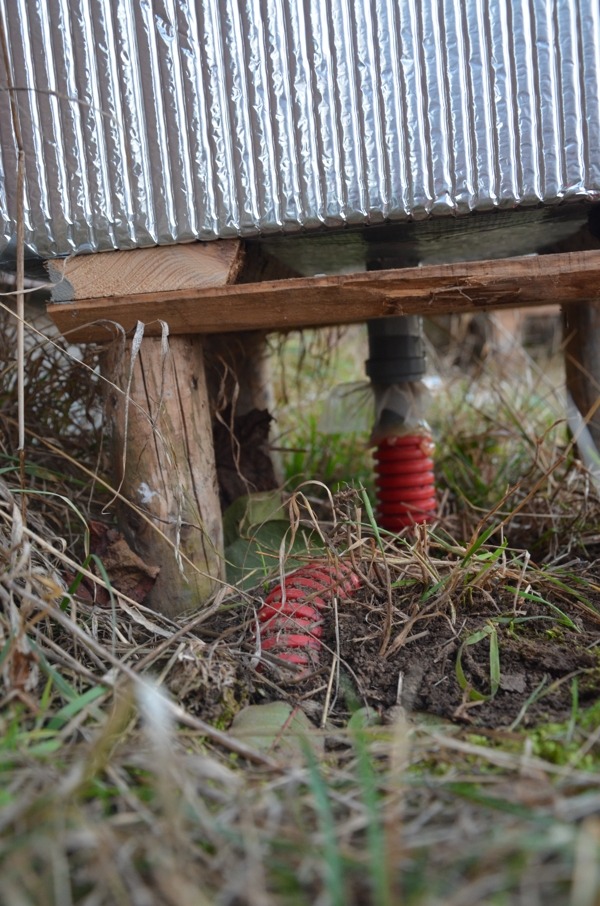
bottom waste pipe
connected to a ground heat exchanger for cooling the hive during tropical summer
Fundamental design
- All polystyrene parts must be covered except for the side edges of the inner lid
- Internal living walls must be plastered with cement-based facade plaster/adhesive. This is an absolute must for the internal design of the hive, in at least 2-3 layers with a total thickness of at least 4-5mm.
- The above applies twice as much to the design of the inner bottom of the hive.
- The exterior walls must also be filled with cement-based facade filler. A thinner layer in at least two layers is sufficient here.
Warning
If the beekeeper does not want or cannot thoroughly clean the hive , then the polystyrene hive is not suitable for breeding , or rather it is a disposable hive. For the next season, a polystyrene hive with poorly protected walls becomes a pantry and storage place for bumblebee parasites, which will destroy the colony in the solitary phase the following year. Such a hive is therefore more of a bumblebee trap and a completely unnecessary investment and work for the beekeeper. Protection of the polystyrene is absolutely necessary.
Many of our observations have shown that the larvae of the bumblebee parasite Antherophagus pallens (nigricornis) and the caterpillars of Aphomia sociella feed on polystyrene and also use it as a shelter. With a poorly made spatula or one that is too weak, the parasites drill into the polystyrene wall, which they then eat away at - it is food for them. It is impossible to get them out of the wall and they degrade the wall. The following year, these parasites threaten the colony at its most vulnerable stage - the independent queens. It does not matter what type of polystyrene construction is used (gray, white, red, green). The parasites do not care how the polystyrene is compacted and made.
- The hive was designed based on Karel Kučera's experience with breeding in these types of hives. The design includes solutions to a number of risks (increased humidity, air tightness) and pitfalls gained from experience in these breedings as well as knowledge from breeding in classic wooden hives. In order for the hive to meet expectations, it is necessary to adhere to the structural design of the walls, openings and maintain the quality of the materials.
- In contrast, the dimensions can be adjusted with the available size of polystyrene boards.
Minimum technical skill required for successful hive construction
or Should I start building?
The goal is not to discourage potential designers, but to lay the cards on the table fairly. Everyone has different possibilities and abilities, so it is good to consider whether our own skills will bring the work to a successful conclusion before purchasing materials and starting construction.
If in doubt, it is better to use the time differently, more efficiently, without unnecessary losses of money that can be invested in the purchase of a ready-made product. When making one hive, especially if the designer does not have much equipment (an overview is provided below), self-production does not mean financial savings compared to buying a ready-made product - quite the opposite, and the result could be rather disappointing for both the creator and the successful beekeeper. The parameters of commercial hives and how to choose a suitable hive are discussed in detail in the section for novice beekeepers.
So what do you need to know to build a hive?
- measuring using angles, orientation in a simple technical drawing, spatial imagination
- technique of straight, perpendicular and precise cutting of boards on a saw, working with a miter saw, cutting with a penknife
- large-hole gate operators with a diameter of 30mm and more with high precision
- gluing larger surfaces
- leveling of smaller areas / repairing damaged plaster
- working with wire/wire mesh – cutting or shearing, shaping, working with a grinder
- working with a hot melt gun
- processing of plastic pipes – cutting, grinding
- the ability to assemble a simple wooden frame and make a simple table
List of materials needed to make one hive
Material parameters that must be observed are highlighted in bold
- 3 pcs polystyrene board 30mm thick , dimensions 1250 x 600mm TECHNONICOL CARBON ECO F, Thermal resistance of the layer 0.857 m 2 *K/W, Thermal conductivity coefficient, 10 °C, λ D , 0.034 W/m*K, Compressive strength at 10% compression 200 kPa, facade with grooves
- 50pcs construction nails approx. 6cm long
- 1 pc of polystyrene glue without foam effect , universal glue Roxolid UNI FI-X 180kg/m2 used
- 1 pc acrylic putty for dry construction on plasterboard Soudal
- 1pc Textile waterproof adhesive tape for exterior 50mm x 5m 3M
- 1pc HT DN 32mm sewer pipe length 1000 mm
- 1 pc HT DN 32 90 degree elbow
- 1pc Internal plug (blind plug) for HT sewer pipe DN 32mm
- 1pc HT DN 50mm sewer pipe length 150 mm male - female end
- 1pc Screw (jam) lid from a 1l jar (e.g. from honey, cucumbers)
- 1pc WEBER CZ 700 polystyrene adhesive 25 kg ( cement-based facade adhesive screed )
- 1pc Planed wooden lath 15 x 30 x 2000 mm spruce
- 2 plates of staples for the stapler, 8-10 mm height of the staple
- galvanized wire mesh, mesh 3.15×0.8mm x 300 mm 600mm (beekeeping supplies)
- 2pcs of aluminum or galvanized insect screen fabric 150mm x 150mm (or 1pc 200mm x 200mm approx.)
- 1pc GUTTA Hobbycolor hard foam plastic board x 3 mm smooth, white (smaller boards are possible, but the corresponding area)
- 1pc GUTTA Hobbycolor hard foam plastic board 500 x 250 x 3 mm smooth, colored
- 3pcs Uhelon 53S approx. 150x150mm
- two pieces of thin-walled plastic packaging (ideally black, e.g. from shipping packaging) 150x 150mm
- 4-5 hot glue sticks, diameter 11mm
- 1 roll DAPE AB vapor-proof thermal insulation (4.8 m²/roll) Thermal resistance 0.53 m 2 K/W,
- 1 pack Window and door rubber seal Tesa Multi Protect 4m, 20mm:5mm or equivalent – straight rectangular profile width 10-20mm height 3-5mm
possible, but untested substitutes: CONTEGA FIDEN EXO 15 mm x 3-6 mm x 8 m
Self-adhesive polyethylene tape, seal against drafts, dust, thermal bridge interruption PE tape grey width 12mm, thickness 5mm, roll 15m, density 29 kg/m3
in case of using tapes with a maximum height of 3mm it is necessary to place the tape opposite each other on both sides (edge of the hive and roof)
DEN BRAVEN Self-adhesive sealing tape for windows and doors 9mm X 3mm - 1pc Protective flap for bumblebee with Uhelon hinge - oak, connectable to HT pipe DN 32mm
- 1pc Chemopren extreme glue
- 1pc PET bottle (Pepsi etc.) 2.5l clear
- Corrugated pipe (protection for underground cables, red) 40mm, length 3 m
2 small screws (0.4-0.3mm thick and 10mm screw height)
Overview of used workshop equipment
These are not strict requirements, but rather an overview of what is needed and can certainly be done differently, or with tools that make the work more efficient. However, you need to consider your workshop equipment, as purchasing some tools for use purely for hive construction would in many cases already exceed the purchase costs of commercially available hives of the highest quality.
- steel angles 30-70cm, marker
- miter saw
- carpenter's clamps 60cm wide 4 pcs
- Extrusion gun for glue in tubes
- hot melt gun
- hole saw for 28-32mm and 46-48mm holes (better smaller than larger)
- drill
- Cordless screwdriver/drill. You can also use an electric one if it has speed control.
- plasterboard spatula (smooth)
- spatula, ordinary
- spiral mixer (spiral whisk) with protective ring, for mixing adhesives, adhesive mortars and grouts
- knife / hacksaw / saw blade
- wide break-out knife (pencil)
- scissors
- stapler
- angle grinder with metal cutting disc
- sandpaper for aggregates, grit 120 and 180
- hammer
- file or grinder
Construction instructions
For ease and understanding, we have prepared a complete video tutorial from the very beginning, step by step, which is divided into a total of 20 parts due to its size. We recommend watching it before purchasing, so you can get an idea of whether the construction is within your capabilities and time and dispositional possibilities. Rather than cheating on the construction somewhere, it is better to buy a commercial tested product.
As the parts go one after the other, the individual tasks follow one after the other, unless otherwise stated in the video. We really highly recommend starting a little unconventionally with the construction of the base for the hive. The reason is simple, the base is needed not only for the final installation, but also during the construction of the entire hive, from the stage when you install the waste hole and the outer corridor of the hive.
You can find all the videos on our YouTube channel, and there are also links to downloads where you can conveniently download the video tutorials to your home.
It also includes a cutting plan along with a checklist of the necessary materials (almost everything can be purchased in the Hornbach network, although many components can be purchased cheaper in smaller specialized stores, so we definitely do not prefer this network of sellers, we are just stating where we obtained the materials).
 Subscribe