Introduction
This chapter continues the basic information for beginning breeders and supplements it with details, interesting facts and information for experienced breeders.
We would be happy if you would help us to further develop and improve this chapter. o further experience.
The importance of the entrance hall
Most bumblebee species need an entrance tunnel/tube because it simulates a passage to a rodent burrow, where they usually nest in nature. A typical example of such a species is the ground bumblebee (Bombus terrestris).
However, some species nest in a pile of grass, for example the field bumblebee (Bombus pascuorum), they do not need any corridor, but on the other hand they do not mind.
You can read more about the nesting methods of individual bumblebee species here.
Observation and experience show that an entrance corridor is needed where the mother queen of a ground-nesting species really requires such a corridor and feels content and safe there. She instinctively expects it and seeks out such a nesting place. Hives without a corridor therefore have a lower establishment success rate for these queens.
However, the corridor does not have to be present in the nest all the time. Once the nest is strong or when a strong nest is moved (not a small nest with the first generation of workers, e.g. from the Troubsko breeding), the corridor is no longer so essential. It can even happen that the corridor becomes clogged with dirt due to the operation of the nest and then a problem arises.
The entrance corridor is therefore essential at the beginning of nest development , then it can be removed if necessary.
You can read about how to remove the entrance hall "during operation"<PŘIPRAVUJEME>
The corridor also has a defensive function for bumblebees . If a stronger intruder (a mother bumblebee, a strong mother of another species, etc.) tries to enter the nest, the workers can use their numerical superiority to stop the intruder in the corridor. They would not be able to do this in the open space of the nest, but they have a chance in the corridor.
Breeders know that bumblebees set up sentries at the entrance hole . The sentry can then intervene, together with other workers in the entrance corridor, and overpower the intruder.
about the attack methods and lifestyle of the pachyderms in the chapter
Bumblebee keepers treat entrance corridors as external (the corridor leads outside the hive and only opens into it and does not continue inside) or as internal (the corridor is entirely or mostly inside the hive).
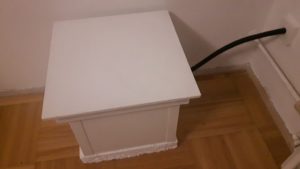
Using the external corridor to place a hive indoors – Photo J. Čížek
Recommendation: If you use an external corridor, for example when placing a hive inside a building, you do not need to use the internal corridor . The corridor would be disproportionately long for the bumblebees.
Breeders decide on a specific type of corridor primarily based on where they will place their cage - inside or outside the building.
You can read about the placement of hives in the chapter<PŘIPRAVUJEME>
Some beekeepers use hives with short corridors, or without a corridor at all . This is due to the specific species of bumblebee that prefers specific nesting sites.
Our recommendation: if you are not targeting one specific species, use a trap with an entrance corridor, as most species will accept it.
Whether the corridor is placed inside or outside the hive is not so crucial, in commercial products it is done inside for reasons of simplicity of execution. Its presence is essential for species that require it (see above).
The interior corridor is a basic solution that most beginners will use, and is also used in commercial products - due to the simplicity of execution.
an entrance corridor located outside the hive can help the beekeeper to solve the layout of the hive and trips (e.g. hives located inside buildings). A sufficiently long external corridor also has a certain protective/defense factor , as mentioned above.
On the other hand, such a solution using long external corridors requires a different way of settling the queen mother.
This topic will be described in detail in this section in the chapter on seat modifications.<PŘIPRAVUJEME> .
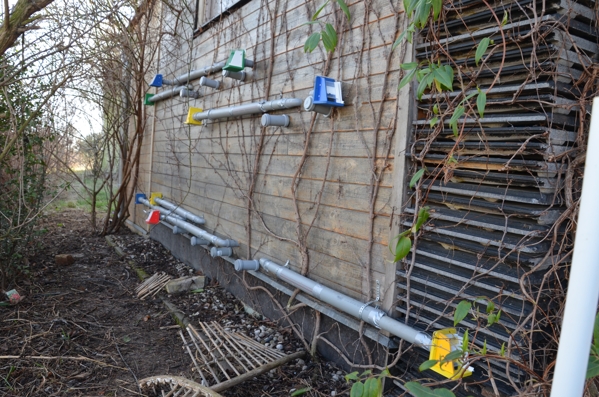
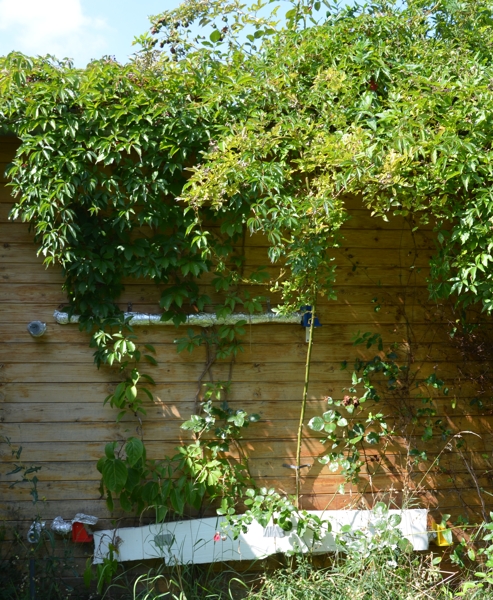
Example of the outdoor corridors of the hives, which are located inside the warehouse
, photo Karel Kučera
Essential parameters and correct design of the inner corridor of the hive
Material for making a hallway
It is not so crucial, the corridor can be made from a hose, an electrician's "gooseneck", but also from PVC, HT pipes. Opinions differ, but everything usually works.
However, the inner surface of the corridor should not be slippery, which seems to be well met by the gooseneck and that is why it was recommended by the bumblebee guru Mr. Miroslav Stuchl.
a clearance (inner diameter) of the entrance passage inside the hive of 25 mm . We do not recommend a smaller - it may become clogged . We consider it irresponsible that some manufacturers sell clearances as small as 14 mm.
If a large species (such as the ground bumblebee Bombus terrestris) settles in the hive and the nest is strong, an entrance corridor with a small clearance significantly complicates operation, especially if there are already new queen mothers in the nest.
It is important to remember that bumblebees pass through the tube here and there. When they meet and cannot fit in, they have to return. They also lose pollen grains here, which they can no longer use. This costs them a lot of energy and leads to unnatural delays in traffic (traffic jams).
In natural nests, bumblebees are able to modify the passage (walking in a burrow after rodents). However, this is not possible in man-made hives, and bumblebees often react to such a situation in an unusual way – they gather on the comb and sometimes even build the foundations of a new wax structure there.
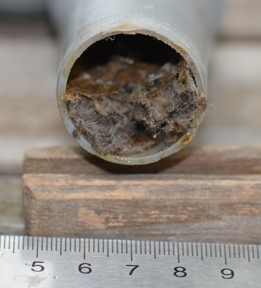
It is also easy for such a corridor to become clogged, for example, with a dead individual, a bumblebee, or a wasp.
The situation must then be resolved by removing the corridor , which is an unnecessary intervention in the nest's operation and not every breeder is willing to do so.
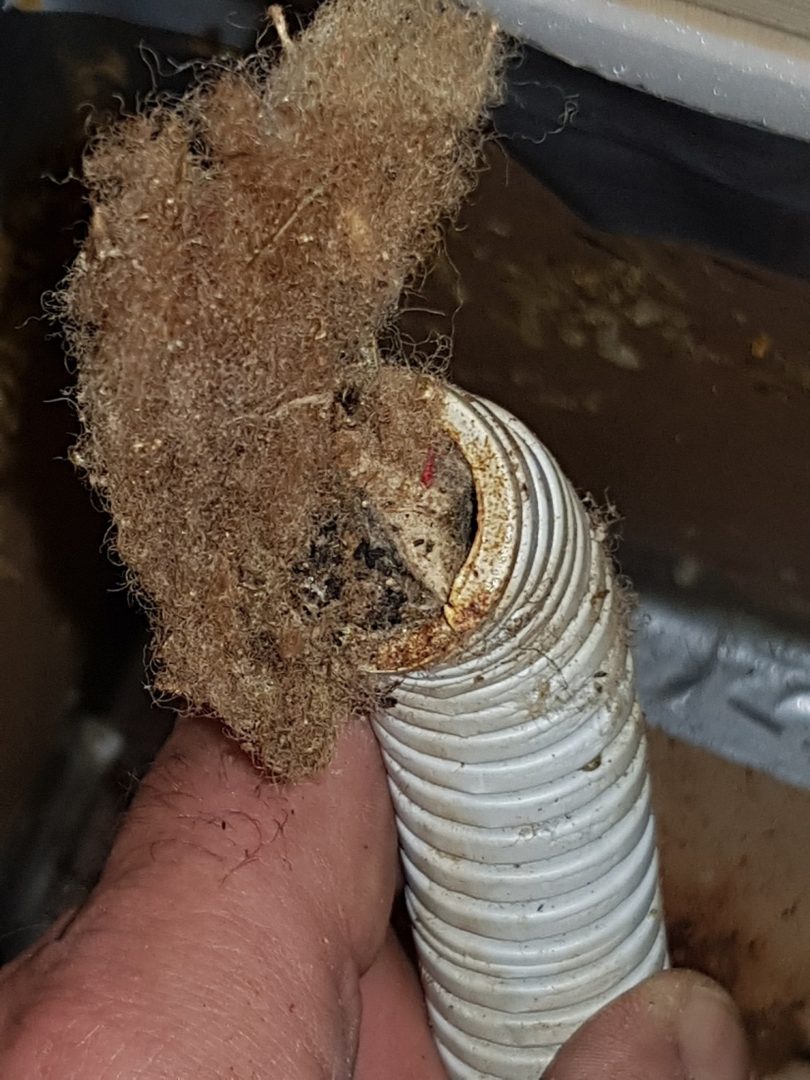
A corridor of inappropriate width clogged with nest traffic – photo O. Hercog
You can read about how to remove the entrance hall "during operation"<PŘIPAVUJEME>
Although Mr. Stuchl recommended an entrance passage width of at least 18 mm, many commercial products have a passage width even smaller, even 14 mm. Such a tube easily becomes clogged and therefore such products must be modified. If you imagine the size of a queen mother, for example, a bumblebee, it is difficult for her to squeeze through a tube with a width of 14 mm.
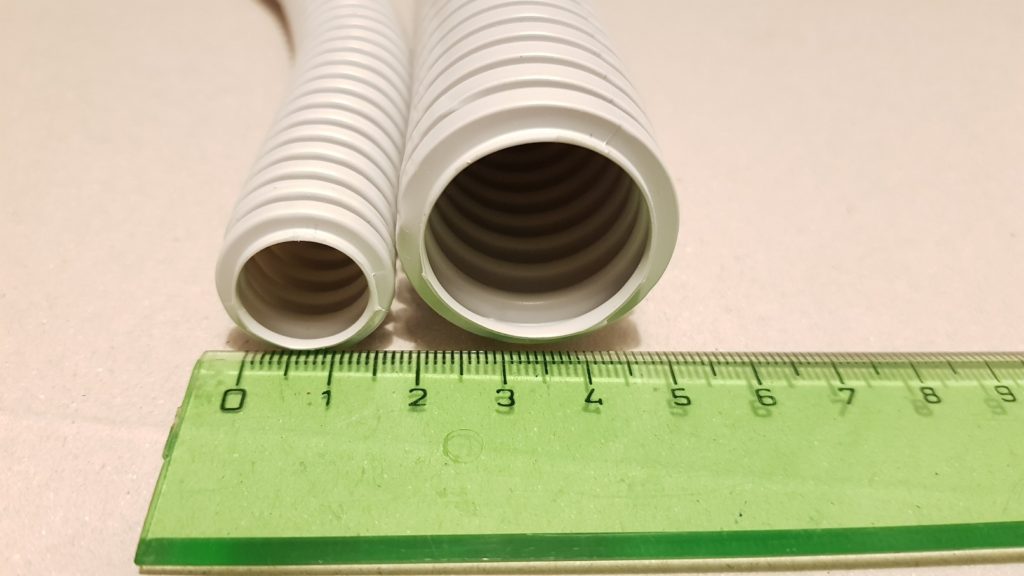
Comparison of the corridor width of a commercial product (14 mm) with the recommended width (25 mm)
photo O.Hercog
Our recommendation: For products with a smaller passage width, it is necessary to replace the original tube with a new one with a larger width before populating the hive. If this is not possible (you do not have the opportunity to drill a hole of the appropriate size into the hive body), then at least use the emergency modification as shown in the picture.
Method of repairing an unsuitable corridor in a bumblebee hive.
Replacing a corridor with a small clearance with a larger one – photo O.Hercog
Warning: Do not try to increase the diameter of the inner opening of the flap, it has its own meaning, see
For interior solutions of the entrance hall, we do not recommend using a larger clearance than the recommended 25 mm, especially with regard to the defensive function of the entrance hall (see protection factor ).
Interior hallway solution
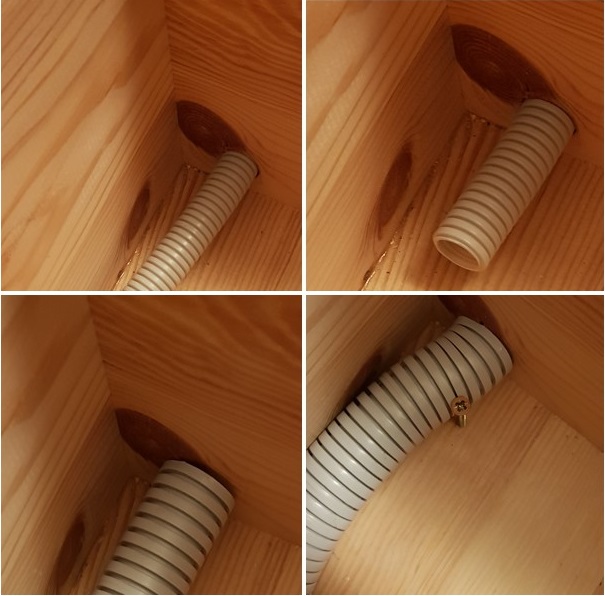
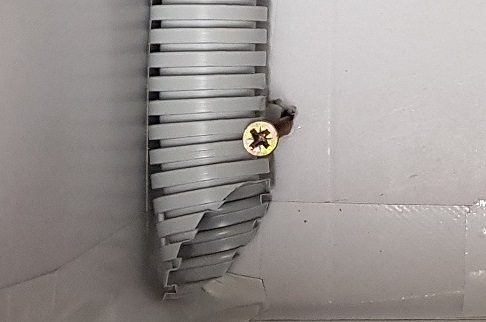
The inner corridor is completely hidden in the hive. One end of the corridor opens into the protective flap and the other is free in the corner of the hive. The tube should be able to be removed, or at least disconnected on the flap side and the tube then left in the hive. The method of attachment is best shown in the photos.
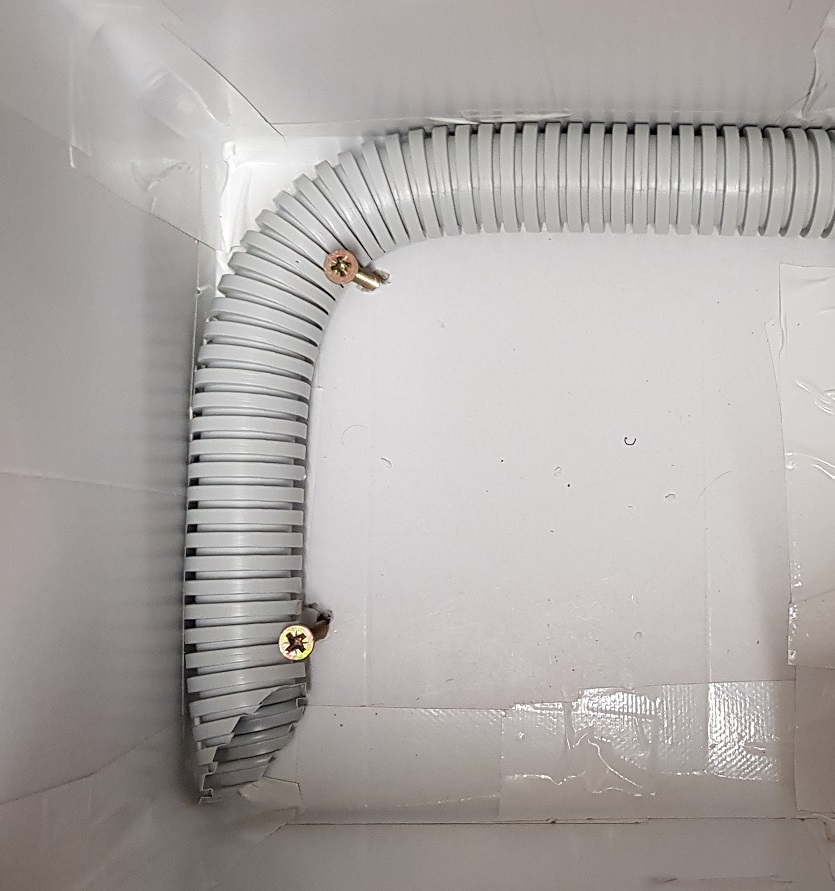
Running the tube in the hive along the walls – photo O. Hercog
Correct length of interior hallway
It is advisable for the corridor to start at the front wall, run along the inner perimeter of the side wall, along the opposite wall and end in a corner. This results in a length of approximately 50-60 cm with a hive size of 30x30x30 cm. Therefore, one right angle is recommended.
The reasons for this are not unified. According to some breeders, the bend simulates the shape of a mouse hole. According to other breeders, the main reason is that when the bend is made, it is impossible to see into the nest and it reduces micro-drafts, to which the mother is very sensitive in the initial phase.
An important aspect is also the internal layout – the tube should be led along the sides of the hive, not through the middle. The central space of the hive should be used for the nest and bumblebees usually start building it there.
A corridor through the middle then practically makes it impossible to carry out any service intervention during the life of the colony and to check the nest with its removal using the <Bee lift – UNDER PREPARATION>, or to remove the tube in case of blockage, etc.
End of the tube in the hive
One of the greatest contemporary bumblebee breeders, Jaromír Čížek (bumblebee guru), recommends ending the tube in the corner of the hive. Mr. Čížek has observed that the queen in a newly settled hive walks along the wall and stops in the corner. So she finds the tube that ends there more quickly. This reduces the risk of the queen “freezing” in the hive, see<Usídlení matky-královny> .
Our recommendation: Cut the end of the tube diagonally . The inlet then has the shape of an ellipse and the inlet area is larger.
The end of the corridor is cut diagonally - photo by O. Hercog
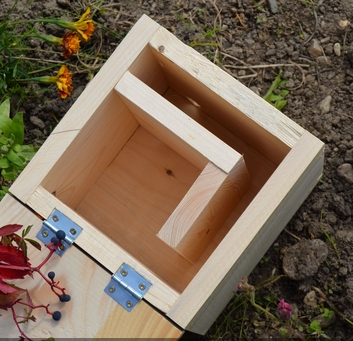
The other end of the corridor is led into an opening in the hive body, to which a protective flap is screwed. The design must be such that there are no gaps for parasites to pass through.
Wrong solutions – a corridor like a cavity in a hive
This is a partition between the nesting area and the exit from the hive. You can find it in some commercial products and old recommendations. It was designed either as a vestibule or in the form of a narrow L-shaped corridor formed by the walls of the inner hive.
We do not recommend such a solution and classify it as incorrect. Bumblebees perceive such a space as a “place somewhere outside” and happily defecate there, bringing corpses or poorly developing larvae here. The entire space attracts parasites, mold and rot develop here. When the bumblebees pass through, they carry everything into the nest and threaten its healthy development. Thanks to its high height, it allows parasites to easily hide.
This narrow and high space is very difficult for the breeder to access . Cleaning, inspection, repairs are complicated and often cannot be done 100%. In addition, the settled queen loses the sense of security of the corridor due to the high ceiling.
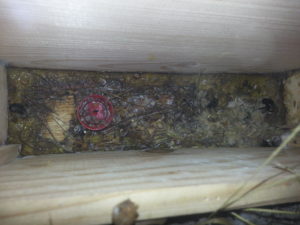
Inappropriate solution – a hive with an antechamber. You can see the amount of waste, which is a source of disease and a hiding place for parasites – photo O. Hercog
Example of a hive without ventilation with an internal partition replacing the corridor – the bottom of the corridor will be very difficult to clean. Moreover, there is very little internal space for the nest.
(source internet)
Old or new tube…
Experienced breeders use older corridors from the previous season. It has been proven that a “ scented corridor ” is a good attractant and facilitates the nesting of the mother from nature.
The old corridor must be washed and cleaned to remove dirt and any parasites that may be overwintering there, but at the same time to keep the bumblebee scent. Using an old corridor has its risks (disease transmission). However, if you use a corridor from a healthy nest and clean it, the risk is reduced.
the procedure for cleaning the hive and the corridor here.
If you're curious about how the Queen Mother marks the entrance hall, check out<PŘIPRAVUJEME>
Principles of exterior corridor design
1) It must be attached firmly and stably , its outlet cannot be changed during the life of the colony, as the bumblebees remember the entry point.
2) Connections and joints must not have gaps through which parasites could penetrate. The joints must be tight so that the tube does not disconnect spontaneously.
3) The material must be opaque and must not leak into the corridor .
4) The inner diameter (tube opening) of long external corridors (1 m or more) must be at least 25 mm, but we recommend 30 mm. Bumblebees clog long corridors with waste and move the lining here. Sufficient opening allows the workers to arrange the material in the corridor while maintaining the passage of the corridor. With smaller diameters, there is a risk of the corridor becoming clogged, which the workers will not be able to remove. Solving the problem is then much more difficult than in the case of internal corridors.
The protective factor of a smaller diameter (the chance that the worker will encounter a parasite in the corridor) is replaced here by the length of the corridor. The necessary narrowing of the corridor as a protection for the hive remains within the structure of the flap (inlet opening).
An example of the normal degree of clogging of the corridor at the end of the season closer to the hive, thanks to the internal diameter of 32 mm, the corridor was not clogged -
photo by K. Kučer
Example of a clogged corridor at the end of the season, thanks to its sufficient width, the corridor is not completely clogged and the worker bees create a passage in the lining - photo by K. Kučer
5) A protective flap . However, the flap should be detachable from the passage for maintenance purposes. A male-female solution (flap-passage) is recommended.
Method of connecting the damper to the external corridor. On the damper, a short piece of pipe (male) and on the opposite side, a long corridor with a widened end (female) –
photo by K. Kučer
6) The corridor should be detachable as close to the hive as possible. Again, the recommended connection system is male-female.
Example of a solution for a corridor near a hive. A short “female” connector is a fixed part of the hive. The outer corridor is connected using a male (corridor) – female (hive) system –
photo by K. Kučer
7) The entire design must allow bumblebees to easily crawl through. There must be no siphon in the tube that could create a water level.
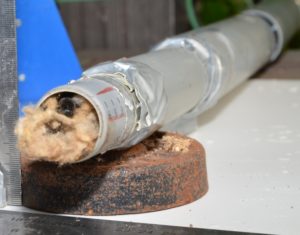
8) The outer construction of the corridor must be shaded , the sun's rays can heat the dark tube to extreme temperatures above 45°C. The journey through such a corridor is then a journey through hell for bumblebees, and many of them then stay in the overheated tube and try to ventilate.
Protection of external corridors against sunlight and overheating of the corridor.
(External corridor wrapped in aluminum insulation and additional polystyrene shielding at the bottom) –
photo by K. Kučer
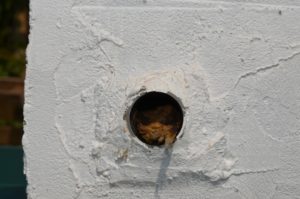
9) In the case of external corridors, we do not put the corridor inside the hive. However, the mouth of the corridor (passage through the side wall) should be close to the corner (approx. 4-5 cm from the inner corner of the hive).
Material recommended for exterior corridors:
We recommend the HT sewage system DN32. (HTEM PP pipe DN32). This is a water supply waste pipe system used, for example, to drain waste water from household sanitary equipment (sinks, etc.). The pipes have male-female ends, secured with a rubber band. HT fittings are available - elbows at angles of 15°, 30°, 45°, 67° and 87°, as well as couplings and blind plugs. We recommend that the passage through the hive be made fixed from a small section of pipe, with only the part necessary to connect the opposite part of the outer corridor protruding outside the hive (male-female system). We also recommend that the flap be adjusted. The outer corridor is then attached to these short pipes from both ends. This method allows for easy cleaning of both the corridor, the hive and the flap. It is also easy to store the components after the season.
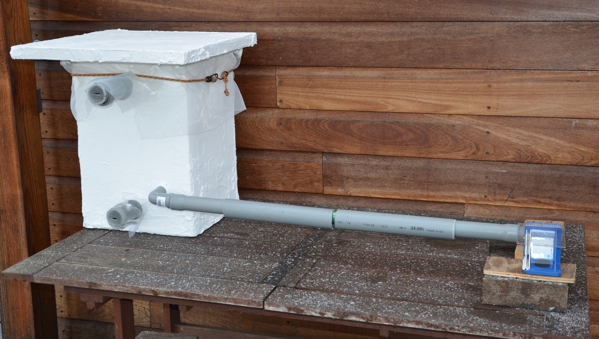
External corridor created using fittings, elbows and pipes of the HT DN32 sewage system –
photo by K. Kučer
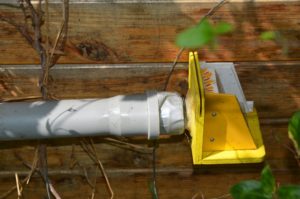
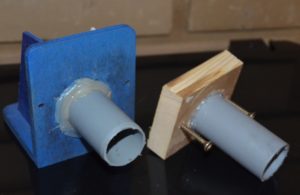
Method of fastening the flap.
- One of the damper manufacturers produces a type of damper with a side connection to the hive and a side trap. These dampers have a hole designed to connect to the hive with the same clearance as the outer diameter of the HT DN32, so the pipe can be easily attached to the damper without the need for further modifications.

Commercially available flap, with a clearance that fits exactly on 32DN HT – no modifications required –
photo by K. Kučer - In the case of other products, care must be taken during construction to avoid widening the inlet opening on the flap body (especially the part at the location of the movable flap). We make a female coupling for the corridor from a short piece of HT pipe. It is advisable to attach this either by gluing (with hot melt adhesive) to a pre-prepared notch. Another option is to use a pre-mounted square, into which a part of the pipe is firmly seated and the square is firmly attached to the rear part of the flap (as if it were a side wall of a hive). Be careful not to change the internal clearance of the corridor in the flap, it must remain even when we intervene directly in the flap body. We recommend that this coupling part of the pipe on the flap be only long enough to be able to safely connect it to the long corridor using the male-female system. The reason for this is the maintenance of the corridor flap.
Recommendation: It is advantageous to have a male on the flap side and a female on the long corridor side, because then, if necessary, the long corridor can be closed with a blind plug at night, the flap can be disconnected and necessary service adjustments can be made without disturbing the bumblebees or risking the parasite entering during the service adjustment.
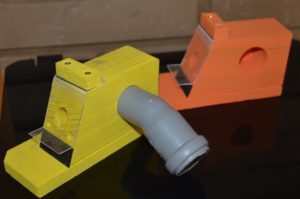
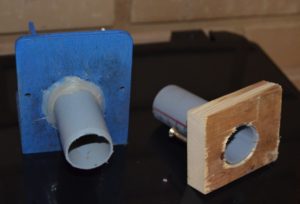
Two ways to connect the flap to the outer corridor.
On the left, by gluing it into a pre-milled notch.
On the right, an easier way to create an extension that connects to the rear side of the flap from the back –
photo by K. Kučer
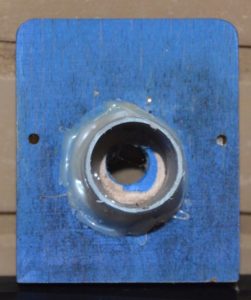
Modification of the flap for use in a long corridor –
photo by K. Kučer
View inside the short corridor on the flap – we do not change the internal clearance of the flap itself even when milling for the pipe –
photo by K. Kučer
Another option is to use goosenecks, similar to internal corridors. In these cases, however, high-quality material intended for laying cabling in the ground must be used. It is advisable to anchor the corridor with clamps. However, the solution for connecting the flap and the passage through the hive is more demanding in this case.