Checks and work in the hive
What you will learn here
- Why and whether to carry out hive inspections at all
- As it has advantages and disadvantages
- How to perform checks
- how and when to perform them
- What to look for when inspecting the hive
- Basic procedures for resolving findings
Last updated: 9/6/2022
Contents
Introduction
Why do we recommend carrying out inspections when the hive is equipped with protective equipment
What are the risks associated with nest inspections
Is it necessary to carry out nest inspections and when should you do it?
Types of internal inspections of the condition of a bumblebee nest
Basic routine preventive inspection of the nest
In-depth inspection of the nest
Cleaning the nest and hive
Cleaning the nest
Cleaning the hive
Replacing the lining
Returning the nest to the hive
Introduction
For some, this is a controversial topic, but the practice of many beekeepers shows that control is a way to prevent and solve problems in the hive in a timely manner . Controls in the hive help protect against parasites , but during inspections you can also detect and solve other problems , such as incipient mold, etc.
Checking the contents of a hive is usually a problem for beginners: "The nest is full of buzzing bumblebees and I'm supposed to stick my hands in it and even look in there? I'll never do that!"
Yes, it looks wild at first glance, but it's not as difficult as it might seem. It just takes overcoming fear and using the right technique, and that's what these pages are for.
It is also important to consider when to start checking . It certainly makes sense when something special is happening in the nest . For example, when the operation of a strong nest weakens before the departure of sexual individuals, or when another anomaly appears. There is no point in starting to check the nest in the solitary phase , or with a single generation of workers .
Why do we recommend carrying out inspections when the hive is equipped with protective equipment?
Notice
- All procedures and practices apply to a developed nest with at least one generation of bumblebees.
- Inspections and interventions in the nest during the solitary phase (the mother-queen is alone) are unnecessary and harmful – they would disturb the mother, damage the nest and it would disappear
- The first routine checks should be carried out when the worker bees appear in the nest
Even if you provide the hive with protective equipment , a parasite can still get into it, or a problem can arise that you may not notice in time . Parasites (except for the patchouli) attack gradually and covertly . Even if a parasite penetrates the hive, you will not immediately detect its effects. You will only recognize it later from various symptoms and often only when it is too late to save it.
An example is the action of the parasitic wasp (Aphomia sociella) see HERE If you find it in time, you can prevent damage to the nest. If you wait until the larvae appear on the surface of the lining, it is usually too late to save it . This is the final stage, in which the bumblebee nest is often consumed.
Just as beekeepers take care of beehives with bees, so too do bumblebee hives. Remember spring and our motto, “ Getting a hive is just the beginning .”? Bees Plus simply cannot agree with the “Get bumblebees and forget it” approach. If you get a bumblebee hive, you need to
So don't be afraid of hive inspections . We can assure you that this will be your first time being inspected. But everything can be managed and you will gradually gain practice and confidence.
What are the risks associated with nest inspections?
Some beekeepers are afraid to open a hive with bumblebees and start checking them.
Other breeders argue that the nest is damaged and therefore they do not carry out inspections, or only carry out routine inspections - by looking at the lining.
you can cause some damage when inspecting the nest . However, this is always less than if you do not carry it out and the parasite enters the nest and causes real damage .
For example, you can carelessly open the wax dome of the nest and damage the cocoons or wax capsules hidden under it. However, this operation can also be handled carefully and no damage will occur.
Sometimes breeders say that during inspection, the wax covers open/damage and larvae fall out, which weakens the nest.
Yes, it can happen, especially when you open the wax ceiling above the nest . However, the cases located here male larvae . These cases are built in so-called beams and are often connected to the wax ceiling of the nest by wax. When the ceiling is opened, the beams can be damaged and some larvae can fall out of them. The wax covers of queens and workers are usually not connected to the ceiling and therefore are not damaged.
However, the loss of male larvae is not a problem for the nest . Bumblebee nests almost always produce an excess of males. Sometimes the workers themselves reduce their number and carry them out of the nest. In addition, at a certain stage of the nest, workers can also lay unfertilized eggs, from which males are born. In addition, males can mate repeatedly, so there are always enough of them.
Yes, gentlemen, in the realm of bumblebees, the male is on the second row..
Interesting fact
- Bumblebees do not rehabilitate larvae that fall out of their wax casings, they carry them out of the hive as larvae without a chance
- Jaromír Čížek observed that only in the striped bumblebee (Bombus subterraneus) did rehabilitation sometimes occur and the workers continued to care for the larvae that had fallen out of the cocoons
There is another specific risk . This is that if you keep the hive outdoors parasites can enter it virtually . This can be the parasitic fly Brachycoma devia, or the small but insidious wasp Mellitobia acasta.
Therefore, we recommend carrying out inspections indoors , where you can move the hive after closing it and open it in the dark and in red light. Quick visual inspections can also be carried out outdoors in the evening We always recommend carrying out in-depth or longer inspections and interventions indoors .
So is it necessary to carry out nest inspections and when should you start doing so?
On our website we recommend performing checks , at least the basic . Since a basic check does not tell you anything about the condition of the nest in time , we recommend combining them with occasional in-depth checks .
However, we understand that it is a problem for some breeders to carry out inspections. However, we have presented arguments for carrying out inspections - inspections are prevention and the way to successful breeding. So it is up to you how you decide . If you decide not to carry out inspections, it is your decision and we respect it. In that case, make your own opinion and experience. Those breeders who lost their nest after being attacked by a wasp/parasitic wasp are clear on this matter .
When to start checking the nest
- Quick preventive checks are quick and easy – do them every day or at least every other day from the time the first generation of workers appears in the nest (checking the solitary phase is possible but not necessary)
- In-depth inspections are more demanding, do them
– preventively when the ectoparasitic wasp appears ( since the warming in May)
– as a reaction to a situation when something unusual is happening in the nest
A non-standard situation is, for example:
- the moment when the activity of a strong nest weakens significantly before the departure of the sexual individuals
- on the cešně/ there are weak/dead individuals
- traces of parasites appear in the nest
- bumblebees do not pass in and out of the hive
- other anomalies.
There is no point in undertaking an in-depth inspection of the nest if:
- there is a mother in a solitary phase
- the nest contains one generation of workers
Notice
Opening a hive with bumblebees during the day and in the light is a risk that the parasitic wasp Melittobia acasta may fly in. It is so small that you cannot see it with the naked eye. It is attracted by the smell of the nest and unmistakably follows its source. All it takes is one individual and the nest is practically doomed. You can read about this bumblebee parasite HERE .
Therefore, we do not recommend opening the door unnecessarily and for a long time in the light. It is safer to do checks at night, preferably under red light.
Types of internal inspections of the condition of a bumblebee nest
a) Basic routine preventive inspection
– View into the nest at the lining after opening the roof
b) In-depth inspection
– Checking the condition of the nest (waxwork) after exposing the lining
Basic routine preventive nest inspection
Objective of the inspection
- Basic indication of nest and hive condition
- Visual and smell inspection of the nest lining surface
- Checking the condition of the inside of the hive
How often to perform the check
- We recommend doing it daily or every other day
How long will it take?
- A routine check will take you 2-5 minutes
When and where to perform the inspection
- We recommend performing this in the evening when checking and cleaning the damper
- We recommend that you carry out a longer inspection and intervention indoors, or limit the inspection time to the necessary minimum; a longer open hive means a risk of parasite penetration (the parasite is attracted by the smell of the nest that comes from the hive)
What equipment will you need?
- Beekeeping gadget
- Peg/plug to close the inlet opening
- Long tweezers
- Red flashlight/headlamp
- For those allergic to bee venom, we recommend beekeeping gloves and a hood for protection
You can find the tools and their description HERE
Inspection procedure
Opening the hive
- Close the inlet opening – secure the closed flap with a pin, or close it with a stopper, for example a cork.
Note: if you are carrying out the inspection after dark, or if there is little traffic on the premises, the inlet opening should not be closed. - Carefully remove the roof , if you can do it without shaking, the bumblebees won't even notice it
- If using, remove the moisture wicking cloth/protective net
- At a red light, look at the scar
- If any individuals climb out of it, remove them with a beekeeping tool into a glass and, after the inspection is complete, dump them all at once into the hive
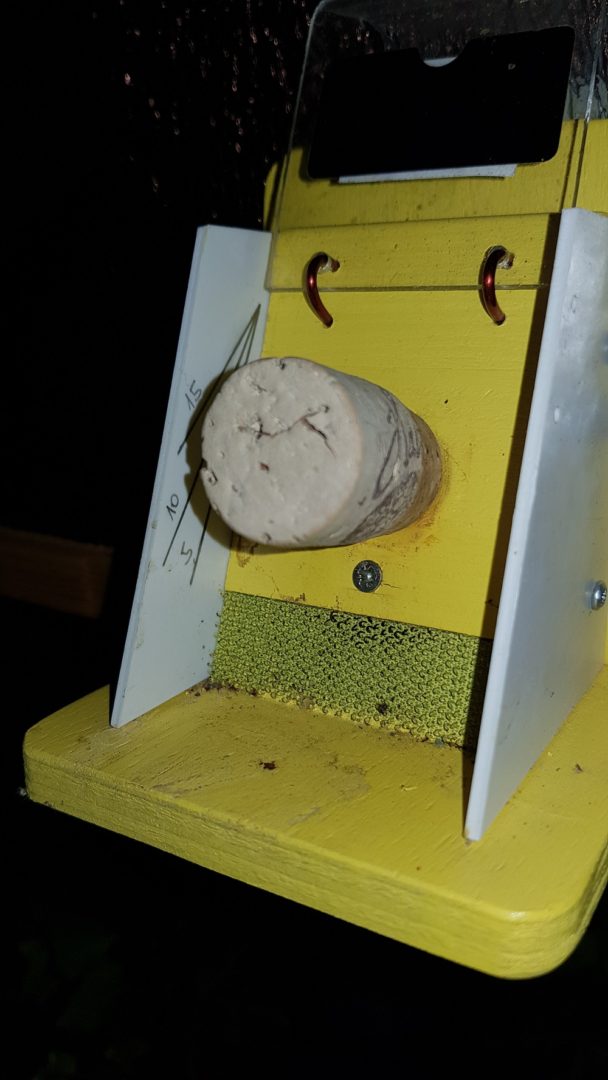
Closing the entrance hole of the alley with a ground cork plug
Beekeeping gadget
Checking the lining surface
- Look under the roof, on the lining and in the corners of the hives for excessive mold (you can smell it). A small amount of mold is not a big problem if you ventilate the hive through the vent.
If so, you need to ventilate more intensively. - The lining may be damp, it should not be completely wet.
If it is wet, it is necessary to ventilate more intensively and use and change an absorbent cloth. - be no parasites on the lining, under the roof, in the corners of the hive, on the absorbent cloth, etc. - the bee moth, parasitic wasps (up to 2mm in size), flies, fly larvae, or dead bumblebees.
If so, it is necessary to carry out a thorough inspection, clean the nest, clean the hive, and replace the lining. - The nest should not smell (sometimes you can smell rotting moss).
If it does and you see dead bumblebees, larvae, parasites on the lining, you need to do a thorough inspection, find the problem and clean the nest and hive. - The vent should not be covered with a lining. However, bumblebees will often cover it with a lining if they feel a draft.
If the vent is covered, it is a good idea to push the lining away by hand, with long tweezers - The lining should cover the entire bottom so that the bumblebees do not nest there.
If there is not enough lining, add it and cover the bottom of the hive; create a pocket/cavity for the bumblebees to enter the hive through – see HERE
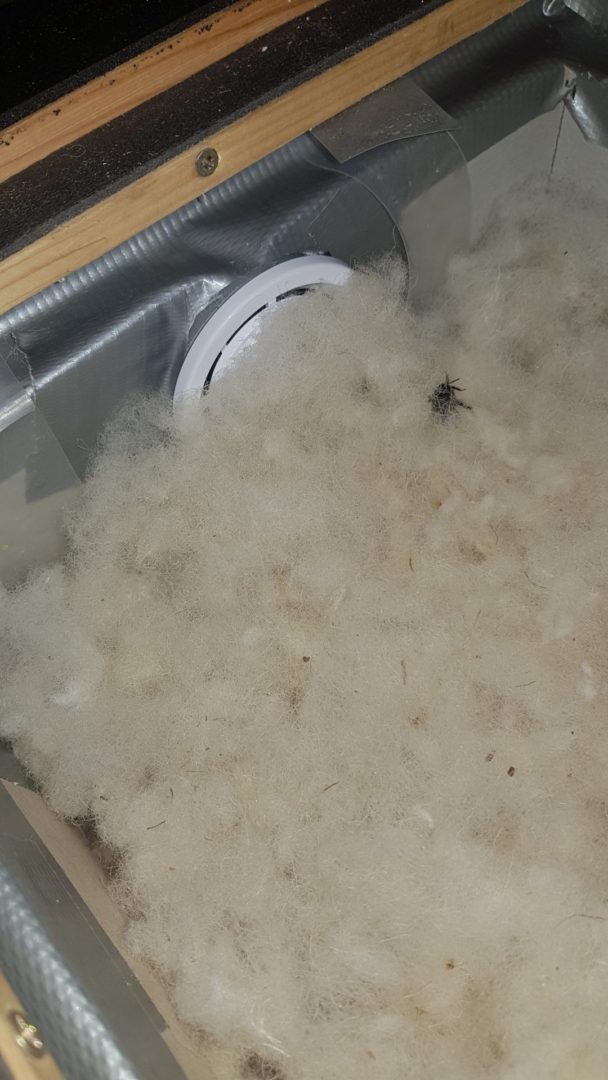
Ventilation hole covered by lining
Checking the inside of the hive
- Check seal for damage (bumblebees sometimes bite through it)
- You will inspect the roof to make sure it is not twisted and fits well.
- Inspect the ventilation grille to make sure it is not chewed through or waxed.
- If you find any defects, fix them as soon as possible
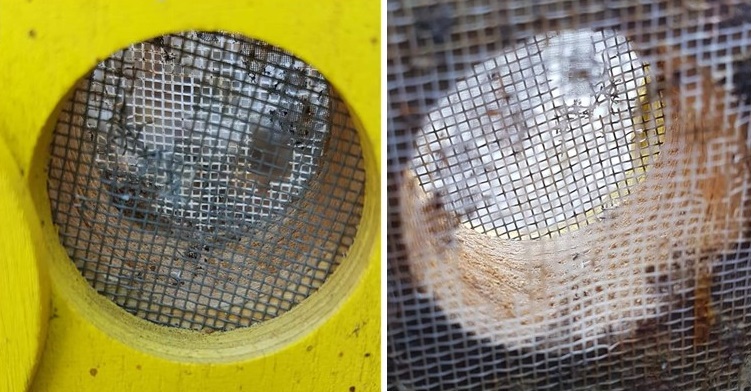
Bee hive ventilation sealed with wax
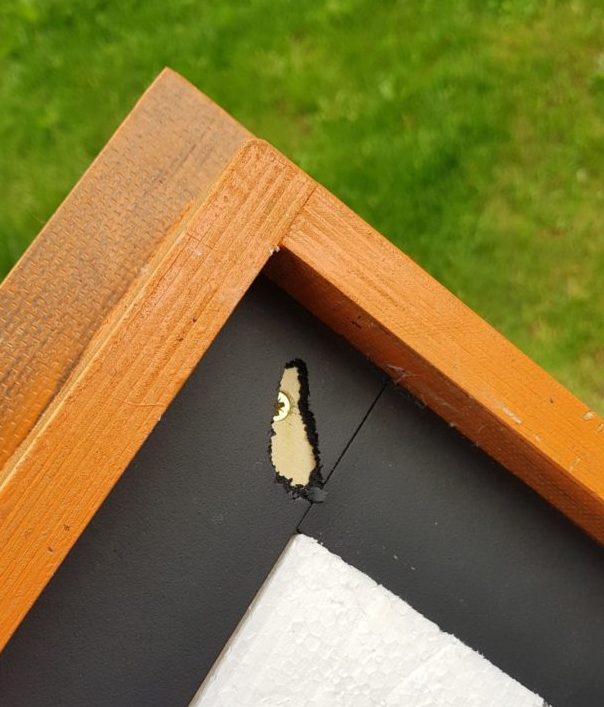
Seal under the roof bitten by bumblebees
Closing the hive
- Cover the nest (rag, protective net), close the roof
- Check that the hive roof is properly seated and tight.
- You can also check how agile the nest is - when you knock on it (when you close it), the nest should respond with a loud buzz. A nest with problems will often sound listless
- After the hive has calmed down, release the inlet opening ; but leave the flap down (tilted) – as in normal operation.
In-depth nest inspection
Objective of the inspection
- Checking the nest lining by sight and smell
- Checking the condition of the inside of the hive
- Uncovering the nest and checking its condition by sight, hearing and smell
How often to perform the check
- We recommend doing this at least once a month, optimally once every 2-3 weeks when parasites such as roundworms etc. appear (from May)
How long will it take?
- The inspection will take you 45 – 90 minutes
When and where to perform the inspection
- We recommend performing it in the dark
- Always carry out the inspection indoors. A closed room without light penetration is very suitable, preferably a bathroom with a bathtub.
- We recommend that you check in a tub that the bumblebees cannot climb out of. Alternatively, you can use another container with a smooth surface
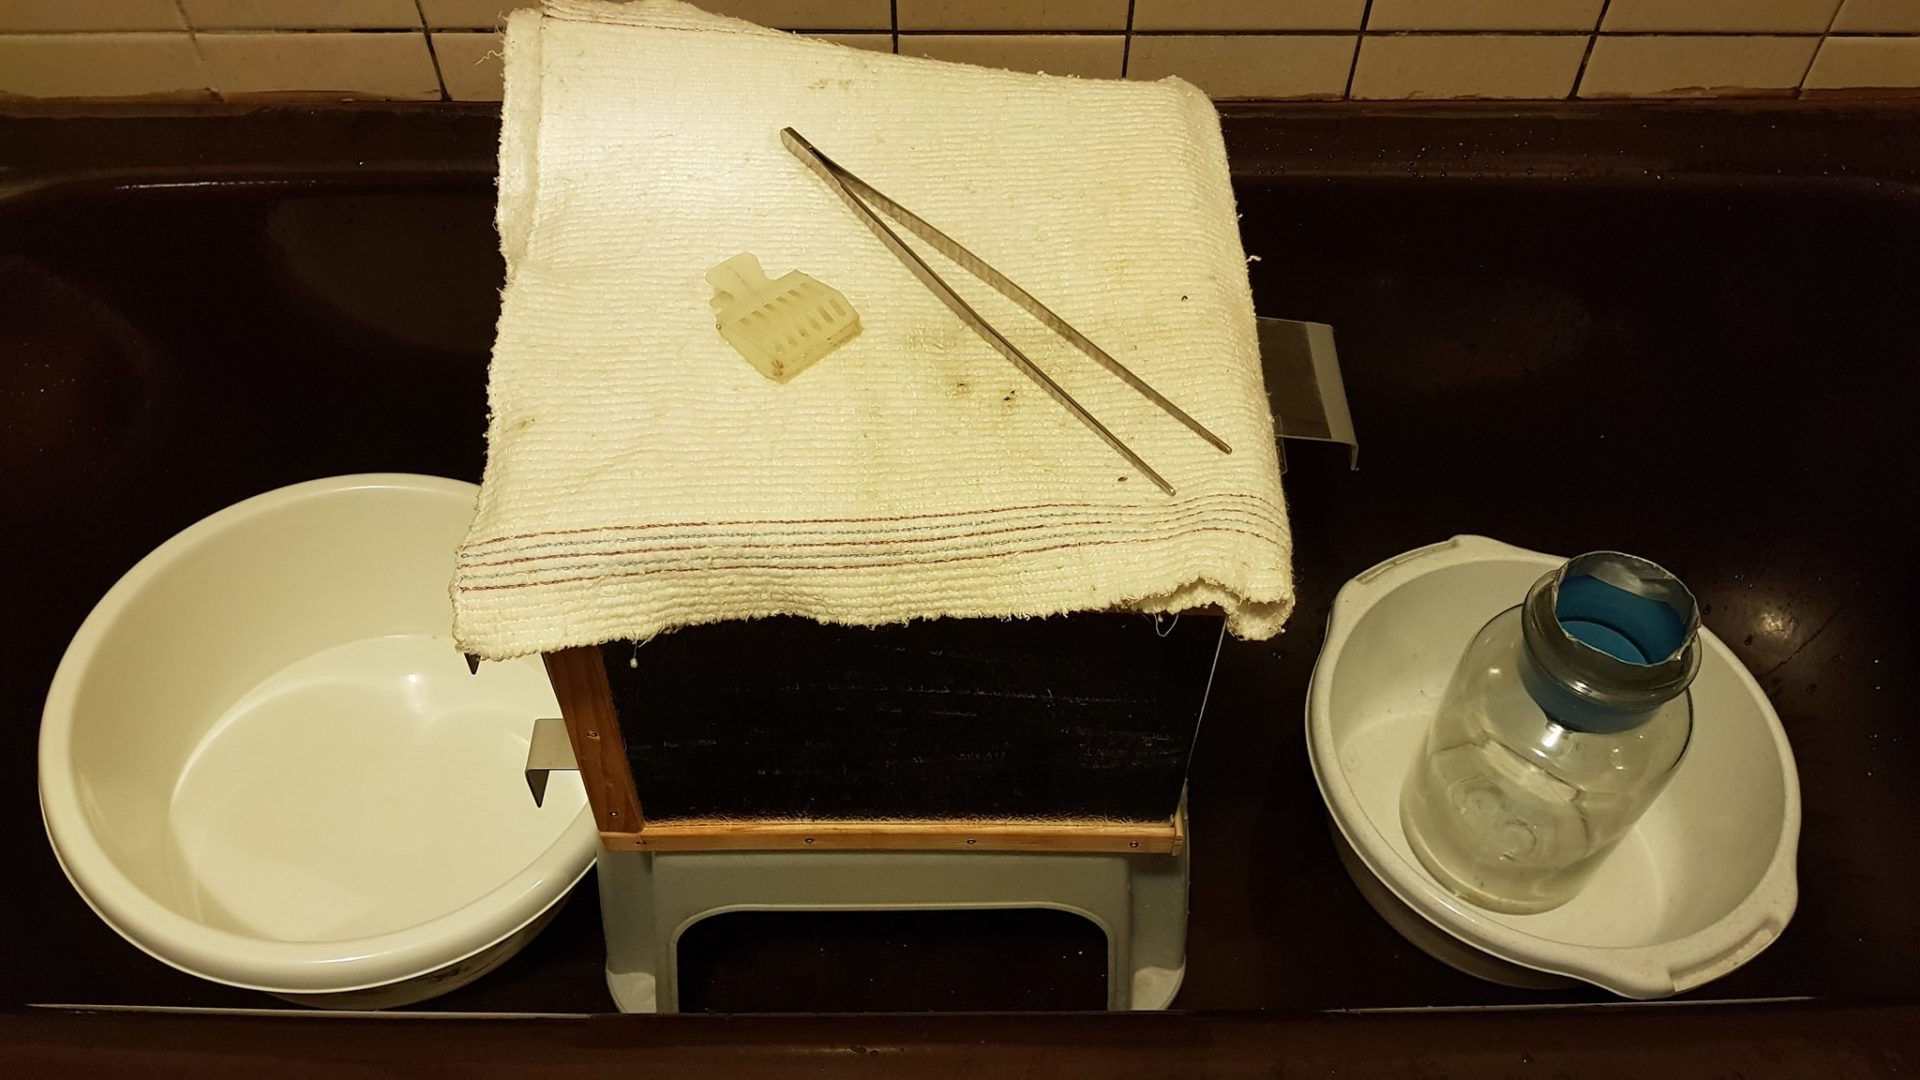
What equipment will you need?
- Beekeeping gadget
- Peg/plug to close the inlet opening
- Long tweezers
- Red flashlight/headlamp
- Rag to cover the nest
- Bumblebee jar with funnel
- Sugar solution feeder
- For those allergic to bee venom, we recommend beekeeping gloves and a hood for protection
You can find the tools and their description HERE
In-depth inspection of the nest
Photo O. Hercog (2019)
Inspection procedure
Opening the hive
- Close the entrance hole after dark – secure the flap closed with a pin, or close it with a stopper, such as a cork.
- Bring the scare indoors to a dark and preferably locked room.
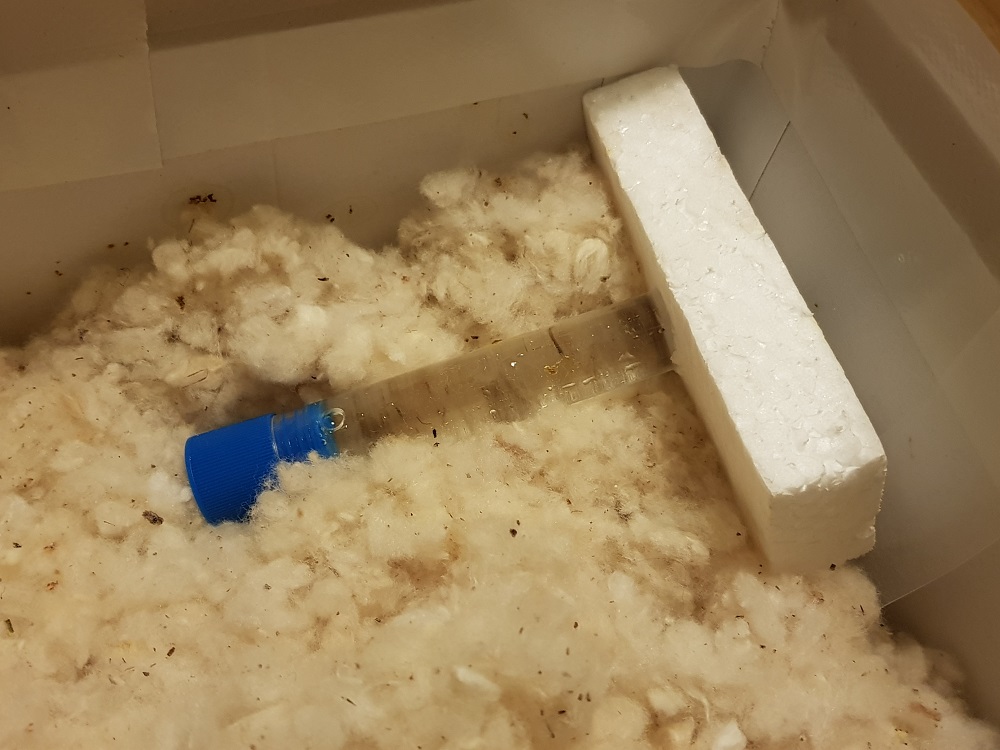
- Place the hive in a bathtub or other container with a smooth surface
- Wait for the nest to calm down , in the meantime prepare everything you need
- We recommend placing a little padding at the bottom of the jar to trap bumblebees as an " airbag " (if you use padding from their nest, bumblebees will be known to be calm)
- at a red light ; if you can do it without shaking, the bumblebees won't even notice.
- If using, remove the moisture wicking cloth/protective net
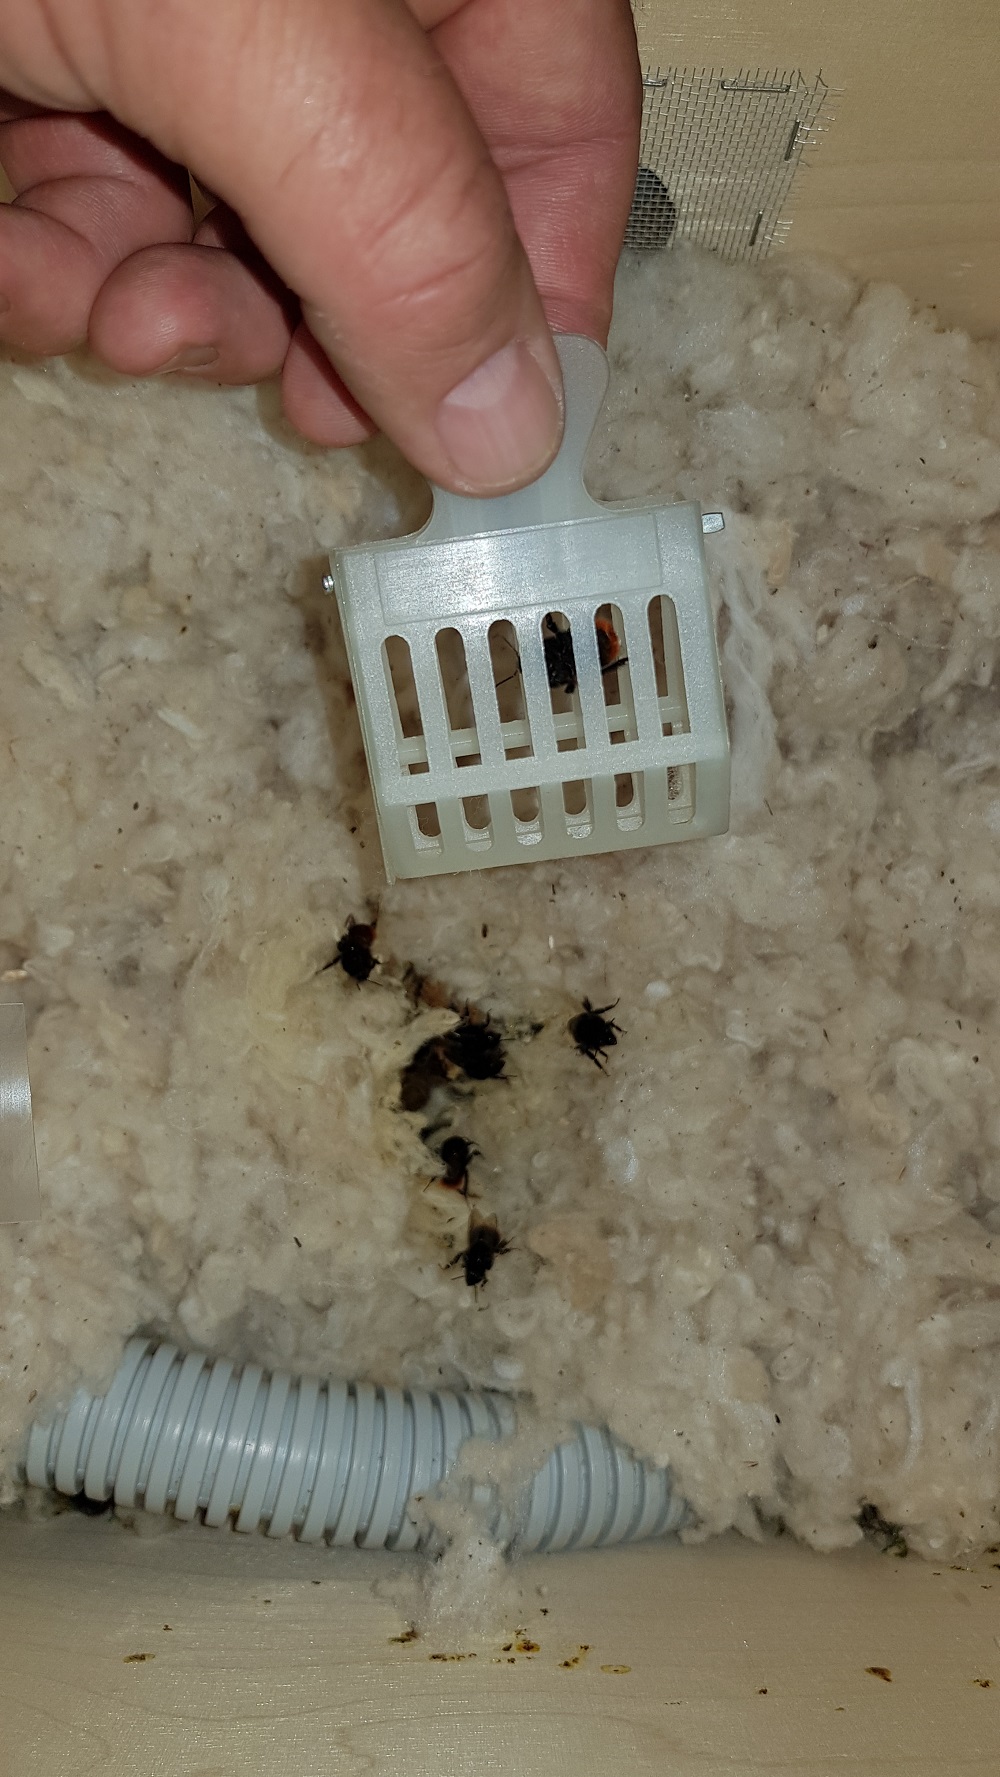
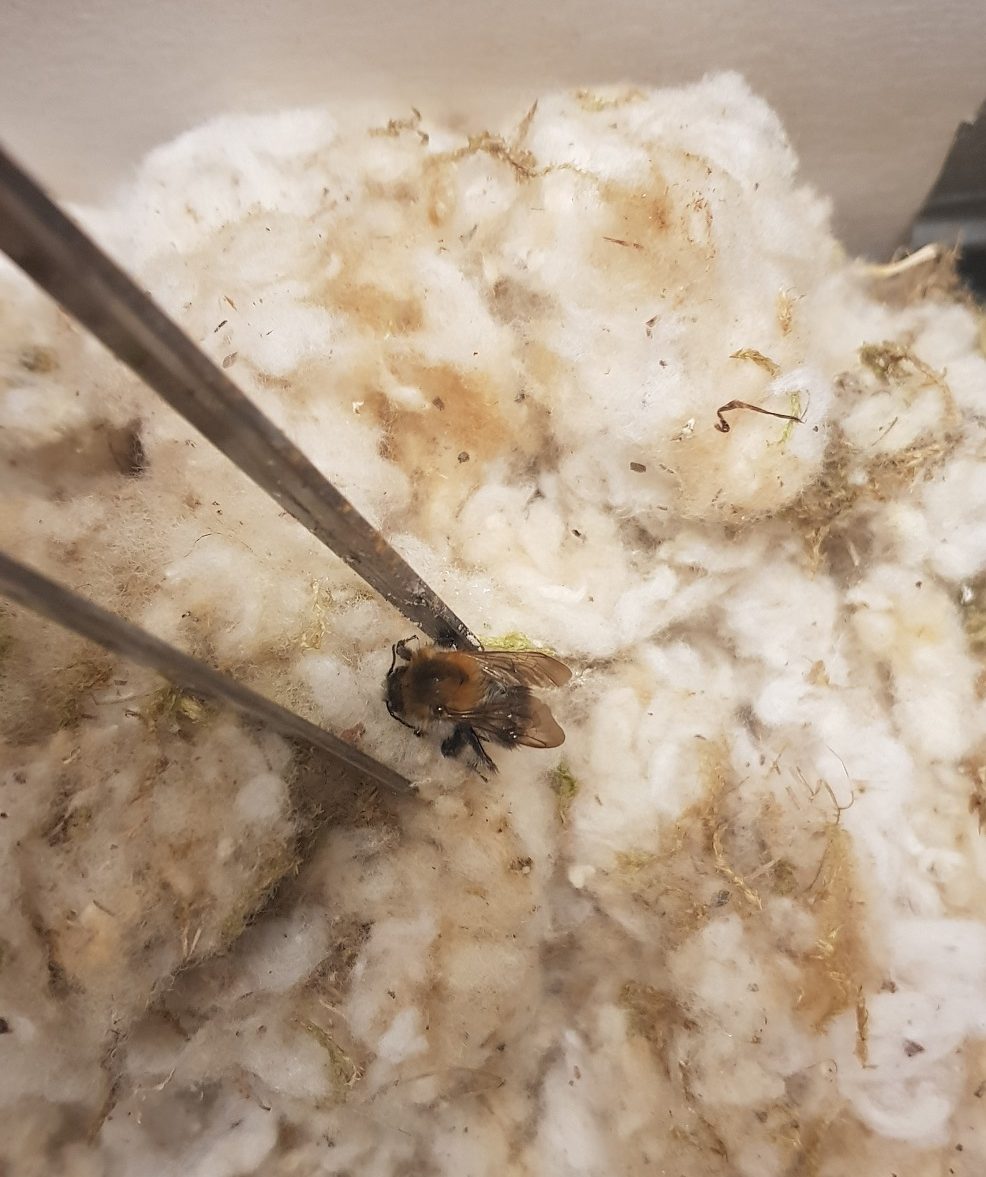
Capturing individuals
- Use a beekeeping device to catch individual bumblebees on the lining
- Throw the bumblebees into a glass with a funnel so they don't climb out.
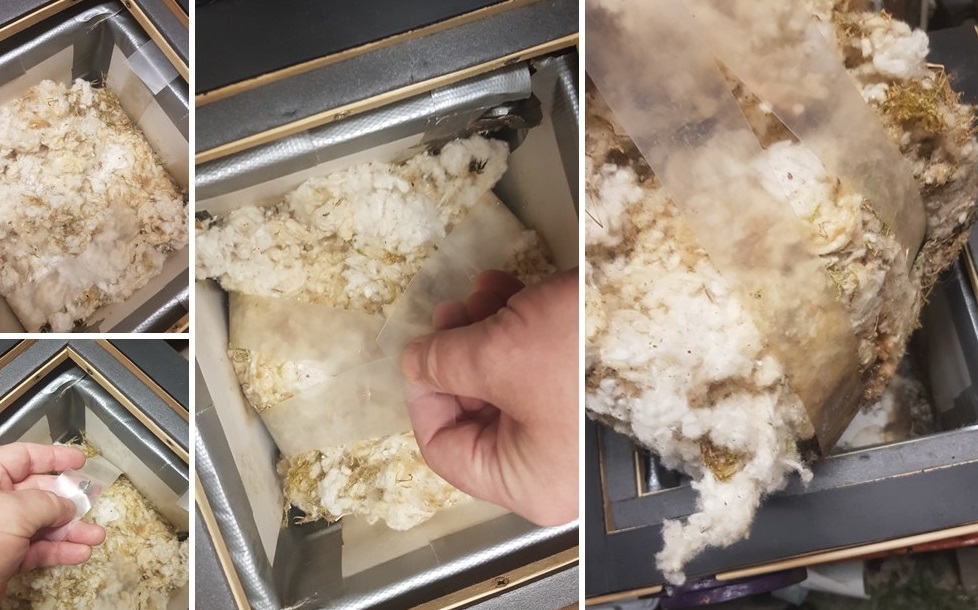
- remove the lining piece by piece and catch the bumblebees as they emerge.
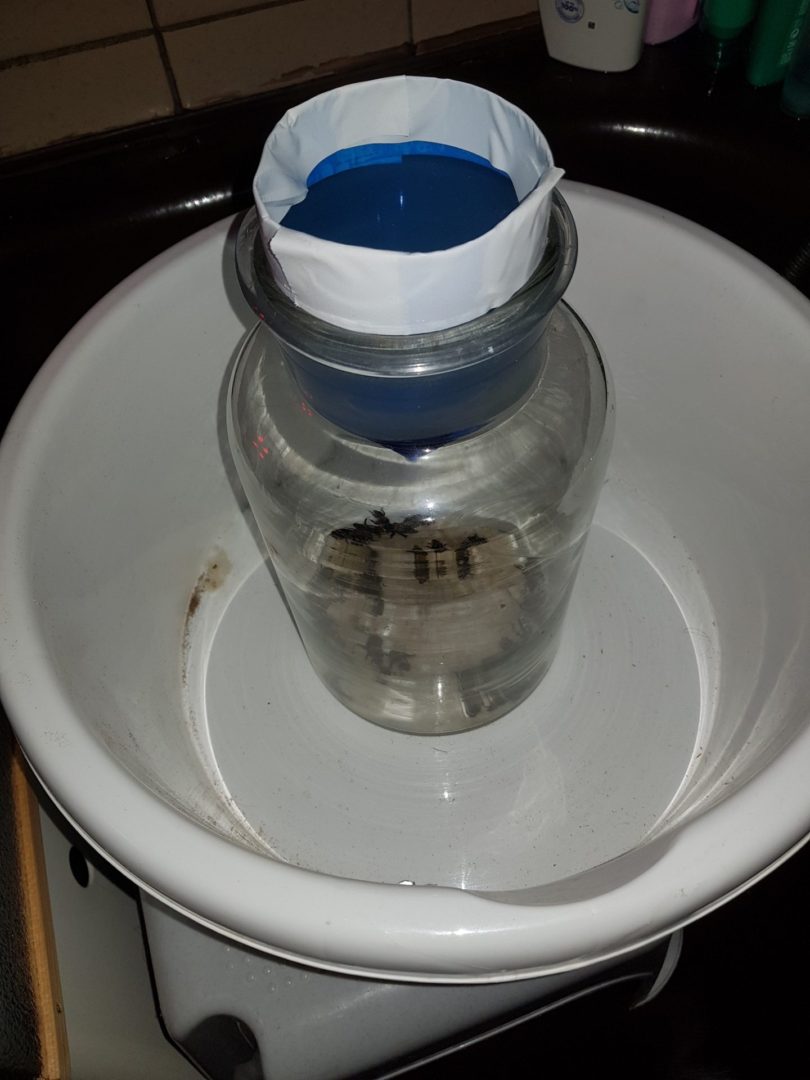
Bumblebee transfer jar with funnel made from PET bottle
Checking the lining
- The procedure is the same as for a basic routine nest inspection
Opening the nest
- Gradually remove the lining until you reach the wax ceiling of the nest (not all species have it),
- Carefully open the ceiling with tweezers and spread it to the side
- If more workers/individuals emerge, catch them and throw them into the jar
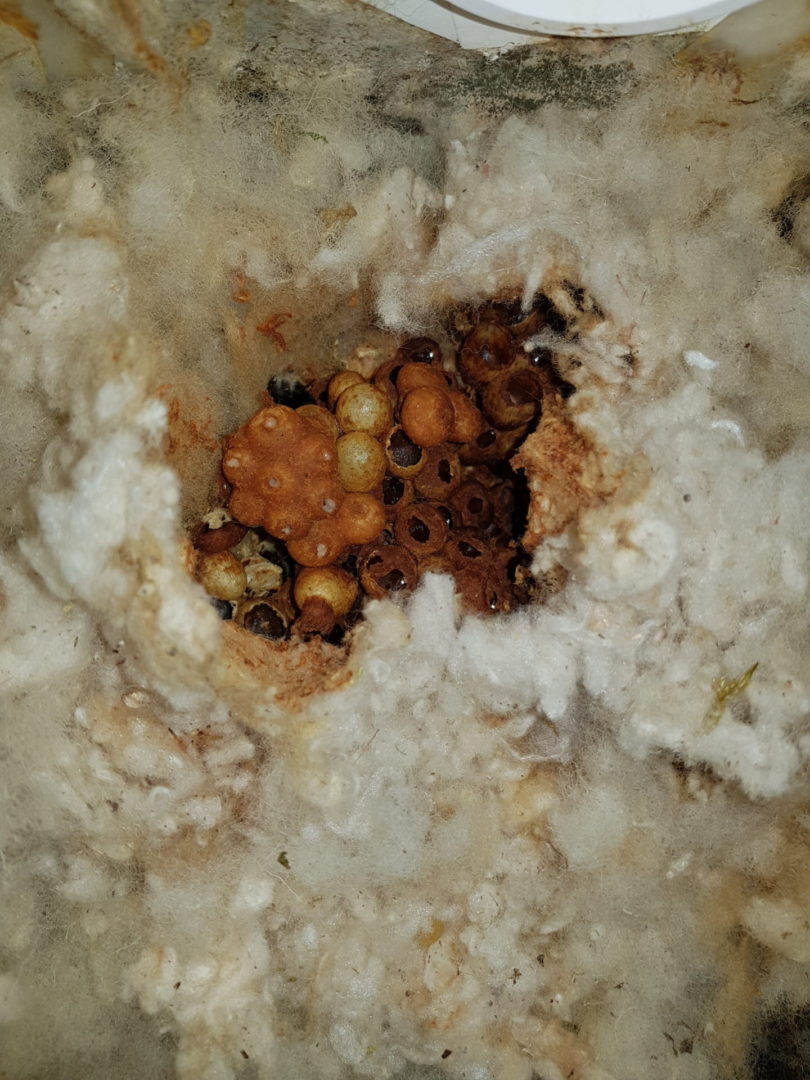
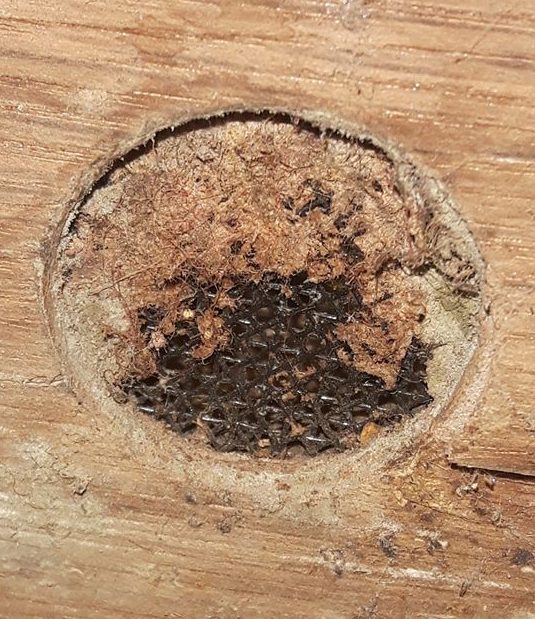
Wax ceiling of a bumblebee nest (Bombus ruderatus)
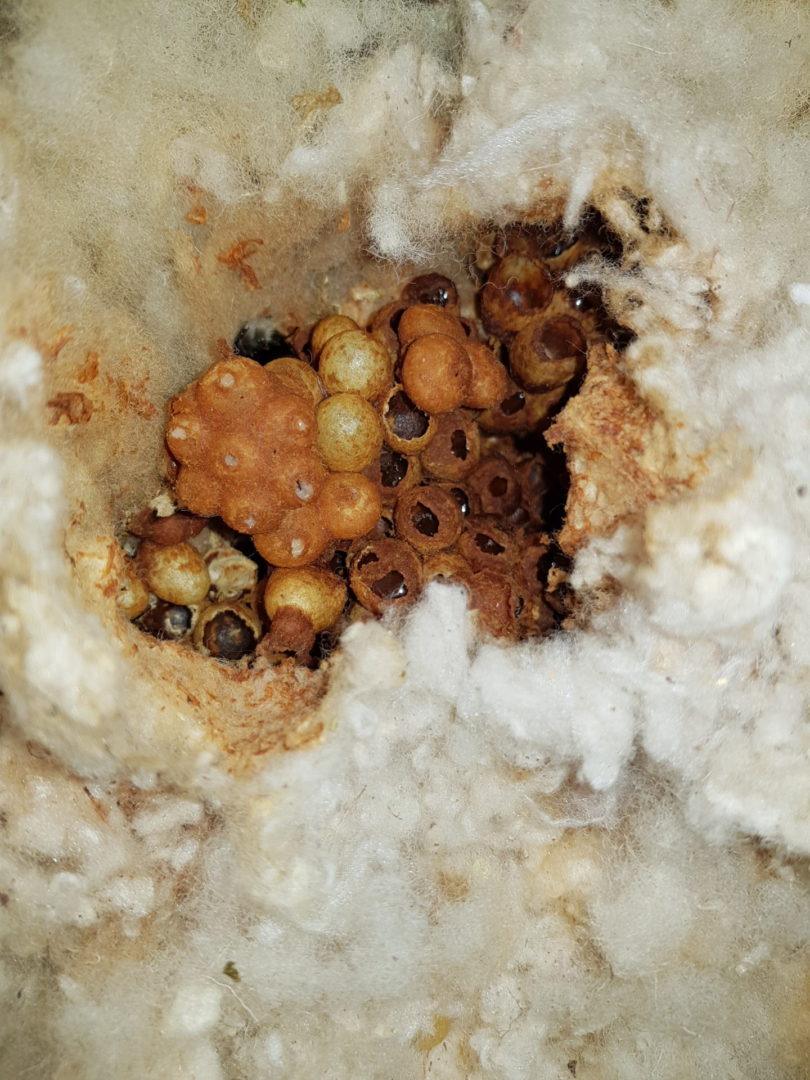
Wax ceiling of a nest of Humboldt Bumblebees (Bombus ruderatus)
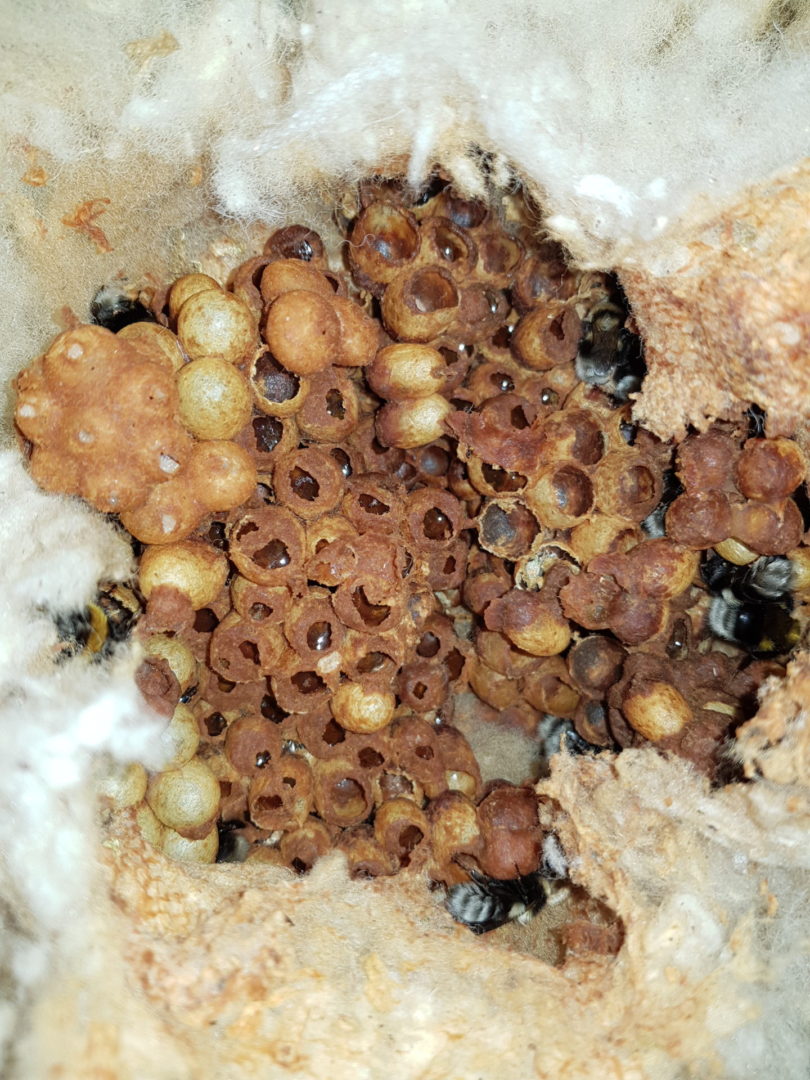
Wax ceiling of a bumblebee nest (Bombus ruderatus)
Photo O. Hercog (6/2020)
Young mothers of hummingbirds (Bombus ruderatus) hiding under the nest
Photo O. Hercog (6/2020)
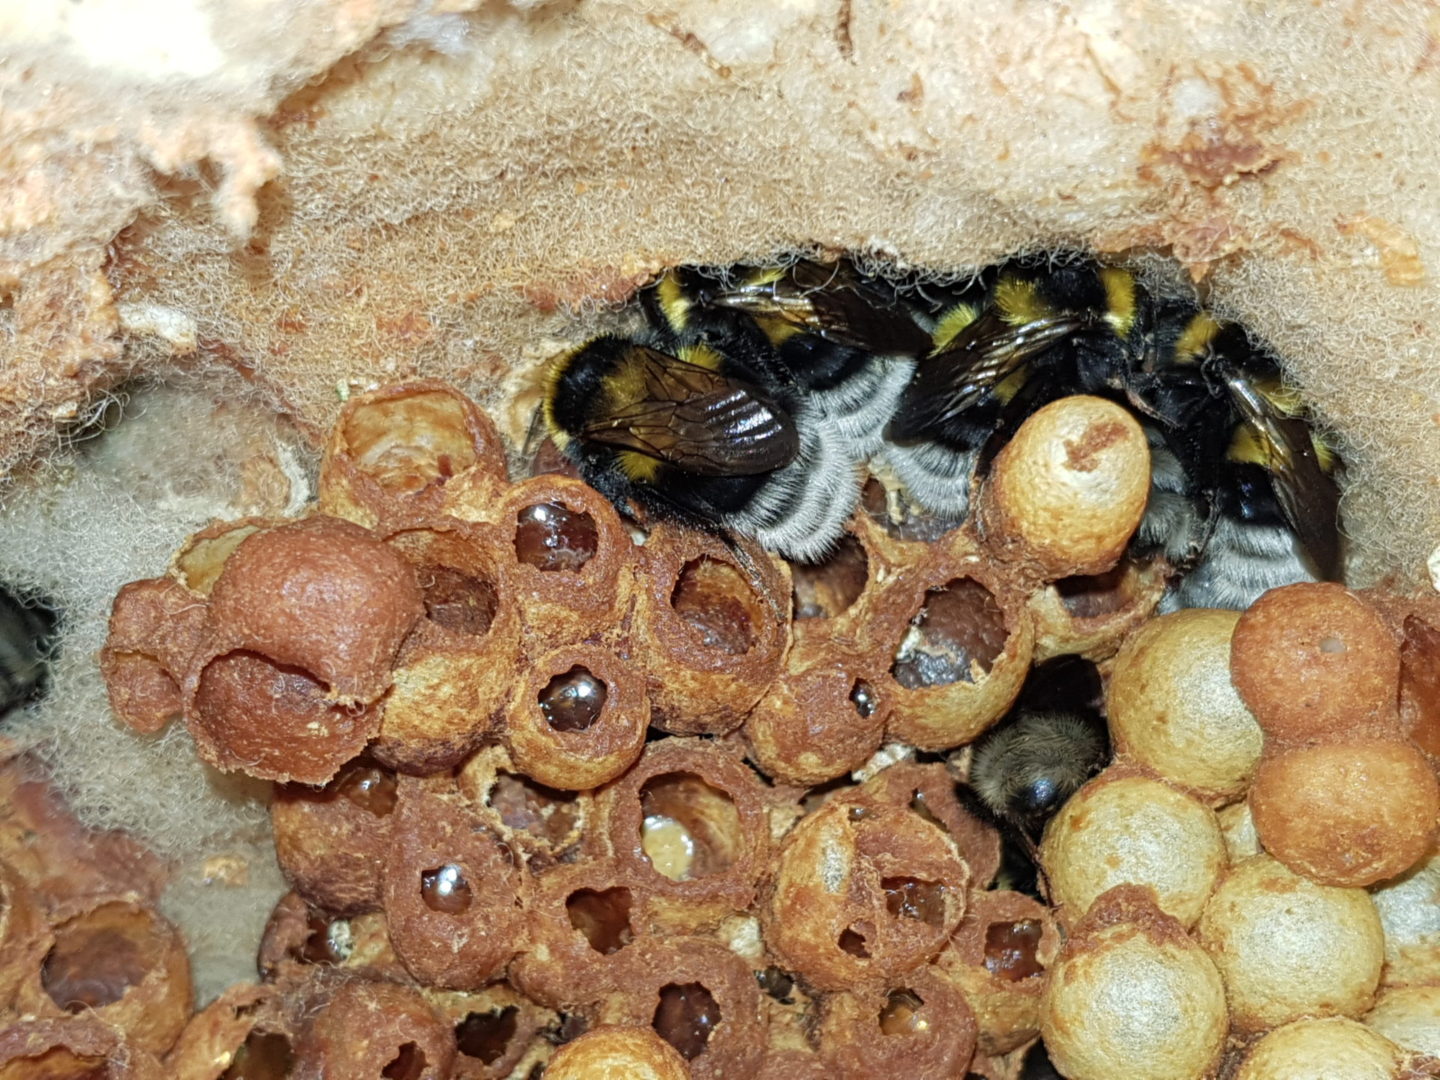
Nest inspection
- In the nest you will see waxwork, cocoons, laying, workers. The queen mother / young mothers will usually hide under the nest, or she will buzz at you intensely and threaten you.
- Watch and look for anomalies
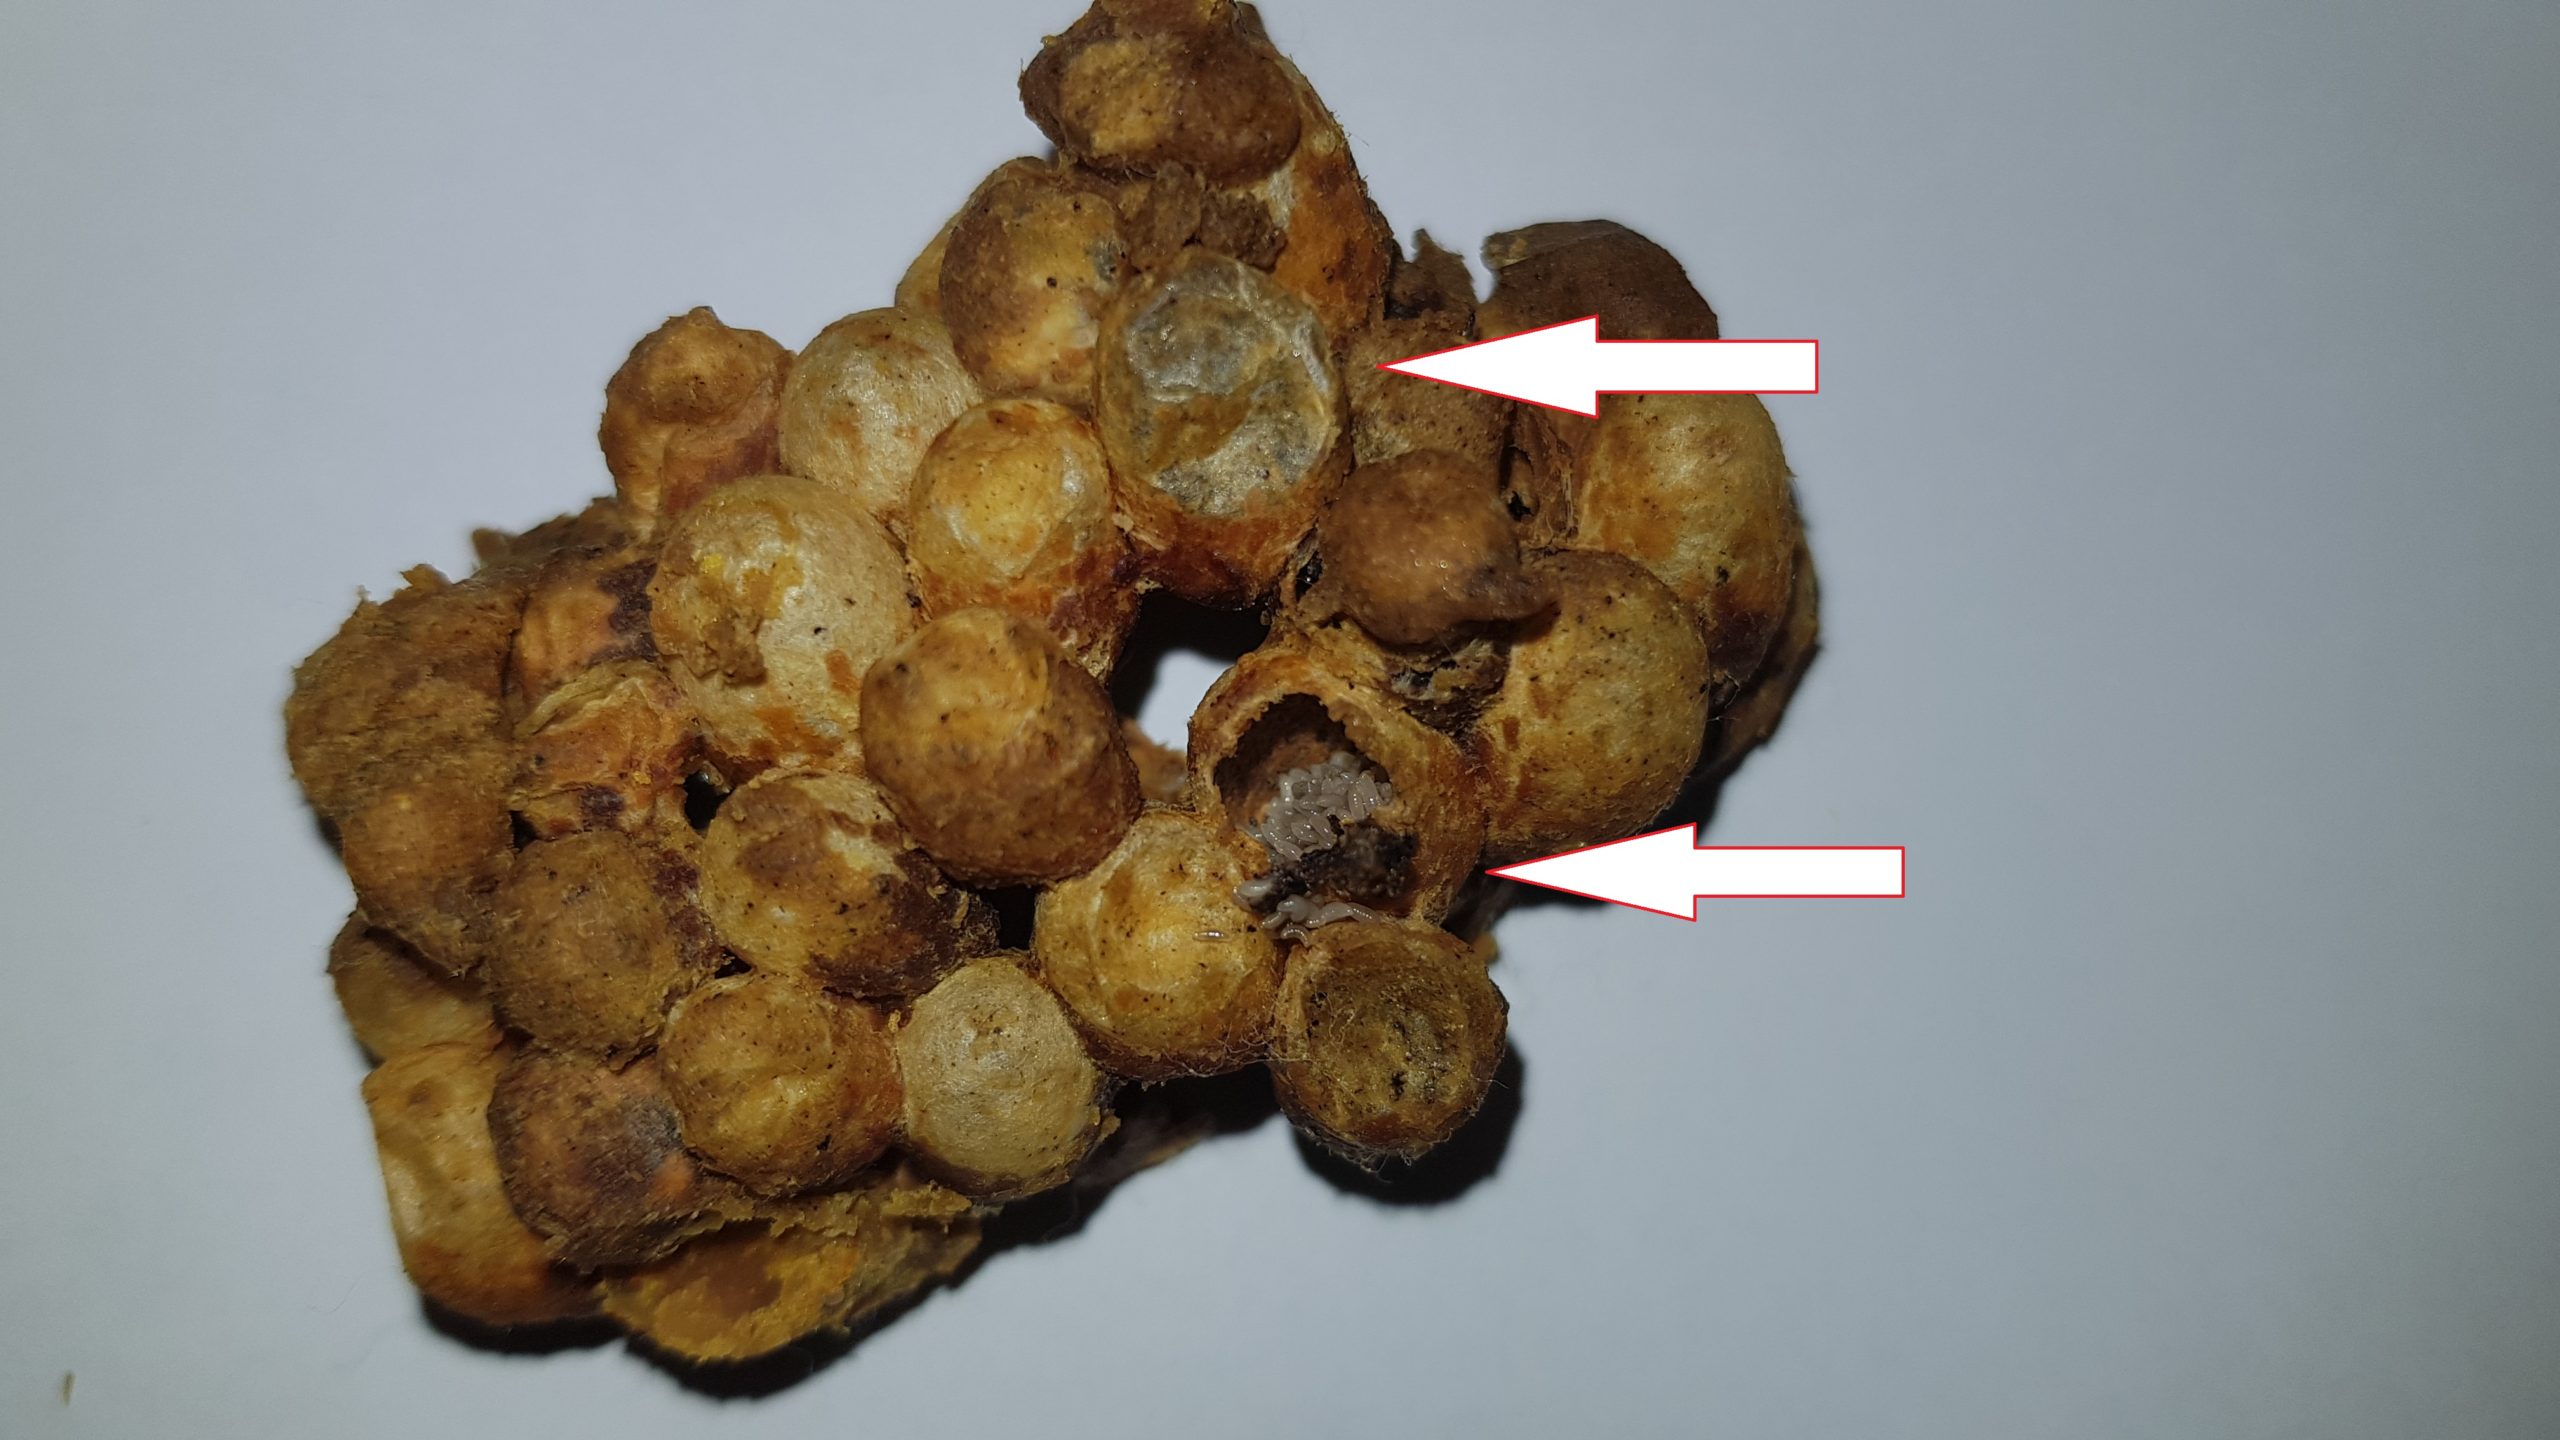
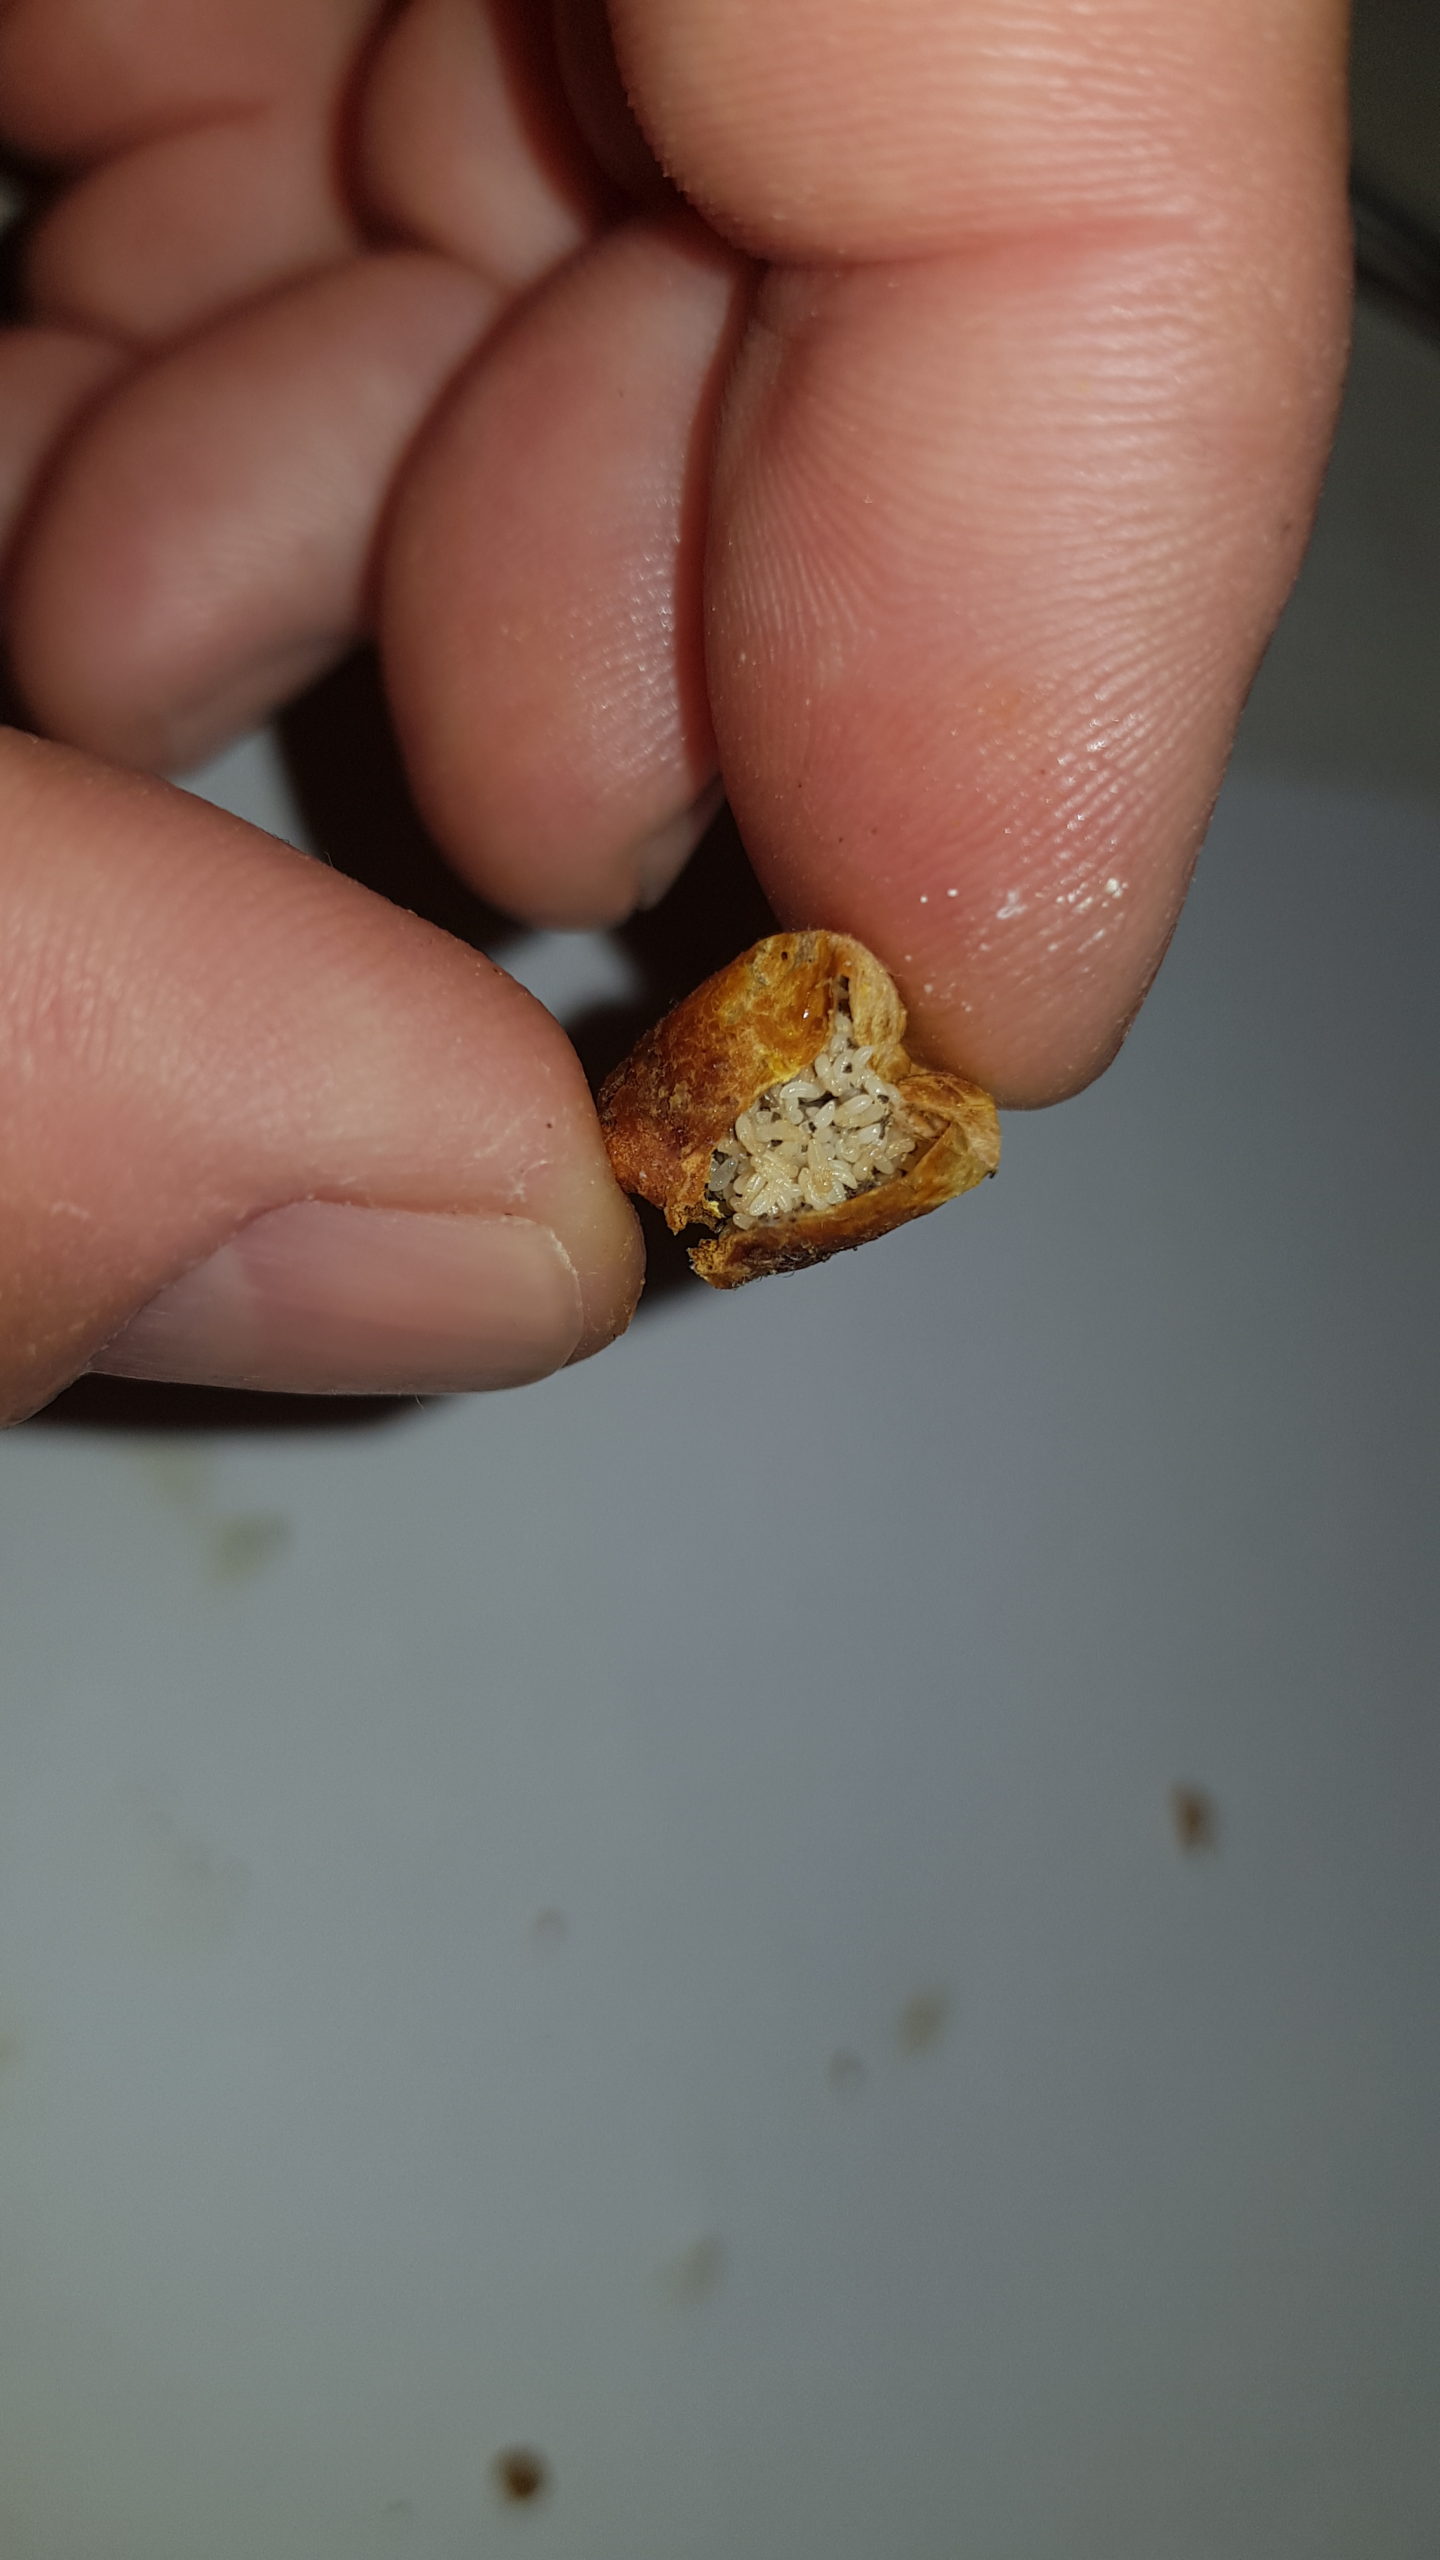
- Look carefully to see if you see adult parasites , or their caterpillars (e.g. the bumblebee moth Aphomia sociella), their larvae (parasitic flies, gnats, etc.), larvae or pupae of flies , etc.
If so, and it is necessary to clean the nest and the hive with long tweezers, the nest and preferably put it in a clean lining. - Look carefully to see if you can see any traces of parasites :
– threads of the caterpillars of the bee-eater,
– holes in the sides of the cocoons / wax cases,
– eaten away wax work,
– cocoons / wax cases eaten away by the larvae of the parasitic wasp Melottobia acasta
– movement of small creatures in the wax work
If so, and it is necessary, clean the nest and the hive and put the nest in a clean lining - Take some photos of the inside of the nest and look at them later. You will have a comparison of how the nest is developing and will also be able to see at a leisurely pace if you have overlooked anything.
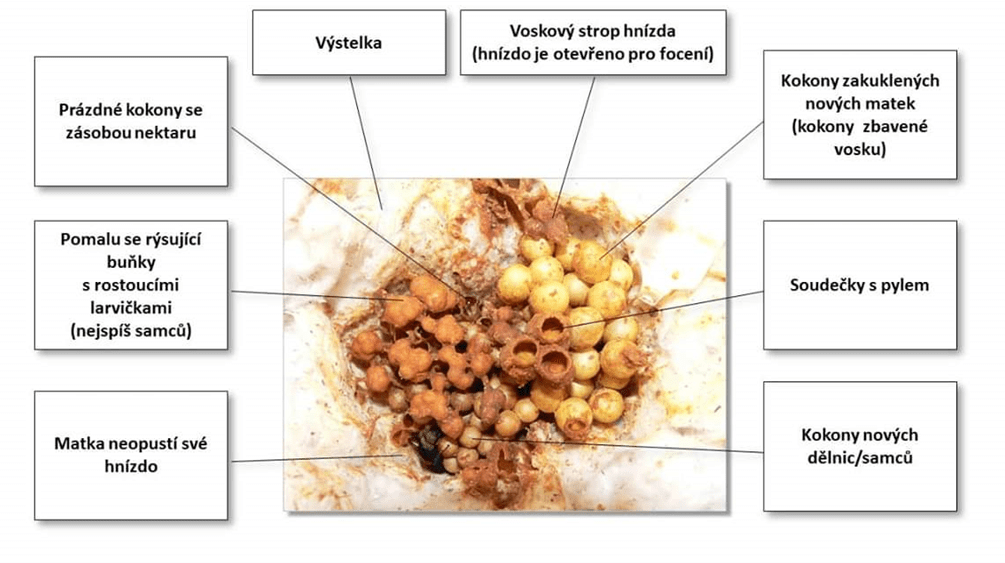
Description of a bumblebee nest
Photo: O. Hercog
.
Example of nest infestation by the parasitic wasp (Aphomia sociella)
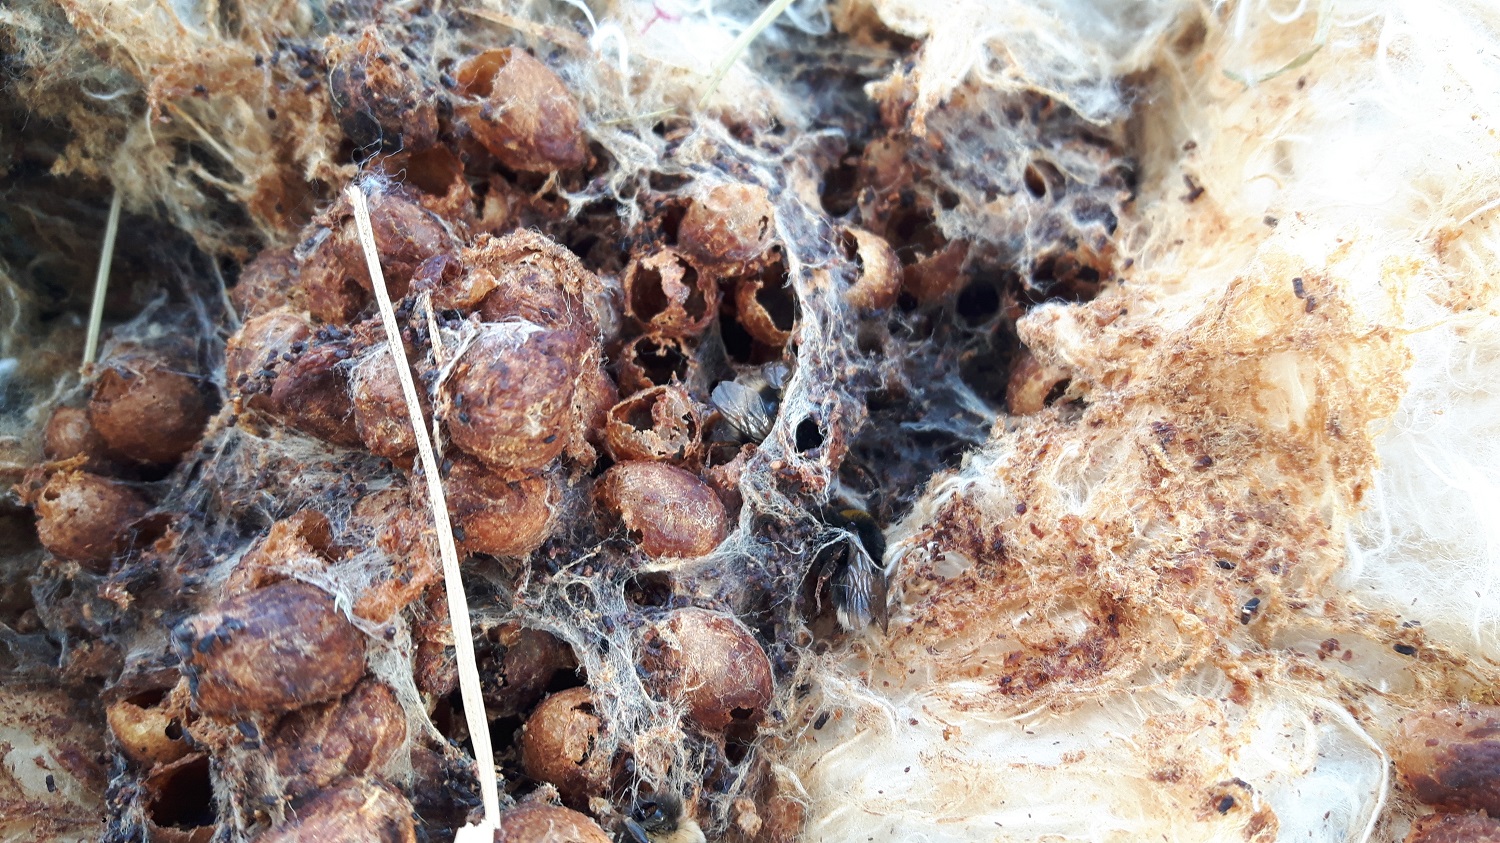
Aphomia sociella – nest infested with Aphomia sociella
Photo O. Hercog (2017)
And here it was left to nature. The nest was eaten and covered in Aphomia sociella caterpillars
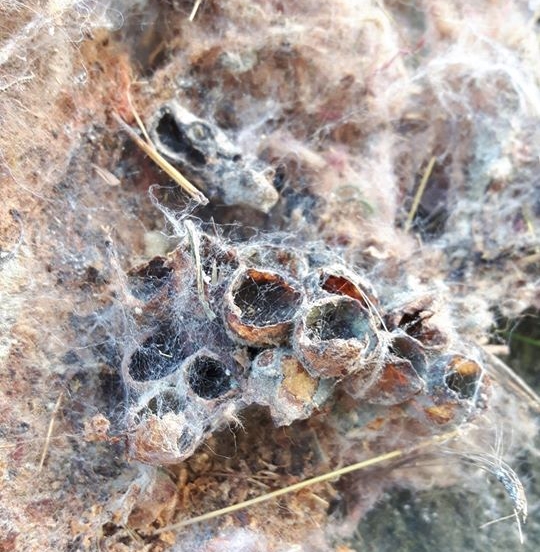
Example of nest infestation by the parasitic wasp Melittoobia acasta
Melittobia acasta – Infested bumblebee cocoons
Photo O. Hercog 6/2019
Melittobia acasta – infested bumblebee cocoons
Photo O. Hercog (6/2019)
O.
Closing the nest
- If you accidentally changed the position of the cocoons during the inspection, you must return them to their original position (yellow part up)
- If you have collected pollen and feel the need to strengthen the nest, place it in the lid of a PET bottle as close as possible to the nectar and pollen containers ; only here will the workers take it and use it to feed the larvae, otherwise it will be consumed by the workers and young queens (applies to pollen storrers), such as the ground bumblebee.
- Carefully cover the waxwork with a wax cap – use tweezers
- Carefully place a layer of lining
- Fill the lining up to the vent hole - do not compress the lining!
- Place a feeder with a sugar solution , which will strengthen the bumblebees and make them calm down / start carrying the wort into empty cocoons)
Checking the inside of the hive
- Check the hive seal for damage (bumblebees sometimes bite through it)
- You will inspect the roof to make sure it is not twisted and fits well
- Inspect the ventilation grille to make sure it is not chewed through or waxed
- Also check the inside of the hive to see if there is any problem that needs to be addressed
- If you find any defects, fix them as soon as possible
Closing the hive
- Pour the bumblebees from the jar you collected them from earlier onto the lining
- Cover the nest immediately (rag, protective net), close the roof
- Check that the hive roof is properly seated and tight
- Move the hive to its original location
- After the hive has calmed down, release the entrance opening (but leave the flap down - as in normal operation) - it is best to open the entrance opening of the hive only in the morning.
Tube feeder – inclined position
Photo: O. Hercog

Bumblebees PLUS – Feeder made from a PET bottle cap with a cotton insert – SUITABLE
Cleaning the nest and hive
Cleaning the nest
If it is necessary to clean the nest of parasites, you have several options.
a) You can use long tweezers , or carefully remove the entire nest from the hive.
b) If you have equipped your hive with a bumblebee lift, use the option of removing the wax work using hinges. Otherwise, it will be very difficult to remove the nest without damage and it is better not to try.
If you had to remove the nest, place it in a plastic box the remaining workers and queen remain in it . If the queen and workers do not remain sitting on the nest, put it away with the other bumblebees. However, the queen will usually stay in the nest, it is not worth taking her by force.
You can then examine the nest closely and remove the parasites with tweezers . Parasites often stick right under the nest . You can also collect them there, or at least reduce them with long tweezers. But it is better to do it through the lining.
A bumblebee lift is very useful for removing the nest. You can read about it HERE
If the nest has been attacked by the Aphomia socilela , you may not always see all the larvae (caterpillars) of the mite. They will be hidden under the nest (hence the replacement of the lining), or directly in the wax structure. It is worth taking your time and inspecting the work carefully, removing the caterpillars.
We recommend treating the lower part of the wax work with Lepinox Plus.
Recommended procedure:
- Apply the product only when the nest is attacked – not as a preventative measure
- Then sprinkle (sugar) a little of the preparation on the lining where the wax work of the nest will be placed, as well as its immediate surroundings
- Treat the underside of the wax piece – it is advantageous to use a fine brush and “powder” the wax piece from the underside
- Do not apply the product to other areas
- Apply only the necessary amount of product
- Do not apply the product to food containers
- Do not apply the product to waxwork or bumblebee larvae – avoid sprinkling the work with the product!
- Check the nest after application, you can repeat the application of the product after 10-14 days
Apply the product in the same way when rescuing an open or disturbed nest, for example as part of the Bumblebee Quick Rota campaign
Read more about this product HERE

Lepinox Plus
Source: Manufacturer
Tweezers
Use tweezers to clean the nest
Bumblebee elevator in action
Photo O. Hercog
Cleaning the hive
If the nest in the hive has been attacked by parasites, or the hive is moldy, it is also necessary to clean it . In practice, this means preparing the hive as if it were for a new season , see instructions HERE.
Don't forget that parasites can hide in hard-to-reach places in the hive - in corners under the roof, in the entrance tube, etc.
Cleaning is therefore necessary, including cleaning the walls and replacing the cardboard used to line the hive. Parasites can also hide behind it (especially if it is unsuitable cellular cardboard).
When cleaning the hive, we recommend sanitizing the hive walls by heating (not burning) them with a heat gun.
If you haven't already, don't forget to install a bumblebee elevator .
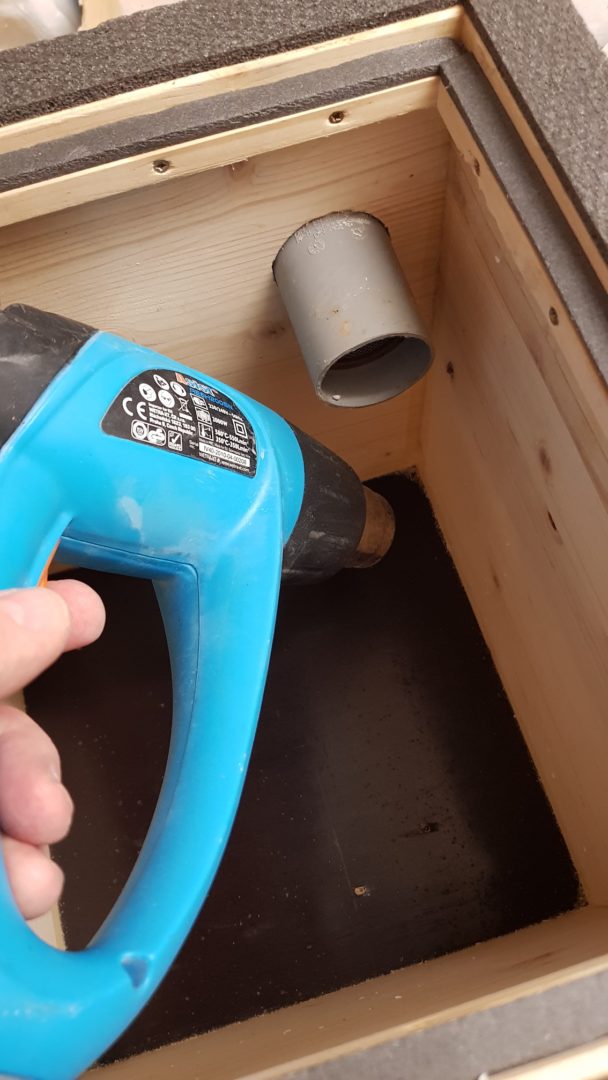
Treat all corners with a heat gun (parasites may be hiding there)
Replacing the lining
Replacing the lining, or at least the affected part, is recommended .
If the nest has been attacked by parasites, or if you have found a female beekeeper in the hive, it is definitely necessary to replace the lining .
If the female wasp did not lay her eggs directly on the waxwork, you can prevent the eggs from hatching and infesting the nest by replacing them, see HERE

An entry pocket is created in the first layer of lining at the end of the tube, which is created by placing another layer of lining over this place.
Return of the nest to the hive
- If you were forced to remove the nest, return it to the nest box now.
- First, adjust the bottom of the hive. Then, place the cleaned nest inside and adjust it to its original condition and position.
- Carefully cover the nest with the lining, preferably in several layers, do not compress it.
- Don't forget to create an inlet pocket at the mouth of the inlet tube
- If you have removed the nest from the hive, it is essential to give them a food supplement in the feeder on the lining.
A view into the jar where the bumblebees were moved during an in-depth inspection.
Several large young queens, about 2 days old, can also be seen in the video.